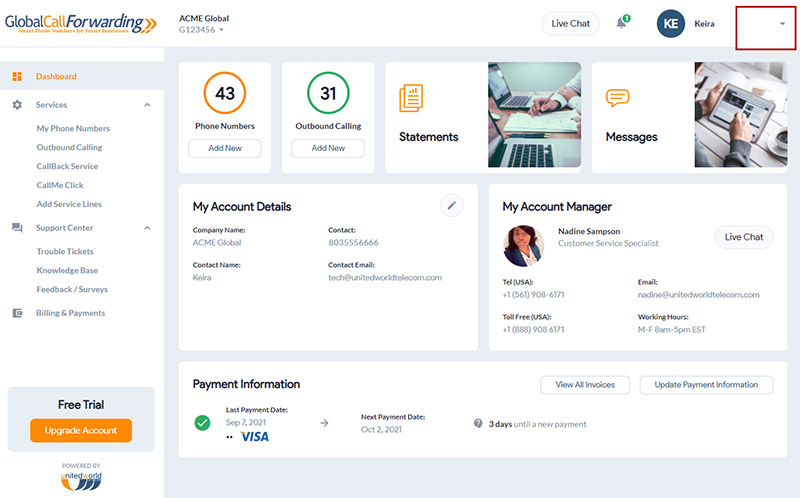
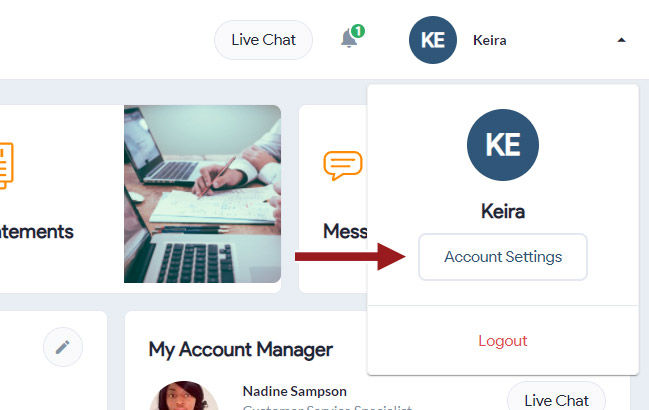
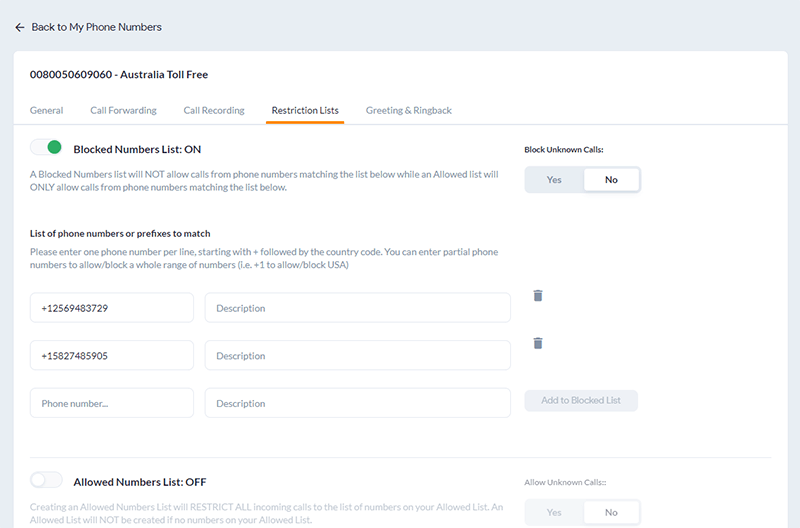
Black and white lists are a great feature to reduce spam calls. Black lists will block calls from phone numbers on the list. White lists will only allow calls from numbers on the list. Please follow these steps to set up a black or white list.
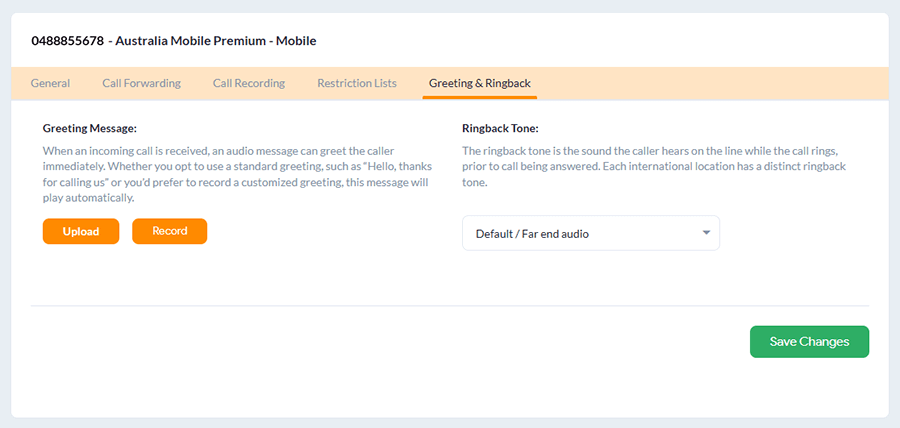
Users may set a customized greeting to professionally answer calls at no extra cost. Custom greetings can be configured in the control panel. You may upload an MP3 or record your greeting from the control panel directly.
Here are the steps to set up a custom phone greeting:
Users may configure IVR (interactive voice response) to greet callers, offer a predetermined list of menu options, and route callers to the appropriate extension. IVR is included free with our business phone service and can be set up from the control panel.
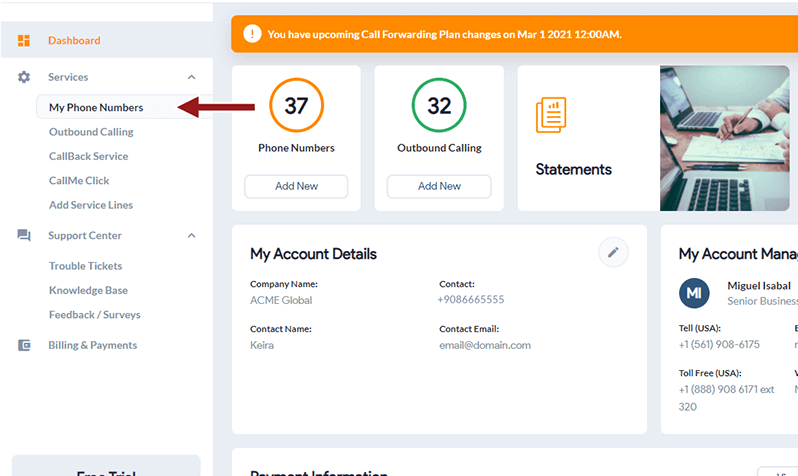
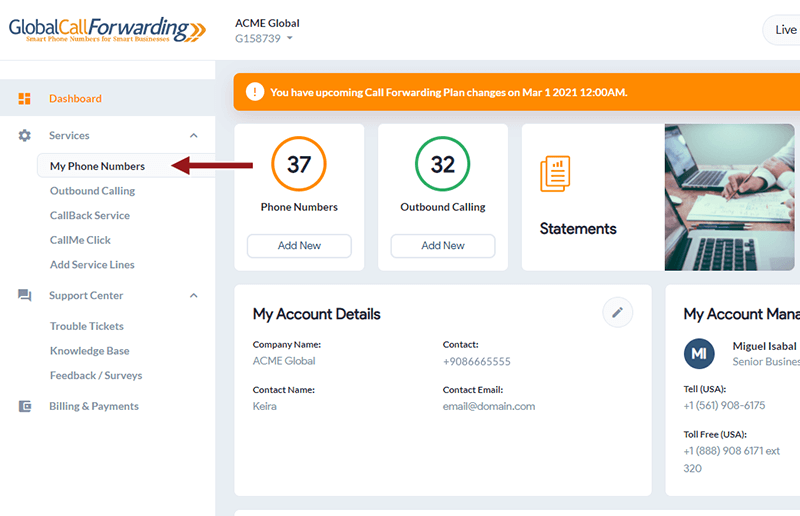
2. Under Services, click on My Phone Numbers, located in the page’s left-hand menu.
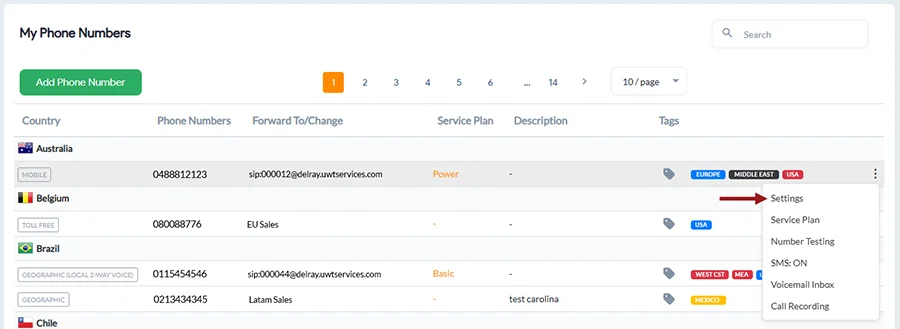
3. Go to the Settings icon next to the line you want to edit.
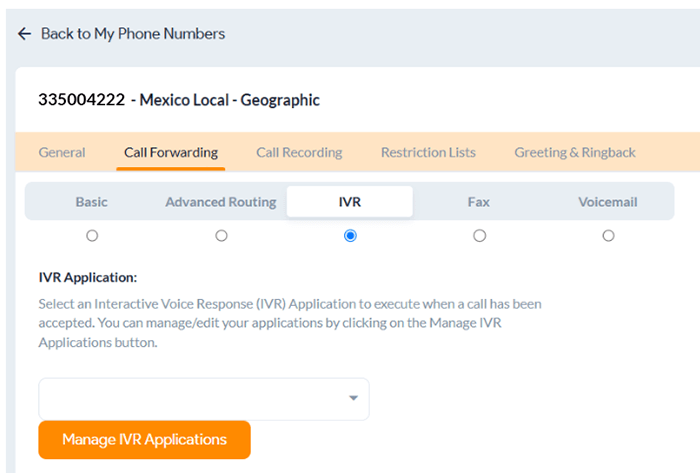
4. Underneath Call Forwarding, hover over IVR (⚪). To switch to IVR from Basic Forwarding, click the icon so it is selected (🔵), indicating that your call forwarding is set to IVR.
5. Click Manage IVR Applications to customize and configure your IVR settings.
Now, before setting up the IVR, you will need to configure prompts and destinations that you will add to your IVR system. Here are the steps:
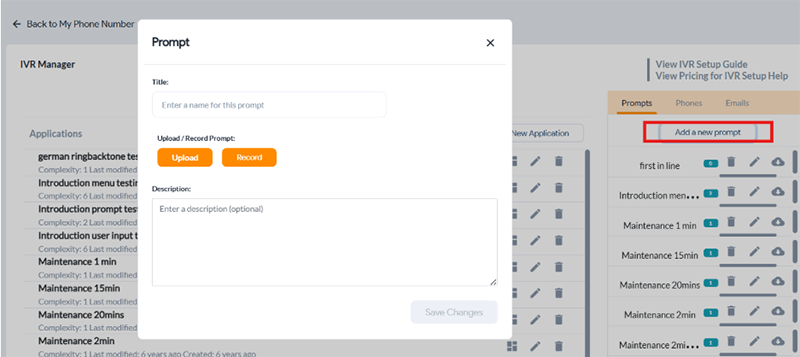
a) For Prompts — This is the message customers will hear when they connect with your phone system. To guide them effectively, you can include company details, announcements, updates, or navigational instructions. Example: Opening greeting or IVR main navigation menu.
Go to the Prompts tab and click Add a New Prompt. Here, you can Upload/Record a new prompt or voice message. Then, click Save Changes.
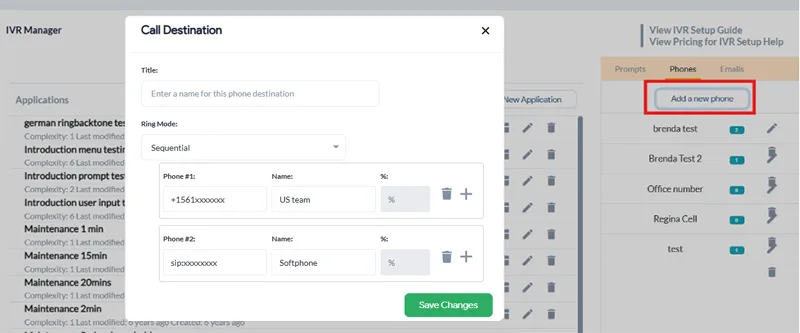
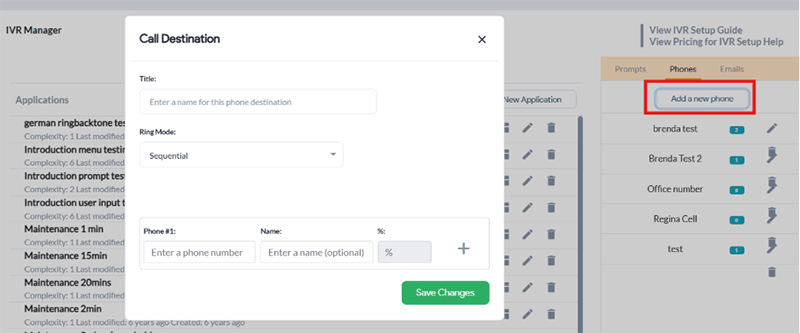
b) For Phones — Here, you can set up a list or ring group with multiple destination SIP addresses or phone numbers. Pro tip: Save the title with a descriptive name such as Customer service team UK for your service team in the UK. If it is an individual, then save it as [name] + phone number + location. Example: Peter phone number UK.
Click on the Phones tab and click Add a new phone. Enter the information, choose a Ring Mode (sequential, random, or simultaneous), enter your phone numbers, and adjust weighted call distribution with percentages, if desired. Then, click Save Changes.
Ring Modes:
Sequential, where calls are sent to numbers one after the other
Random, where a number from the list is selected at random to receive the call
Simultaneous, where all numbers ring at the same time until someone answers.
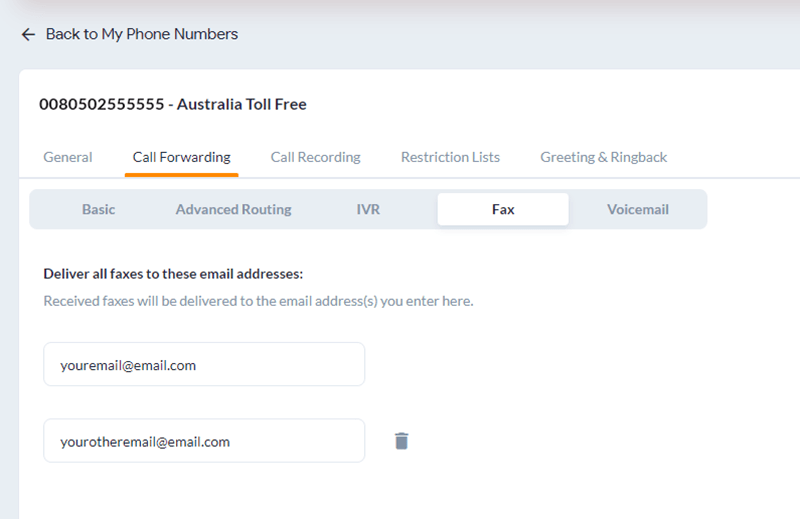
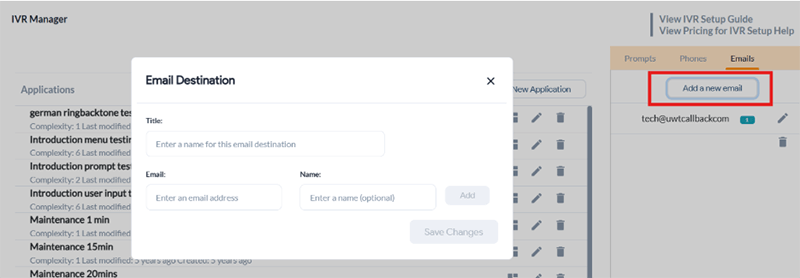
c) For Emails— Here you can enter email addresses where you want voicemail messages to be forwarded to. Example: Peter email address or Billing email addresses. This way, you can potentially send incoming fax messages and invoices directly to your Billing directly.
Click on the Emails tab and select Add a New Email. You can create a list with one or more email addresses from here. Then, click Save Changes.
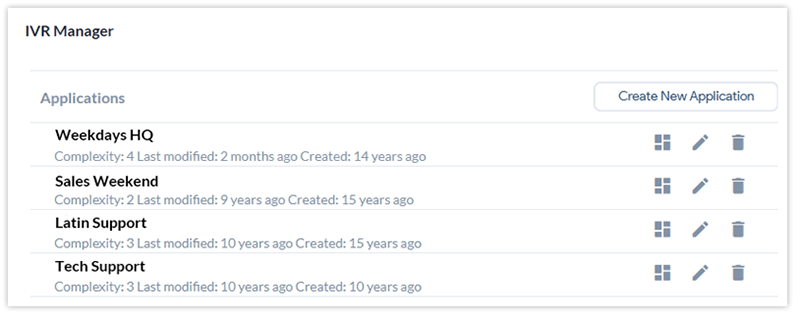
6. With all this set up, you can now create your IVR system. Start by clicking Create aNew Application on the same IVR Manager page to get started:
Setting Up IVR With User Menu
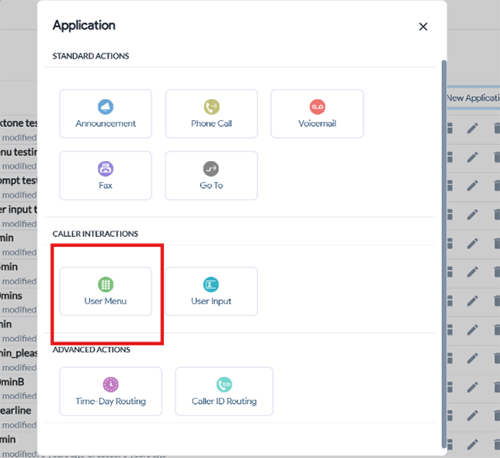
7. An Application menu screen will appear, select User Menu to build an IVR with menu options that callers will listen to and interact with.
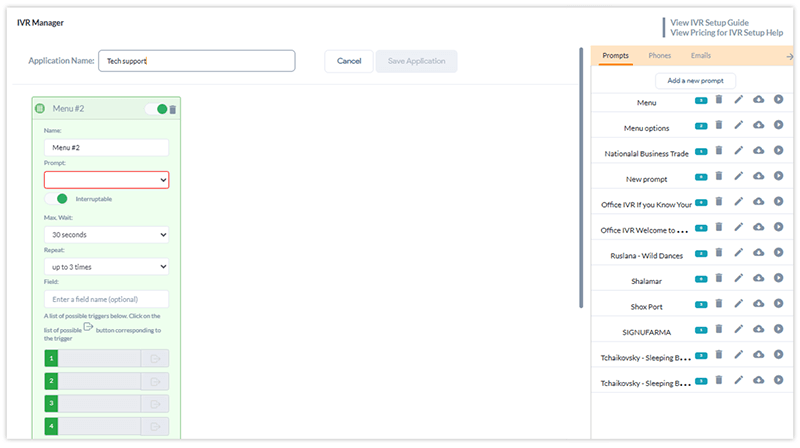
8. Now, start filling the green card below with your requirements:
Prompt: The main voice message welcomes callers and provides them with various menu options. Select from the prompts you’ve uploaded or recorded earlier.
Interruptable Option: Choose whether callers can interrupt the message or must listen to it in full.
Maximum wait period: The maximum duration callers will wait before the system takes action.
Repeat: Number of times the message will repeat
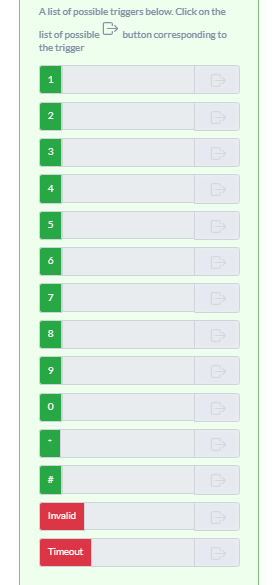
Possible trigger for each key (number on the keypad): Select from various actions and triggers, and assign each key (1, 2, 3, etc.) to a specific target, such as a hunt group, department, voicemail, or a list of email addresses. You can utilize the phone numbers and email lists you’ve created here. The available actions and triggers are as follows:
Phone Call: Redirect the call to another number, department, team, or hunt group.
Announcement: Play a pre-recorded voice message or announcement to the caller.
Voicemail: Route the call to voicemail.
Time-Day Routing: Direct calls to specific locations or numbers based on designated times or days.
Caller ID Routing: Forward calls from specific locations or area codes to selected numbers or groups.
Invalid: Select the action to take when the caller presses an incorrect key or number.
Timeout: Choose what happens when the message repeats the desired number of times, but the caller does not press a key.
Here’s an example: #1 directs the call to the customer service department list, #2 sends it to the billing department, and #3 forwards the call to voicemail. If the caller cannot find the correct option in the menu and doesn’t press any key, you can redirect them to voicemail and allow them to leave a detailed message for further assistance.
9. Finally, click Save.
Have more questions? Please contact us via phone or live chat. We are happy to help customers with their IVR setup.
Setting Up Time-of-Day Routing Through IVR Manager
1. Under Services, click on My Phone Numbers, located in the page’s left-hand menu.
2. Go to the Settings icon next to the line you want to edit.
3. Underneath Call Forwarding, hover over IVR (⚪). To switch to IVR from Basic Forwarding, click the icon so it is selected (🔵), indicating that your call forwarding is set to IVR.
4. Click Manage IVR Applications to customize and configure your IVR settings.
5. Next, click on the Phones tab. Here, you can set up a list or ring group with multiple destination SIP addresses or phone numbers. Choose the Ring Mode and set up Weighted Distribution (if desired) for this group, and click Save Changes.
Pro tip: Save the title with a descriptive name, such as Customer service team UK for your service team in the UK. If it is an individual, then save it as [name] + phone number + location. Example: Peter phone number UK.
You can create multiple “destinations” like this where you plan to route incoming calls for this time-based rule.
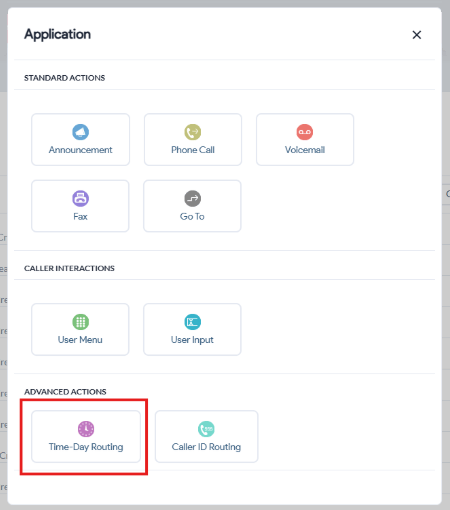
6. With the destinations set up, click on Create New Application on the IVR Manager page and choose Time-Day Routing.
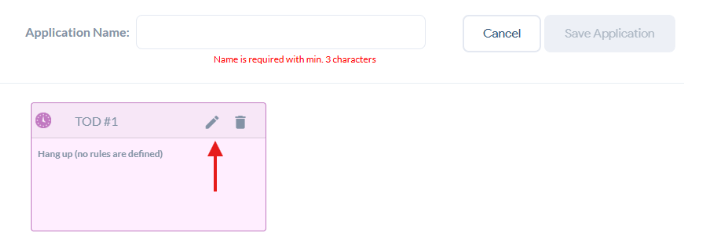
7. Name your new application and click on the edit button to customize the routing rule.
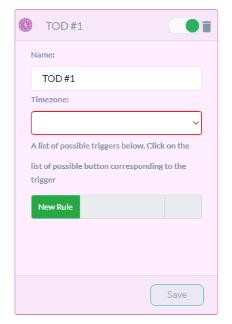
8. Next, give this rule a name and select your desired time zone from the dropdown.
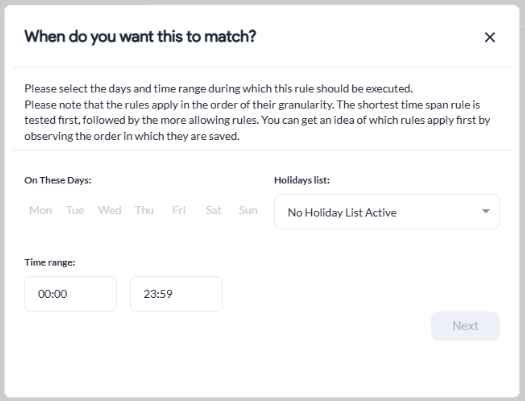
9. Then, click on New Rule to configure time-based routing. Specify the days (under On These Days) and Time range you want the calls to be forwarded. Click Next.
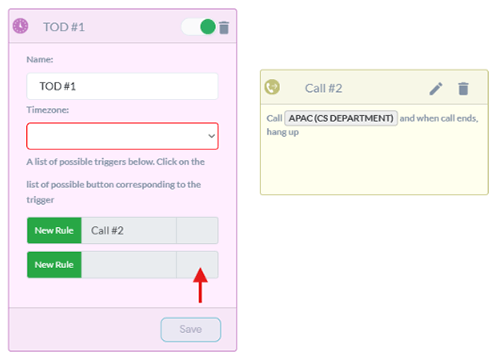
10. Now pick the action this rule should follow. For instance, if you want calls to forward to your APAC team during this time-based rule, you can select Phone Call and then customize the next card with the correct destination (in the example’s case – APAC ring group).
11. To add another time-based rule to the same IVR, you can go back to the first card and add a New Rule.
12. You can also send calls to Voicemail, Fax, Announcement, or User Menu for further customization.
13. When done configuring your Time-Based IVR, click Save Application on the top by the Application Name.
Calling or sending messages to an international phone number may require different formatting than calling or sending messages to standard local numbers. This guide explains the proper way to format international phone numbers in order to ensure the deliverability of your international phone calls.
E.164 Formatting
We recommend that you use E.164 formatting when dialing an international telephone number. The E.164 format entails the following:
A + (plus) sign or the International Call Prefix.
International Country Calling Code.
Local Area Code.
Local Phone Number.
Local Versus International Number Format
For example, here is a US number written in standard local formatting: (561) 276-7156. Here is the same phone number written in the E.164 format: +15612767156
Mobile Number Format
In a number of countries outside the United States, the addition of a ‘0’ in front of the subscriber number is required when dialing a mobile phone number locally. With E.164 formatting, the ‘0’ must be removed.
As an example, here is a UK mobile number in standard local formatting: 074 4295 4275. Here is the same phone number in E.164 formatting: +447442954275
How to Display Your International Phone Number
The phone numbers that we provide generally follow the same rules as any other local telephone number. Domestic calls should be dialed just like any standard number.
E.123 Notation
We recommend that you display your new phone numbers according to E.123 (https://www.itu.int/rec/T-REC-E.123) formatting. E.123 provides guidelines for the presentation of national and international telephone numbers, email addresses, and web addresses.
Additional Factors to Consider
International phone numbers may require additional formatting, but these can be dialed just like any standard number from the destination country.
Domestic example: callers to a US-based phone number from a US-based landline or mobile phone use the standard 10 digit dialing plan (a 3 digit area code followed by the 7 digit subscriber number).
International example: callers to a US-based phone number from the UK are required to enter the UK’s dial-out code followed by the US country code (1) and then the phone number.
Attended call transfer is a web dialer feature that enables a user to relocate a telephone call to another user by pressing a button. Here are the steps to do so:
1. You will need to assign Extension and Username to available agents so they are listed. To set this up, log in to the Control Panel. Go to the desired Outbound Calling line and click on the Settings icon. Under User Options, enter User Info (Username) and User Extension and click Save Changes below.
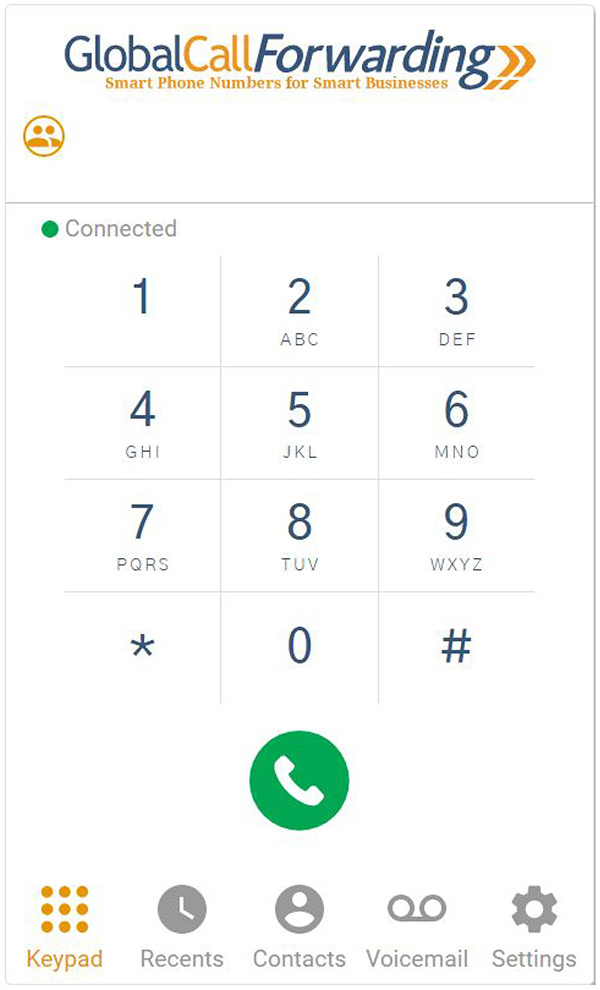
2. After logging in to your GCF softphone or web dialer, to transfer a connected call, click the Person icon in the top-left corner.
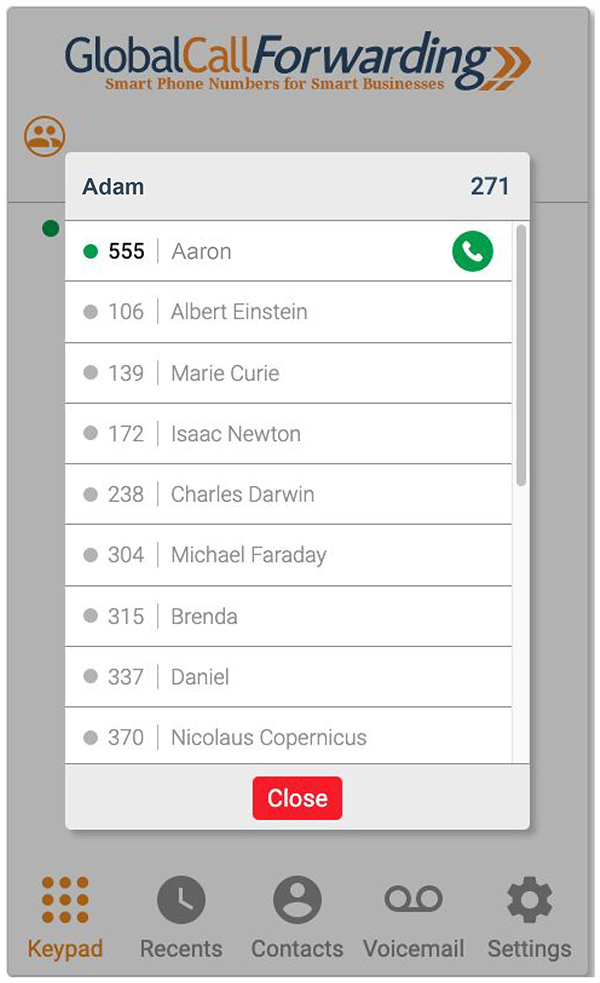
3. The available users will appear with a green circle next to their name. Click the transfer icon on the right side of the user that you would like to transfer the call to.
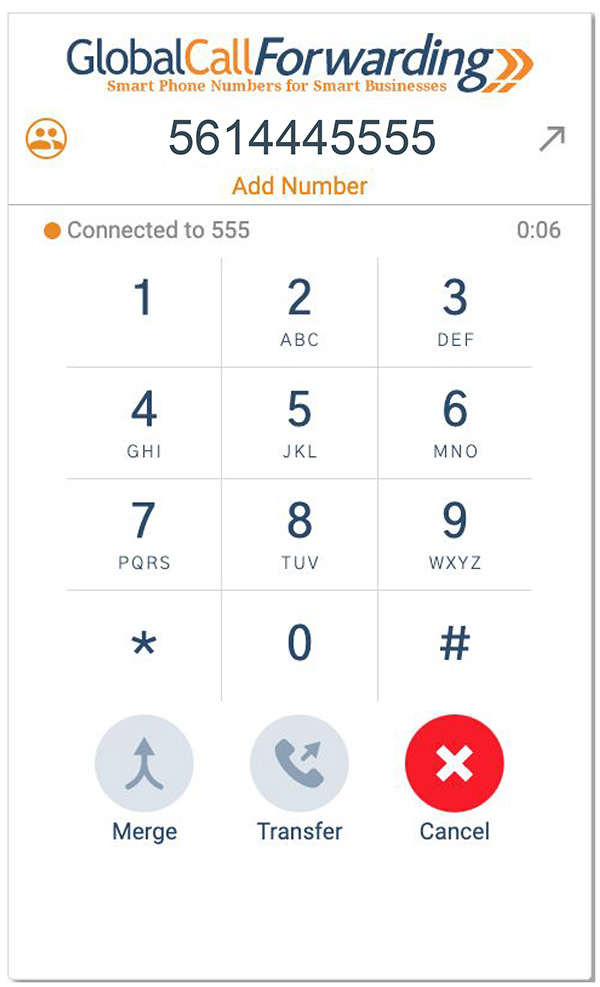
4. You will have two options: Call Merge and Call Transfer.
The merge feature will initiate a three-way conference call, while call transfer will simply transfer the call to another extension.
Note that you cannot transfer calls to external devices; transfers are only possible to available users/agents within the GCF network.
Free in-network calling is available to web dialer users. You’re able to call other users in your network by entering their extension numbers and clicking on the call button.
If you don’t know the extension of the person you are trying to call, please follow these steps:
3. The active users in your network will appear with a green circle next to their names. Click on the phone icon to the right of the user that you would like to call.
Caller experience is important for the success of any business. When customers call for inquiries or customer support, they expect quick and accurate resolutions. And simultaneous ring is one such tool to help your business meet these expectations.
What is Simultaneous Ring?
Simultaneous ring or simultaneous ringing is a feature that rings multiple phones with one number. This is a call routing strategy that lets incoming calls ring on multiple devices so that the next available customer service rep or employee can answer the phone quickly.
With this feature, you can have calls ring on office phones, smartphones, remote workers’ phones, etc. However, the caller is not aware of where the call is being answered. They simply dial your business phone number, even if it routes to a remote employee’s cell phone.
Simultaneous Ring will ring several different phone numbers at the same time. The ringing stops when the call gets answered.
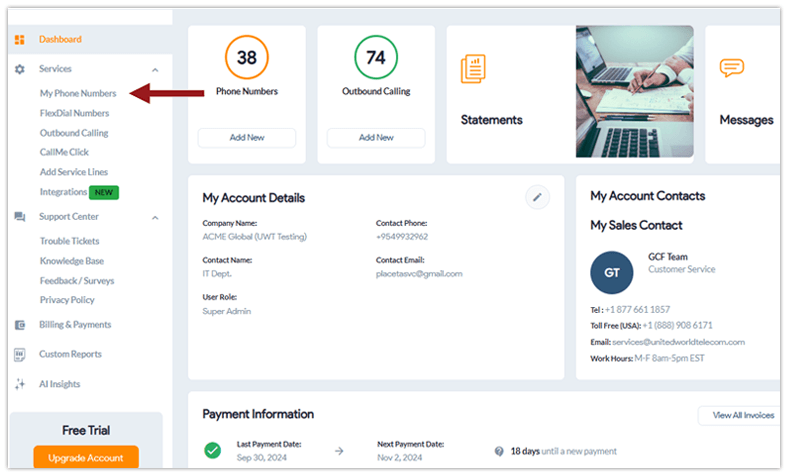
2. On the dashboard, go to the left-hand menu and under Services, select My Phone Numbers.
3. Locate the line you want to modify and click its Settings icon (⚙️) at the right corner.
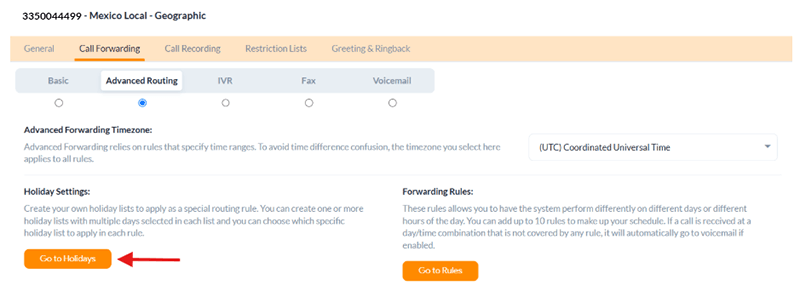
4. Underneath Call Forwarding, hover over Advanced Routing (⚪). To switch to Advanced Routing from Basic Forwarding, click the icon so it is selected (🔵), indicating that your call forwarding is set to Advanced Routing.
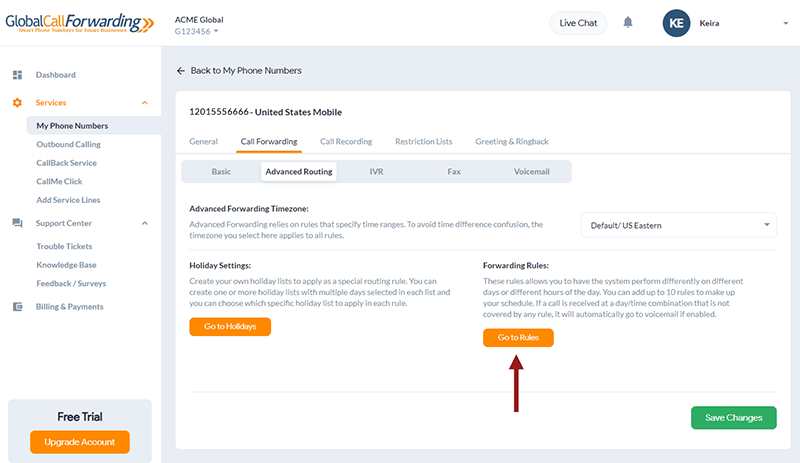
5. Select Go to Rules within the Forwarding Rules section.
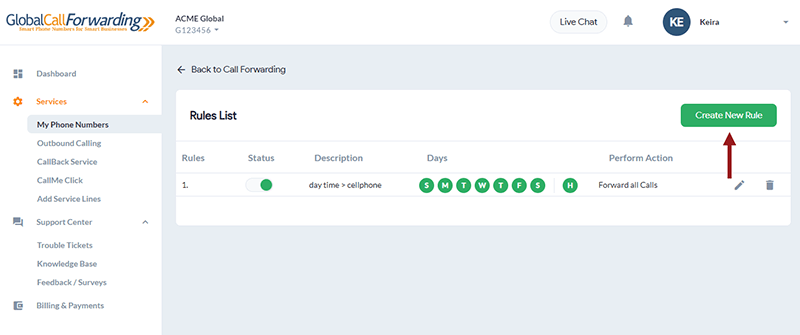
6. Once the Rule List page appears, tap Create New Rule.
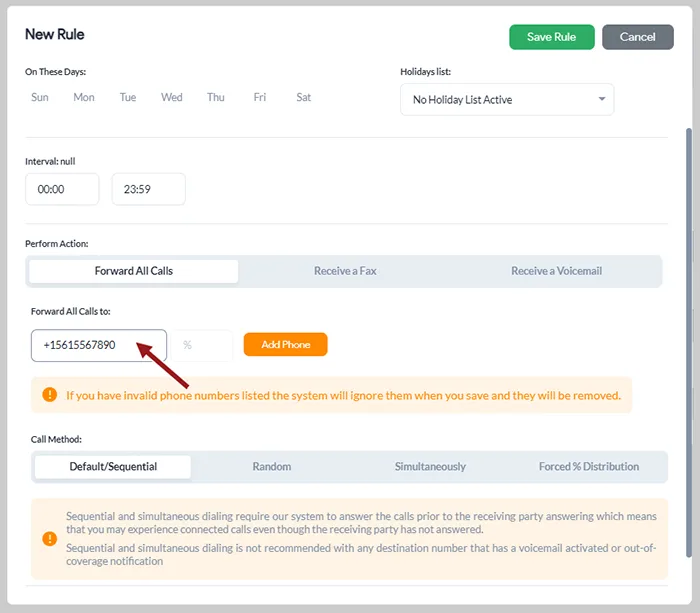
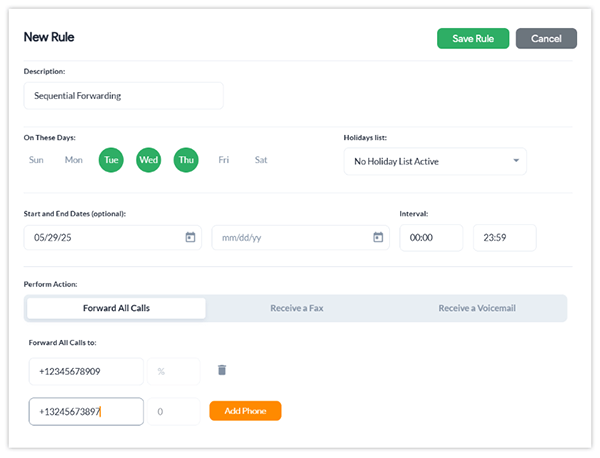
7. Set up your simultaneous routing rule with the desired numbers and destinations.
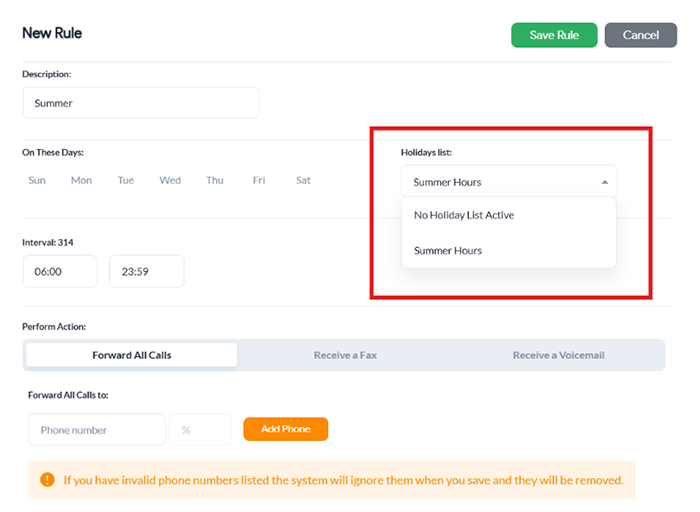
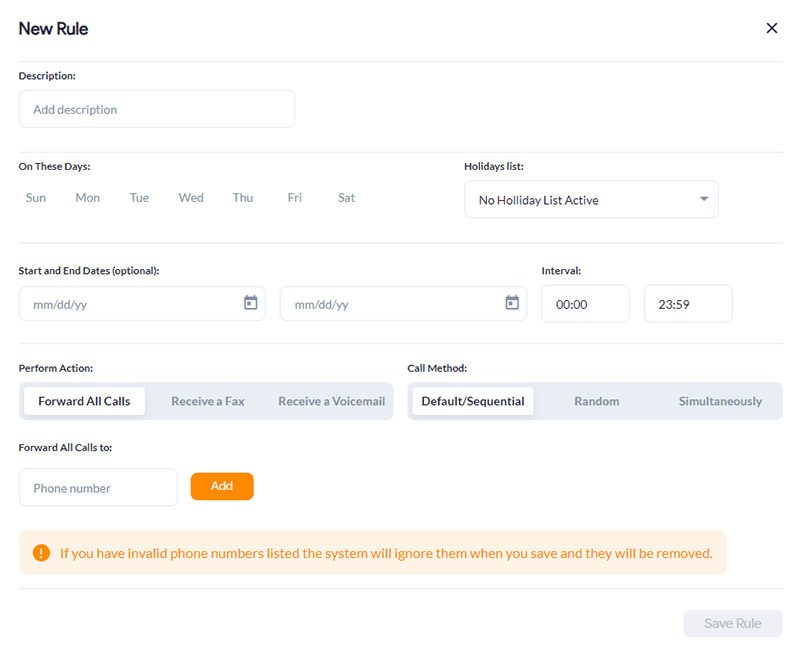
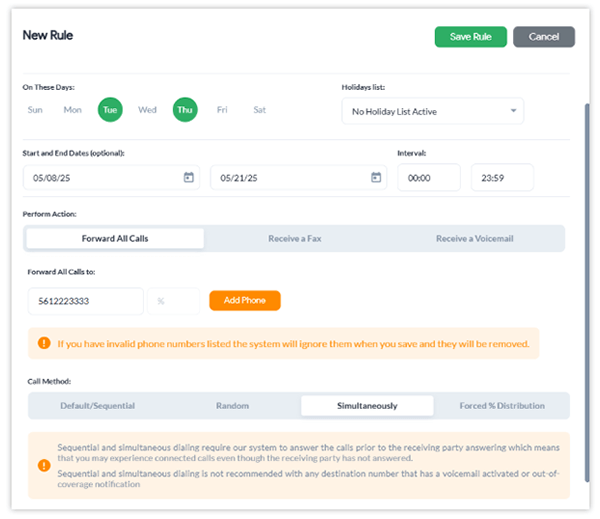
Begin by entering a Description. Next, under On These Days, indicate the specific days you want to activate Simultaneous Ringing.
Next, specify your desired Start and End Date and Interval.
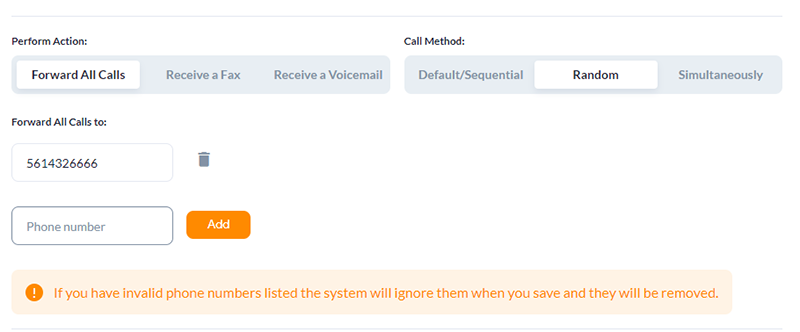
Set your Call Method to Simultaneously, which connects to all listed numbers concurrently.
By default, you can ring up to ten phones simultaneously. However, this number can be increased as you wish. Please contact your account manager to request an increase in simultaneous ring capacity.
8. Click Save Rule, and you are done setting up Simultaneous Ringing.
By default, you will be able to ring up to ten phones at the same time. However, this number can be increased as you wish. Please contact your account manager for increased simultaneous ring capacity.
5 Benefits of Simultaneous Ringing
Simultaneous ring is a common feature for businesses dealing with high call volumes. These companies do not want to miss out on important calls or keep their callers on hold for long. And so, simultaneous ringing is a convenient option. Use this feature when call traffic is especially high and turn off, when not needed.
1. Calls Automatically Route to Designated Lines or Numbers
You can set up pre-determined rules for your call routing needs. Decide where you want calls to ring and during what periods of time. Then, incoming calls will automatically ring on these lines and devices. You don’t have to re-do or reprogram the settings unless you want to make small adjustments, such as adding or removing a device.
2. Achieve Greater Mobility and Flexibility without Missing Calls
Since different lines and devices can be added, you can include various employees within your ring groups. These employees may include:
Employees in the main office
Employees in satellite offices
Remote workers
Virtual assistants or receptionists
Call center outsourcing services
Answering services
By doing so, you can increase the chances of all calls being answered without long wait periods.
3. Reduce the Number of Abandoned Calls
Most businesses that bank on customer service for growth and success face the common issue of abandoned calls. These are customers who called for sales or customer service needs and hung up because:
They were made to wait for too long
Got transferred from one agent to another, or
Had to deal with an automated system without the option to speak with a representative
Simultaneous ring can help reduce these abandoned calls by increasing the chances of the calls being answered.
4. Feel the Combined Power of Ring Groups and Line Hunting
Simultaneous ringing works by ringing multiple lines or ring groups. Line hunting or sequential forwarding, on the other hand, has the call run through a sequence of agents to get to the next agent. However, with advancements in VoIP phone systems, you can use both ring groups and line hunting together to create a powerful communication system that will help you tackle common customer service complaints.
Finally, you can use simultaneous ring in conjunction with other advanced communication tools to enhance caller experience and offer better customer service. For businesses that thrive on customer relations, these features can help with increasing first call resolution rates, lowering abandoned call rates, and increasing customer happiness.
Lower Missed Call Rates with Simultaneous Ring
You can get simultaneous ringing with any Global Call Forwarding phone number plan. This feature comes with additional communication tools such as sequential forwarding (line hunting), international call forwarding, and more. Call us today to see how our features and services can benefit your specific business!
Looking for ways to improve how your business offers customer service? Make your company accessible during off-hours by using time-of-day routing.
What Is Time-Based Routing?
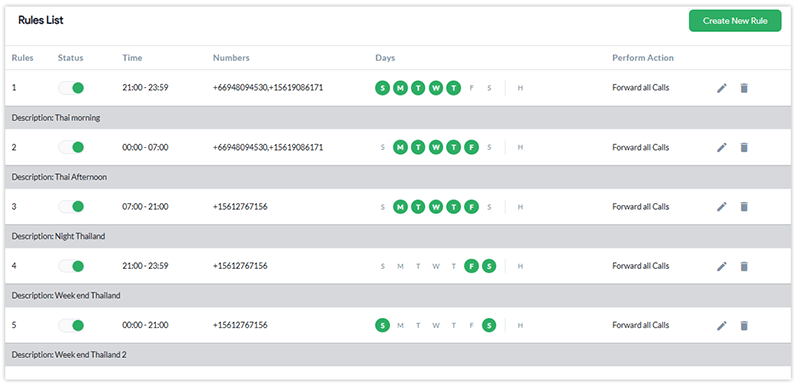
The time-of-day routing feature enables you to forward calls to different destinations depending on the time of day or the day of the week. This means that you can have calls routed to the main office, satellite offices, remote workers, or your home office during off-hours or the weekends, and so on.
Setting Up Time-of-Day Routing Through IVR Manager
2. Under Services, click on My Phone Numbers, located in the page’s left-hand menu.
3. Go to the Settings icon next to the line you want to edit.
4. Underneath Call Forwarding, hover over IVR (⚪). To switch to IVR from Basic Forwarding, click the icon so it is selected (🔵), indicating that your call forwarding is set to IVR.
5. Click Manage IVR Applications to customize and configure your IVR settings.
6. Next, click on the Phones tab. Here, you can set up a list or ring group with multiple destination SIP addresses or phone numbers. Choose the Ring Mode and set up Weighted Distribution (if desired) for this group, and click Save Changes.
Pro tip: Save the title with a descriptive name, such as Customer service team UK for your service team in the UK. If it is an individual, then save it as [name] + phone number + location. Example: Peter phone number UK.
You can create multiple “destinations” like this where you plan to route incoming calls for this time-based rule.
7. With the destinations set up, click on Create New Application on the IVR Manager page and choose Time-Day Routing.
8. Name your new application and click on the edit button to customize the routing rule.
9. Next, give this rule a name and select your desired time zone from the dropdown.
10. Then, click on New Rule to configure time-based routing. Specify the days (under On These Days) and Time range you want the calls to be forwarded. Click Next.
11. Now pick the action this rule should follow. For instance, if you want calls to forward to your APAC team during this time-based rule, you can select Phone Call and then customize the next card with the correct destination (in the example’s case – APAC ring group).
12. To add another time-based rule to the same IVR, you can go back to the first card and add a New Rule.
13. You can also send calls to Voicemail, Fax, Announcement, or User Menu for further customization.
14. When done configuring your Time-Based IVR, click Save Application on the top by the Application Name.
Setting Up Time-of-Day Routing Through Advanced Routing
1. Log in to your control panel.
2. From the dashboard, under Services, select My Phone Numbers from the left-hand menu.
3. Click on the Settings Icon (⚙️) on the line that you would like to modify.
4. Underneath Call Forwarding, hover over Advanced Routing (⚪). To switch to Advanced Routing from Basic Forwarding, click the icon so it is selected (🔵), indicating that your call forwarding is set to advanced routing rules.
5. Navigate to Forwarding Rules and select Go to Rules.
6. A Rule List page will appear on your screen; tap Create New Rule next.
7. Let’s customize all your time-based routing settings now:
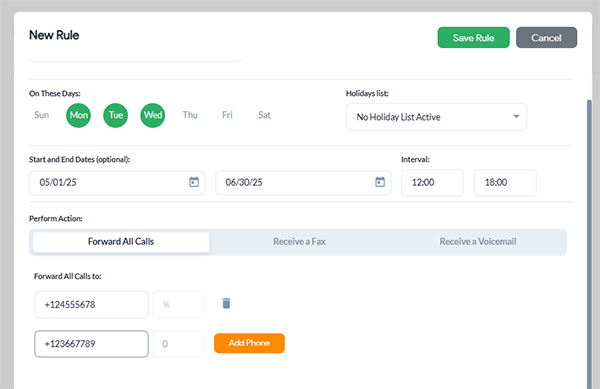
a) First, enter the description, then specify the days (under On These Days) you want the calls to be forwarded.
b) Then adjust your Start and End Date (for range) and Interval (for time frame).
c) Customize Perform Action — you can set all calls to forward to your desired phone lines, fax, or voicemail.
d) If forwarding calls to different phone numbers or lines, list your desired phone numbers or SIP addresses under Forward All Calls to.
Side note: You can also set weighted distribution, if desired.
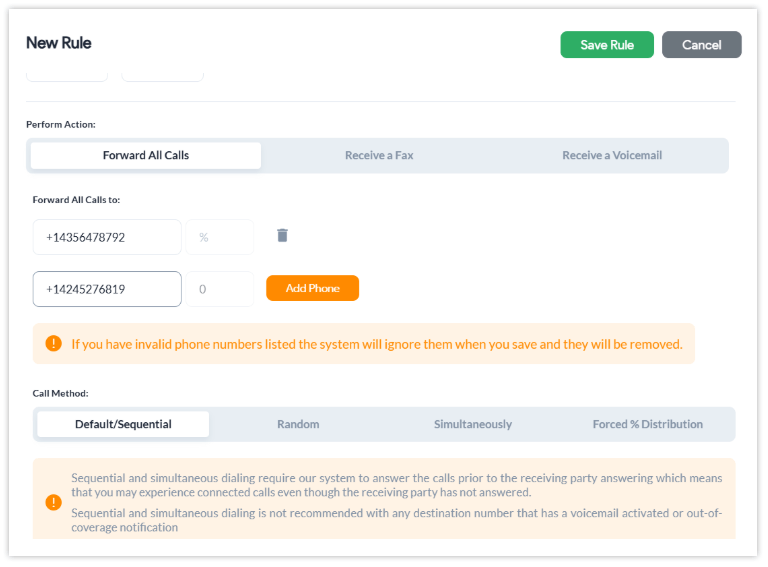
e) Then, adjust the Call Method settings to suit your preferences. Choose from different ringing methods—such as:
Sequential, where calls are sent to numbers one after the other
Random, where a number from the list is selected at random to receive the call
Simultaneous, where all numbers ring at the same time until someone answers.
10. Click Save Rule and test your new routing rule.
Note: Suppose a call is received at a day or time combination that is not covered by any rule. In that case, the call will automatically go to voicemail if voicemail is enabled, or rejected otherwise.
4 Time-Based Routing Strategies to Ensure You Never Miss a Phone Call
Let’s look at the top 4 time-based routing strategies you should consider:
1. Routing for After-Hours Calls
Time of day routing allows users to route calls that come in after-hours to specific employees’ or managers’ home offices or to voicemail. This way, after-hours calls from valued customers don’t go unanswered. Furthermore, with the voicemail-to-email feature, you can set incoming voicemails to be delivered to your email that you can check when at home and return those calls the next day.
2. Routing to Satellite Offices and Remote Employees
Most businesses will use time-based routing to distribute calls to satellite offices and remote workers. This is useful during high call traffic periods such as when your company is running promotions and specials or holiday sales. You can use routing strategies to ensure that calls continue moving without long wait times and abandoned calls.
3. Routing to Virtual Assistants or Call Center Outsourcing Companies
Some companies — especially small businesses — use virtual assistants or call center outsourcing companies to handle their customer service needs. With a time of the day routing feature, you can send incoming calls to these services during certain times of the day when you need to use them the most.
4. Routing on Holidays
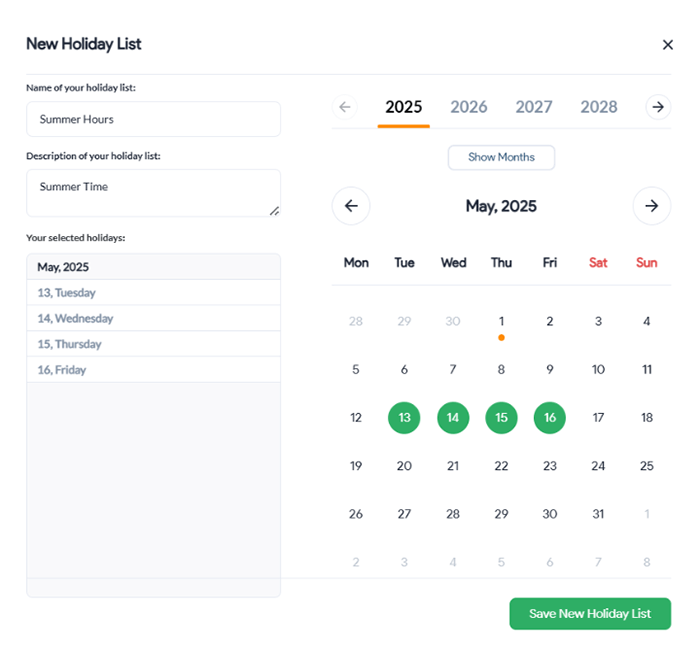
You can also use time-based routing by having incoming calls made during holidays sent to employees still on-call. These may be top managers and supervisors or remote agents. It is not common for companies to offer customer service during prominent public holidays. And so, your company’s ability to do so will make it stand out and seem more reliable.
Furthermore, if your company is the kind that benefits from holiday seasons such as Christmas, Thanksgiving, etc., you may experience high call volumes during these periods. Being able to route calls to additional workers or outsourcing companies can be helpful during these times.
Set up time-based routing if your business experiences a high call volume that may burden your current employees. As a manager, you can prepare your employees and give them the tools they need to increase conversions and improve customer satisfaction. Want to learn more about call routing strategies, speak with one of our experts today!
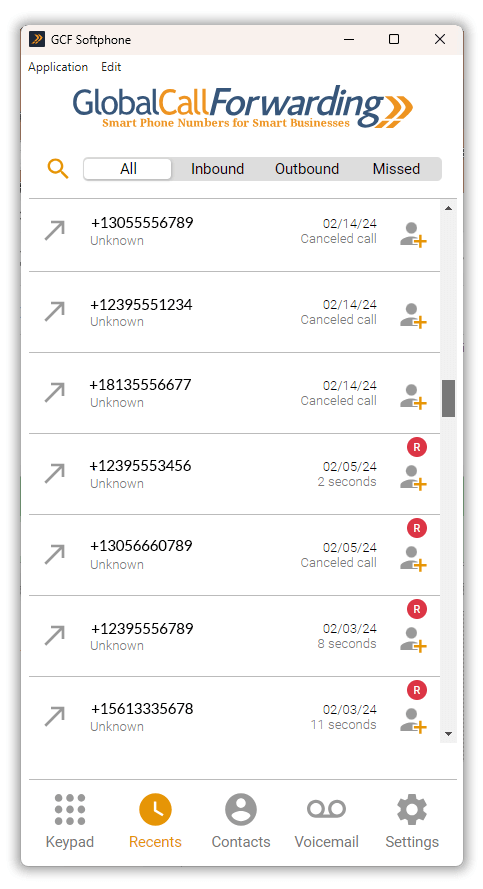
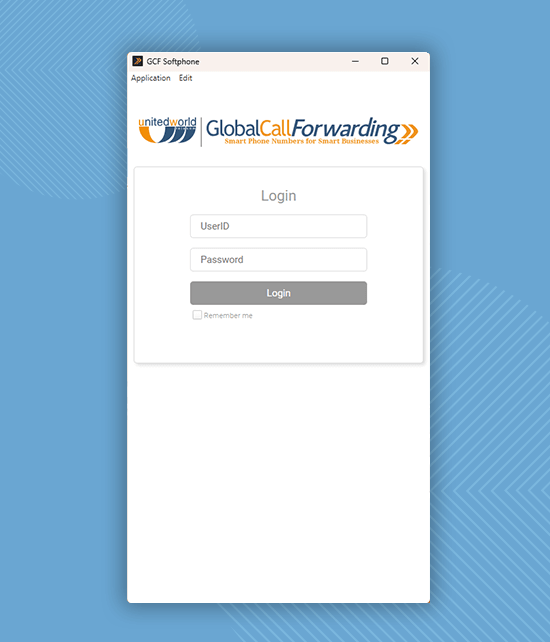
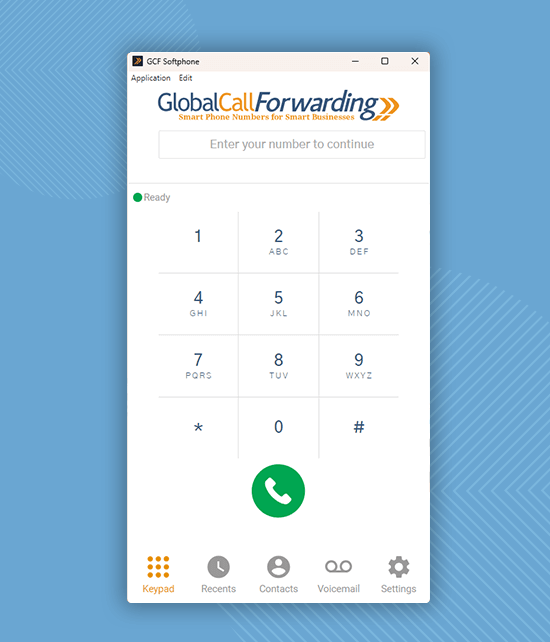
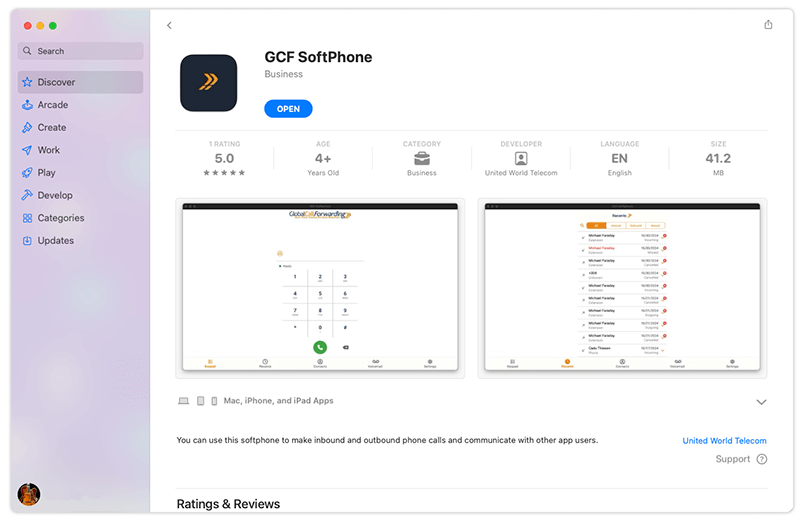
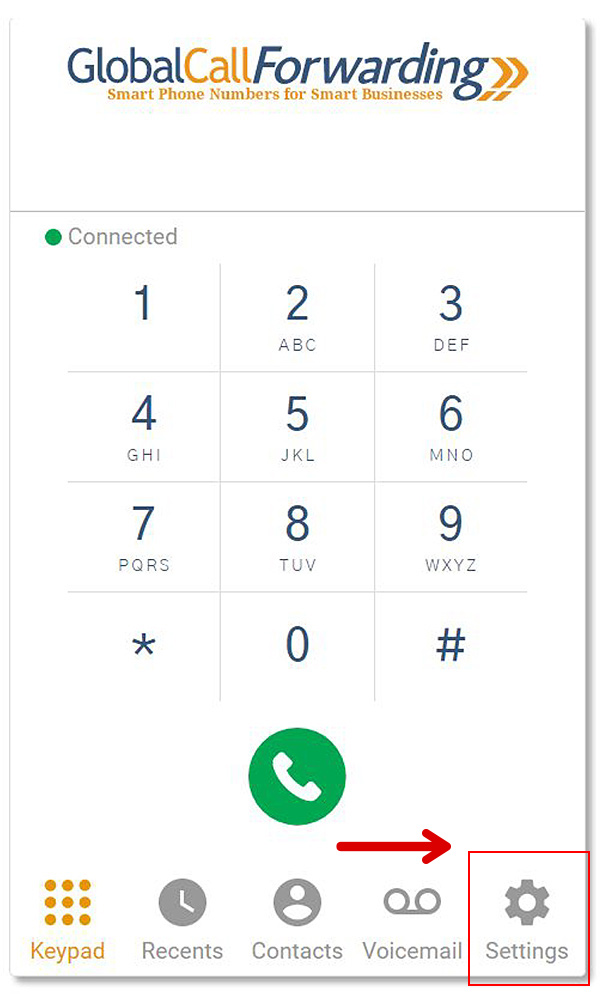
2. Once downloaded, log in with your Outbound Calling User ID and password. You will then see a dialpad.
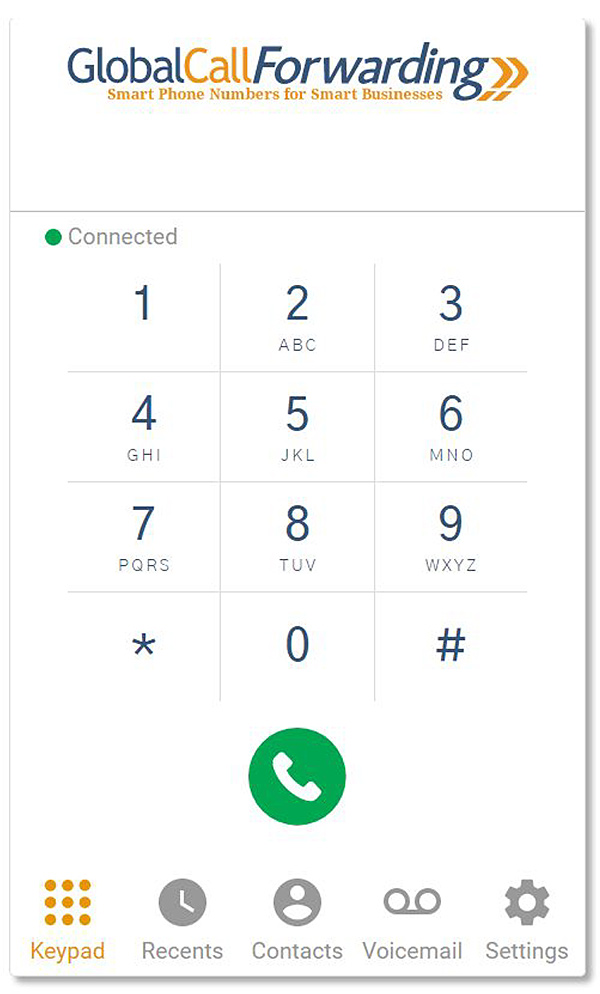
3. Please enter the phone number that you would like to call.
Note: Always enter the country code before the rest of the number. For international calls, dial 00 followed by the full phone number (country code included).
4. Click the green phone icon to initiate the call.
How to Make International Calls With the GCF Web Dialer
It is very easy to make international calls using the GCF web dialer. Here’s how:
1. Log in to the web dialer with your Outbound Calling User ID and password.
2. Upon logging in, you will see a dialpad.
3. Please enter the phone number that you would like to call.
Note: Always enter the country code before the rest of the number. For international calls, dial 00 followed by the full phone number (country code included).
4. Click the green phone icon to initiate the call.
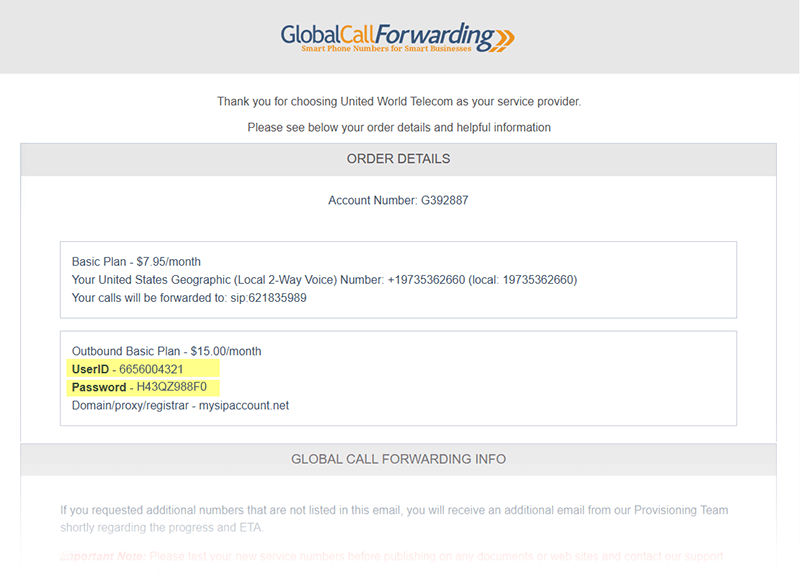
Customers are automatically assigned a UserID and password after purchasing outbound calling services. These credentials are needed to start using your outbound calling plan:
User ID
Line Password
User Email (optional)
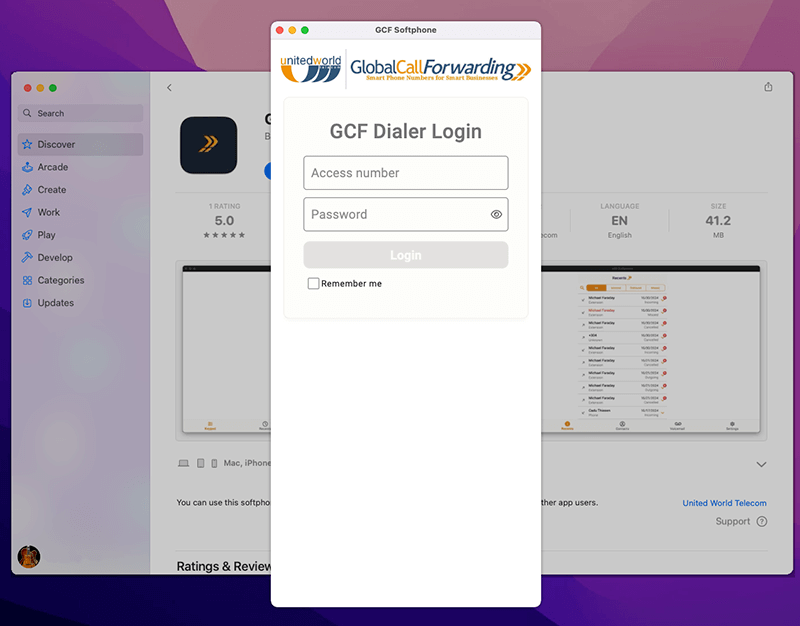
You must use these credentials (User ID and Line Password) to log into the softphone apps.
Your credentials will be emailed to you as part of your service confirmation letter. Here’s what it looks like:
You can also log in to your control panel to find your credentials:
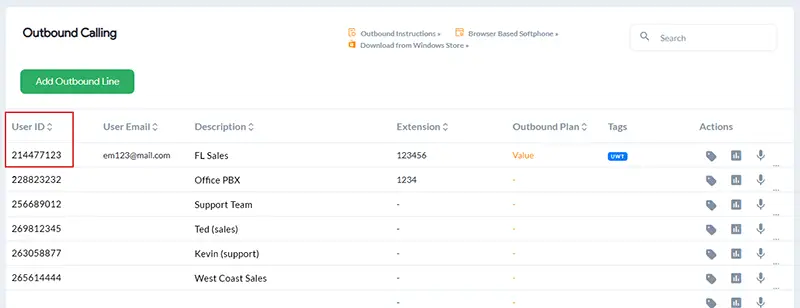
1. Click Outbound Calling on the left-hand side of the control panel to reveal all outbound lines.
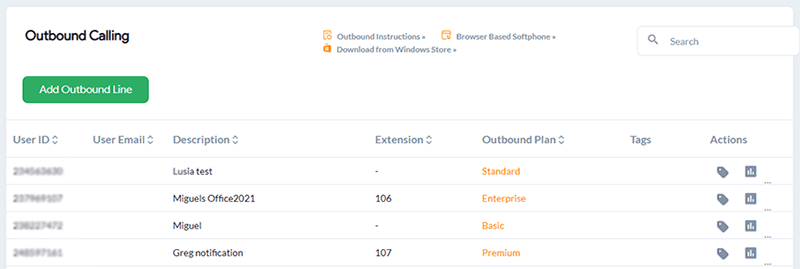
2. Your UserID for each outbound calling line will be displayed under the UserID column.
3. Click the desired User ID or Settings icon and under the User Options tab, you can view your Line credentials: Password for this line. You can also enter a personalized User Email, which can be used instead of the UserID.
4. To change your password, please enter a new password here and click Save Changes. Changing your password will automatically log other users out of the system.
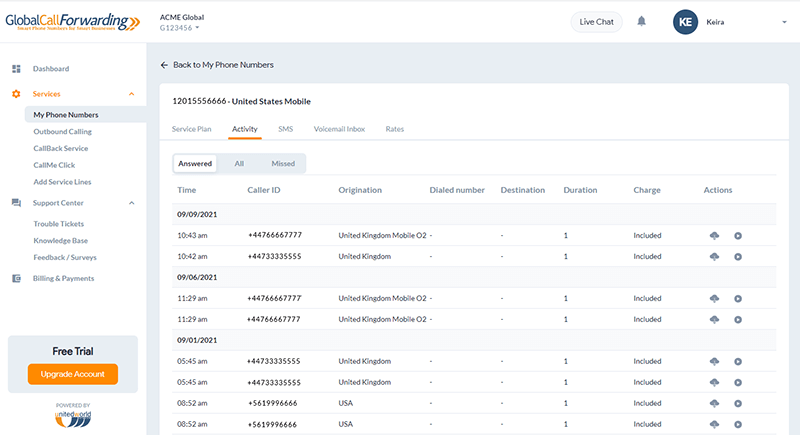
Customers have full access to call detail records (CDRs), which include dates and times of calls, caller ID, call termination, and call duration. CDRs can be downloaded in a variety of formats.
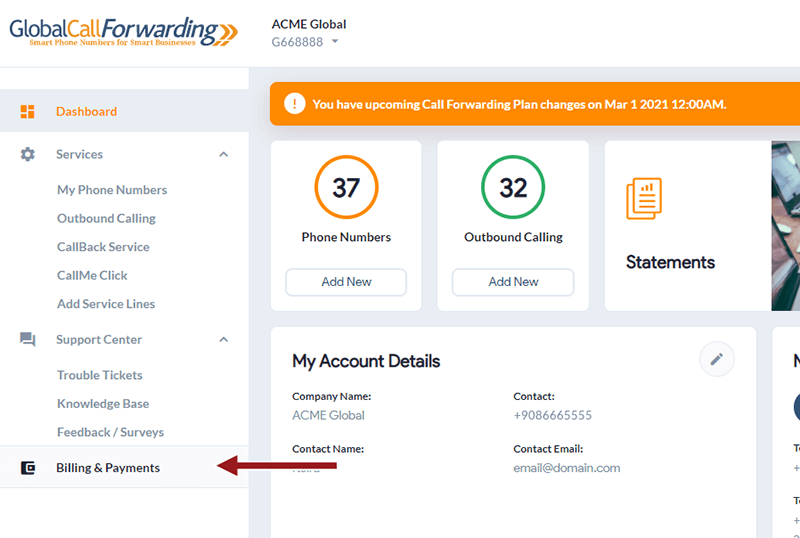
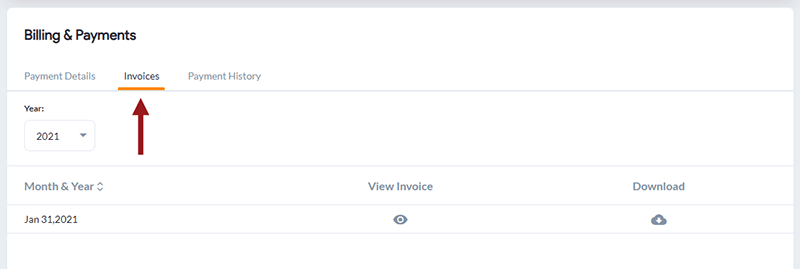
1. On the left-hand side of the portal, click Billing & Payments.
2. Select Invoices from the horizontal menu.
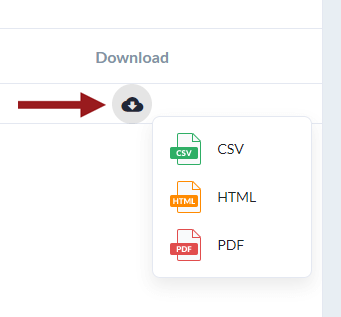
3. Download your desired date and format.
There are a number of valuable insights that can be learned from your call detail records once they are exported to Excel or another business software. We do provide API access to enable real-time synchronization. Please contact us to learn more.
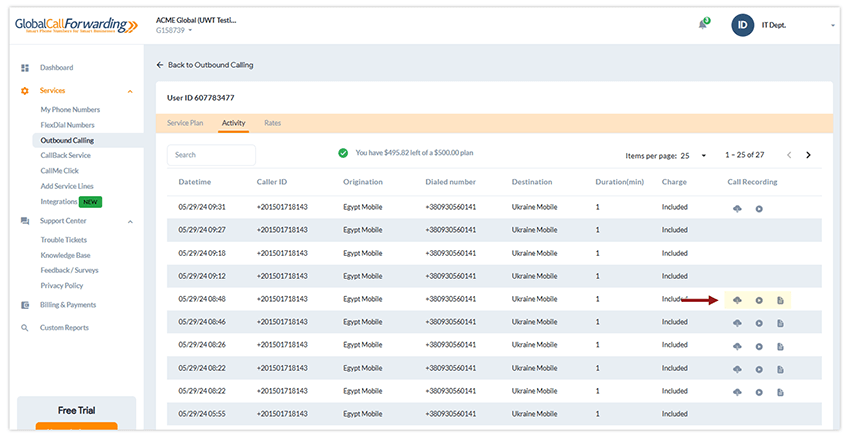
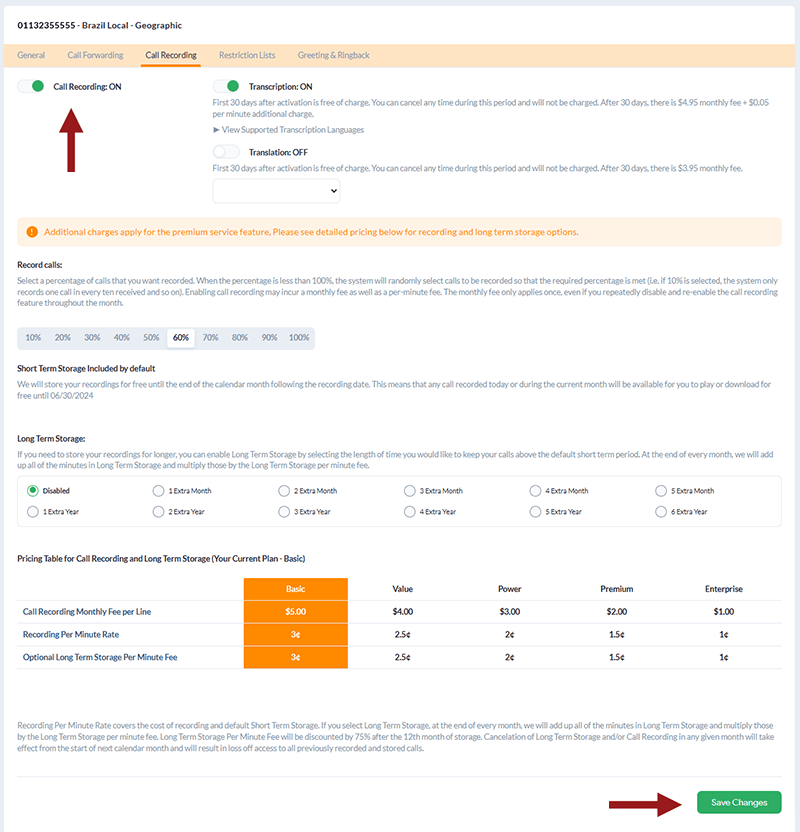
Record incoming and outgoing phone calls on our network. Our hosted call recording platform enables businesses to listen to and download call recordings. Call recording can be added to any service line. Get started by logging into your control panel.
Cost for Call Recording: Our Call Recording plans start at $5.00/month + additional 3¢ per minute.
Record Incoming Calls
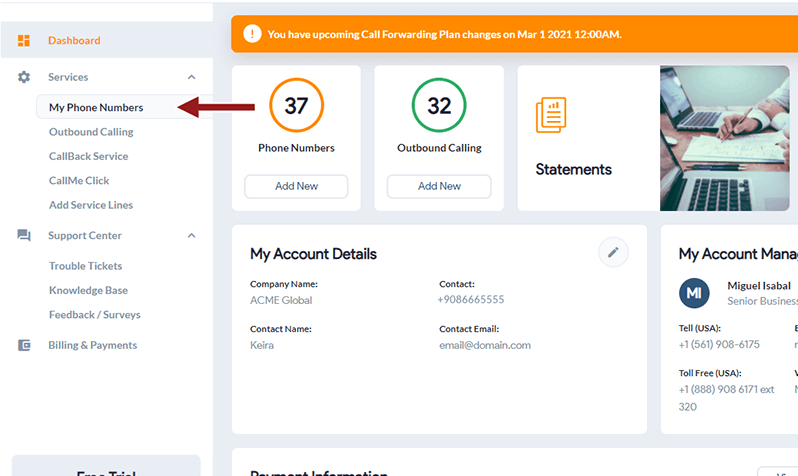
1. Click My Phone Numbers from the left-hand side of the dashboard.
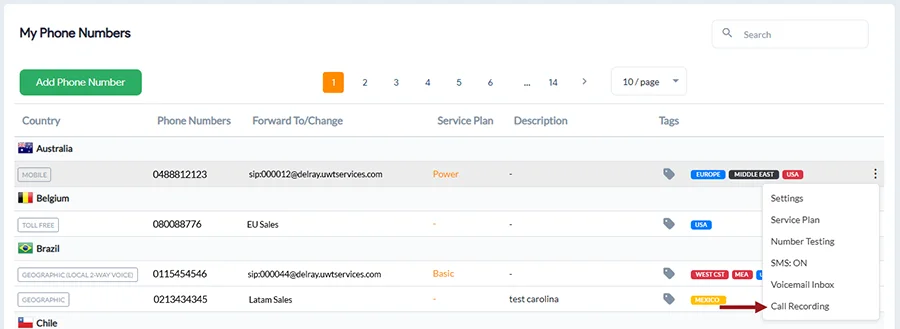
2. Click on the Recording icon for the service line that you would like to record calls.
3. Toggle the menu option to the right from Status Off to Status On.
4. Click Save Changes to confirm your request.
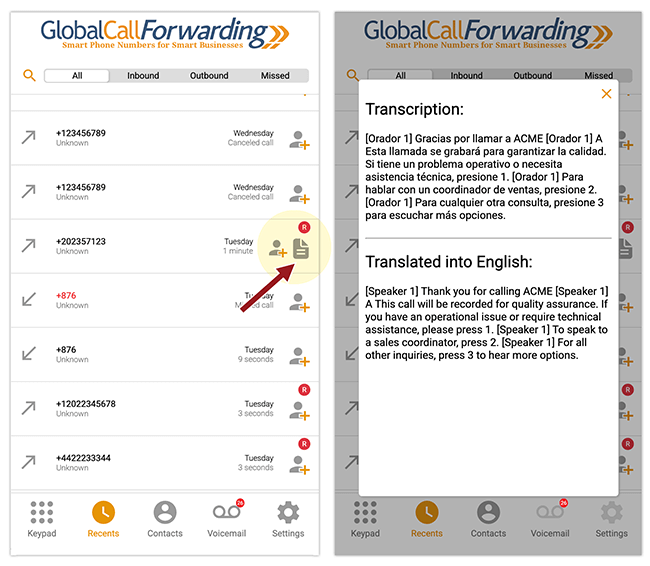
5. Turn on Transcription and Translation, if add-ons are desired.
You can upgrade or downgrade the plan that you have for each service line. Changes must be submitted before the start of your next billing cycle in order to take effect. Please start by logging into your account.
Change Call Forwarding Plan (Local and International Toll-Free Numbers)
1. Log in to your control panel. Click My Phone Numbers on the left-hand side of the dashboard.
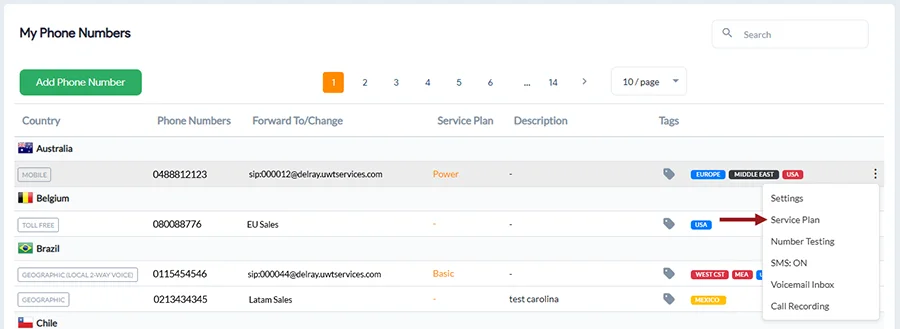
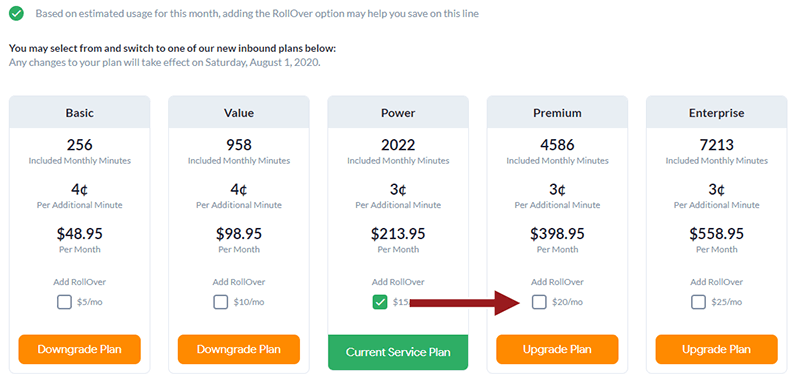
2. On the service line you wish to change, click on the Service Plan icon.
3. Select a new plan from this menu. Larger plans offer better call forwarding rates.
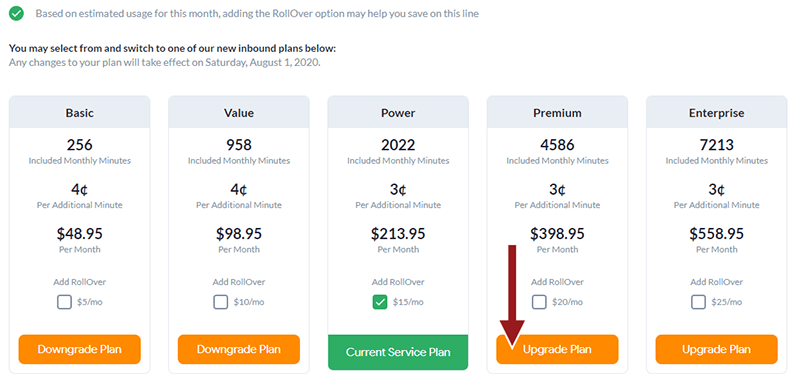
4. Click Upgrade Plan to confirm your order.
Please note that changes to your plan will take effect at the start of your next billing cycle. Contact us 24/7 if you have any questions.
You can add additional services to your account at any time. They will be billed at a prorated amount for the number of days left in the month.
1. Log in to your control panel.
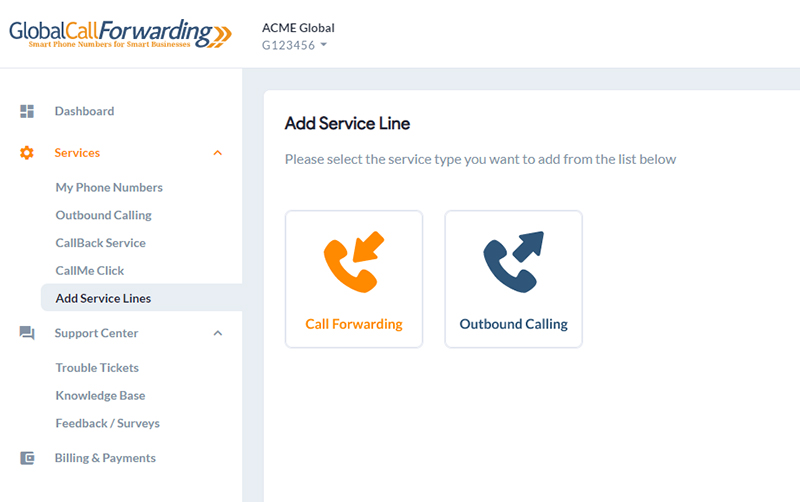
2. Click Add Service Lines from the left-hand side of the portal.
3. Select the type of service that you would like to add. Call us or request a chat if you have questions about any of our services.
Add Call Forwarding Services (Local & International Toll-Free Numbers)
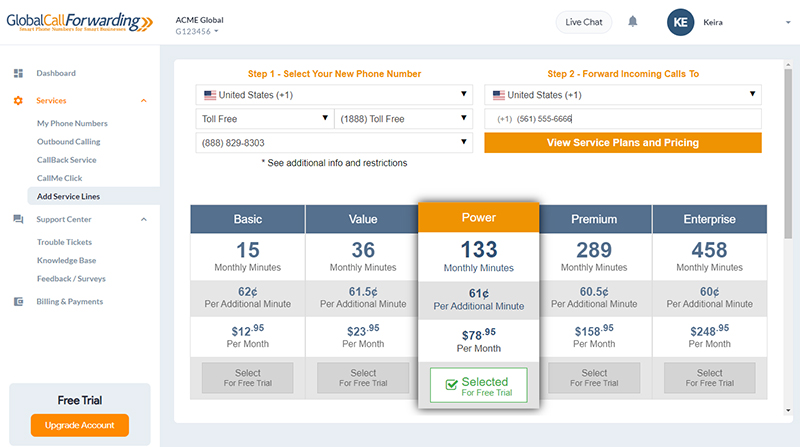
1. From the dropdown list below, select a country where you would like a new phone number. We provide toll-free, geographic, non-geographic, and Local 2-Way Voice numbers from more than 160 countries worldwide.
2. Select your phone number type. If you have questions about the various number types we offer for businesses, please get in touch with your account manager.
3. Select a phone number from our inventory.
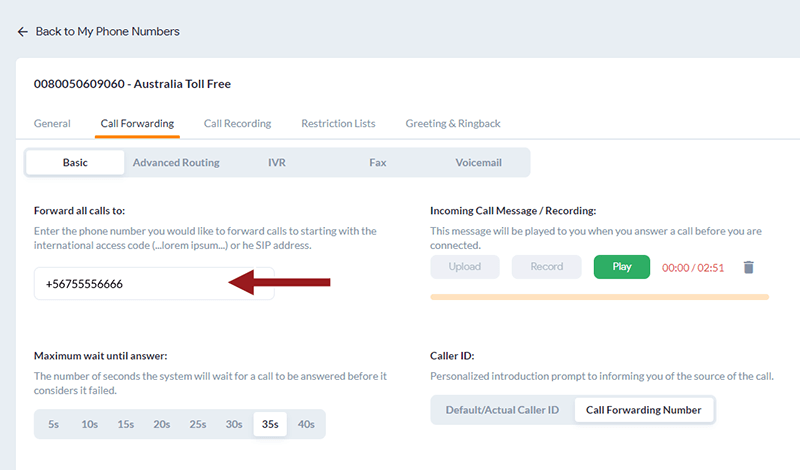
4. From the dropdown list, select the destination country (or VoIP/SIP address) to which you would like to route incoming calls. Once the number has been added to your account, you can modify this and even route calls to multiple destinations.
5. Select a plan size. We have five plans that include minutes and an additional per-minute rate once the included minutes have been consumed. Higher plans offer more included minutes and lower per-minute rates.
6. Choose your plan, add the number to your cart, and submit your request.
A confirmation email will be sent when the additional service line is added.
Please call us or request a chat if you have any questions. We are available to help 24/7.
Add Outbound Calling Services (Business VoIP)
After choosing Outbound Calling from the Add Service Lines Menu, please:
1. Under Where Will You Be Calling To? select a country to view international calling rates to that country. Our service enables international calling to anywhere in the world, no matter what your selection is here.
2. Select the phone number you want to appear as a caller ID. You can change this later.
3. Select a plan size. The monthly fee will be used as a call credit each month. Our service is month-to-month without any commitment; you can change plans anytime. Higher plans offer better rate discounts. Learn more about how Outbound Calling pricing works.
4. Confirm your order by clicking Submit Order.
Outbound calling additional service requests will be processed within 1-2 business days. Please contact us anytime, 24/7, by phone or live chat, to expedite your order.
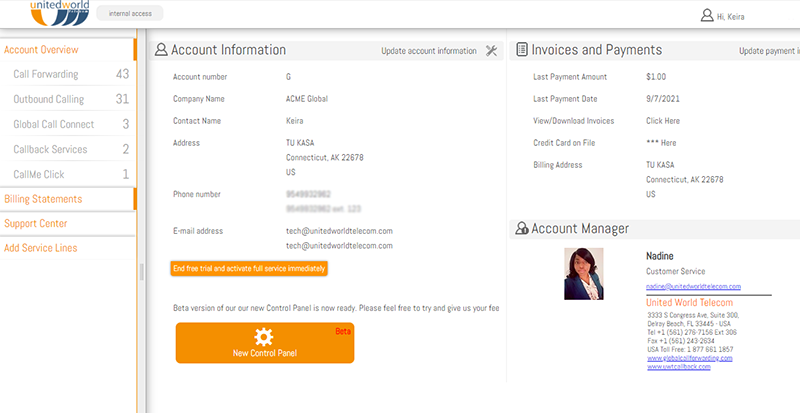
All new monthly invoices are accessible via the Billing and Payments section of your online control panel. You may access your control panel through the following link: https://newcp.globalcallforwarding.com/
Let’s go over how you and your teams can view billing information.
View and Download Invoices through the Control Panel
1. Click Billing & Payments on the left-hand side of the page.
2. Click on Invoices.
3. Choose the invoice that you want to download and select the format.
4. If you have questions about any of the invoice content, please get in touch with us immediately. We also recommend referring to this Invoice Explainer for more information.
Note: Invoices for the prior billing period are finalized and can be downloaded as CSV, HTML, and PDF at the start of the following month. For example, customers can download March 1-31st invoices at the start of April. Pending invoices for the current billing period can be viewed anytime throughout the month and downloaded as CSV, but pending invoices cannot be downloaded as HTML or PDF.
To provide invoice-only access to certain users, contact your account manager or our tech support team.
Our service is month-to-month without any commitment.
Before canceling, we recommend that you give us an opportunity to troubleshoot any issues you might be having. Your service can be canceled by logging into your control panel.
1. Click Feedback / Surveys from the menu on the left-hand side.
2. Click Cancel Service Lines lower left side.
Cancel One or More Service Lines
Here are the steps to cancel one or more service lines:
1. Select the service type that you would like to cancel (Call Forwarding, VoIP, etc.)
2. Select the service line that you would like to cancel.
3. Choose when you would like to cancel the service line and click Next.
4. Enter a note explaining why you want to cancel (optional) and click Submit.
Cancel Account
Here are the steps to cancel all services and close your account:
1. Choose Cancel all services.
2. Click Yes, to indicate that you are sure you want to cancel all your services.
3. Choose when you would like to cancel or close your account and click Next. 4. Please select a reason for your cancellation.
5. Enter a note explaining why you want to cancel/unsubscribe (optional) and click Submit.
We’re sad to see you go, but we thank you for using our services. Please do not hesitate to contact us in the future for help with any of your telecom requirements!
Number porting or “port my number” is the process of transferring your phone number (toll free or local number) to a new service while retaining the phone number.
A large variety of national, geographic, mobile, and toll-free numbers can easily be ported to United World Telecom. The details of each number will determine how the porting process works. You can get started on this page.
Number porting usually takes between 3 and 4 days, but in some cases can take months. This depends on a number of different factors (country, type of number, current provider, status of the number, etc.). We always work as hard as possible to get numbers ported in the shortest possible time.
We strongly recommend that service cancellations are submitted online via control panel. You may also send an email to cancel@unitedworldtelecom.com however cancelling via email cannot be guaranteed unless a reply from us acknowledging is received. The cancellation, furthermore, should not be submitted any later than the last business day of the month during US EST business hours. The cancellation will be effective on the last business day of the month during US EST business hours. No prorated refunds will be made for the month in which the cancellation has been requested.
Verified business customers may ask for a refund of their remaining call credit at any time during the first 30 days of service activation for technical issues that are confirmed by our tech team.
Yes. We offer a 100% satisfaction guarantee. Please contact us if you have any issues within 30 days of service activation and we would be happy to refund you for any charges incurred if you are not satisfied with the quality of the service.
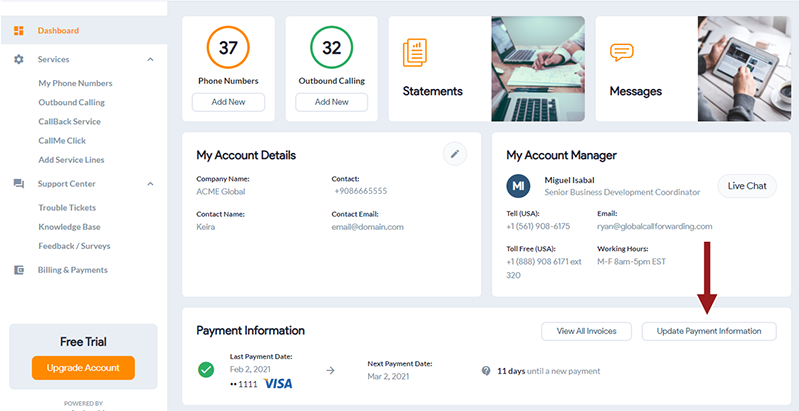
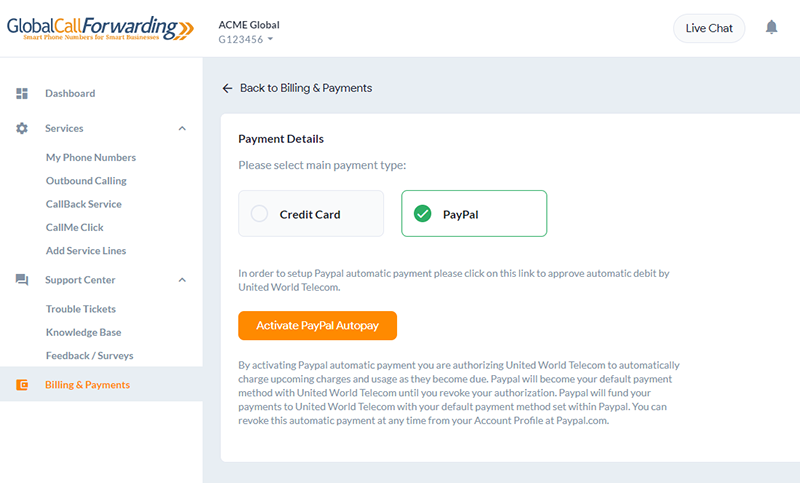
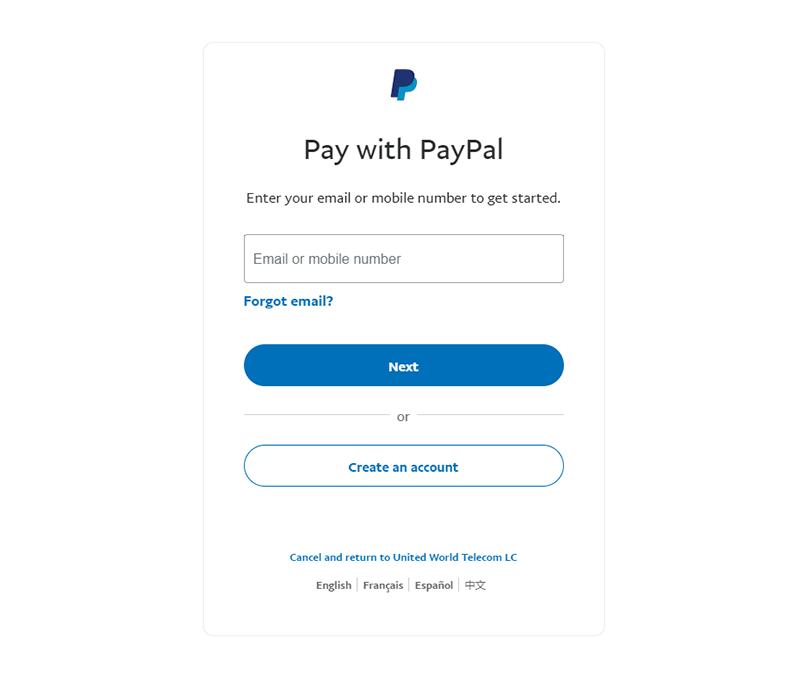
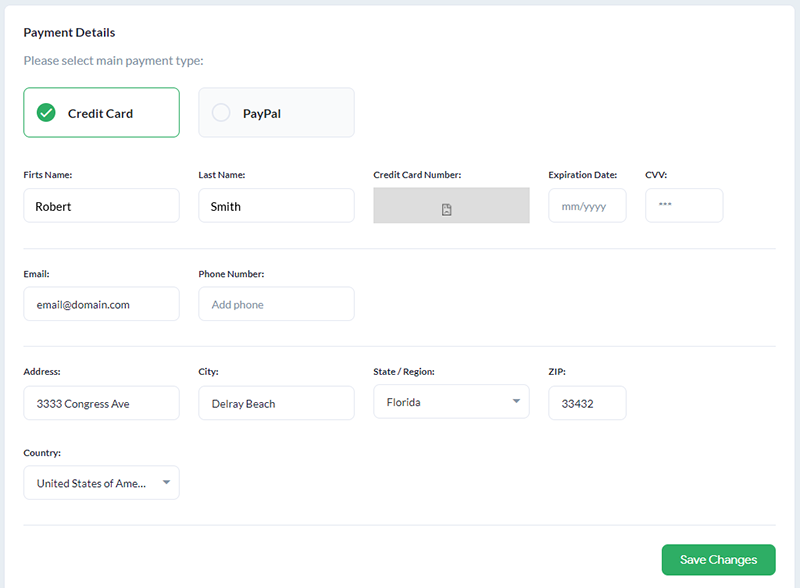
Your monthly invoice will automatically be charged to your credit card or PayPal account on file. This will make sure your account is always in good standing. If you need to change your payment method, you can log into the control panel to manage payment settings.
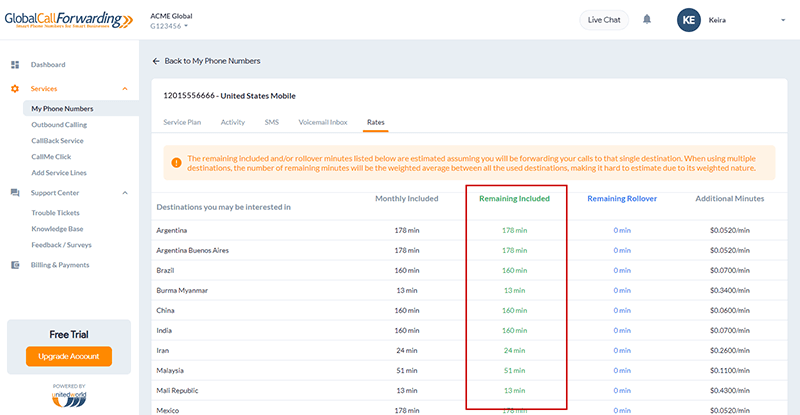
If for any reason you go over your monthly minutes, the extra minutes will be charged at additional per minute rate. The rate can be found in your control panel.