Cloud-based call routing software enables your business to manage and forward incoming calls across time zones, teams, and locations in a structured, efficient way. With an advanced call routing strategy, your sales and support teams can handle calls more effectively, ensuring a seamless experience for customers, no matter where they’re calling from.
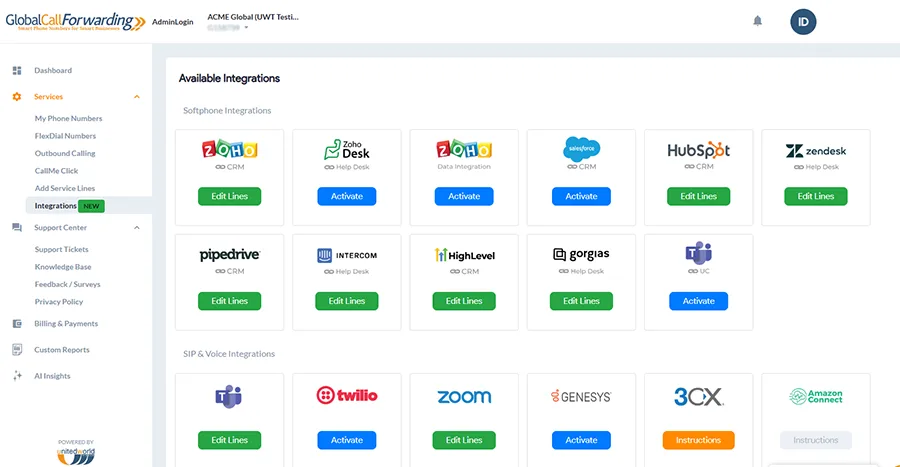
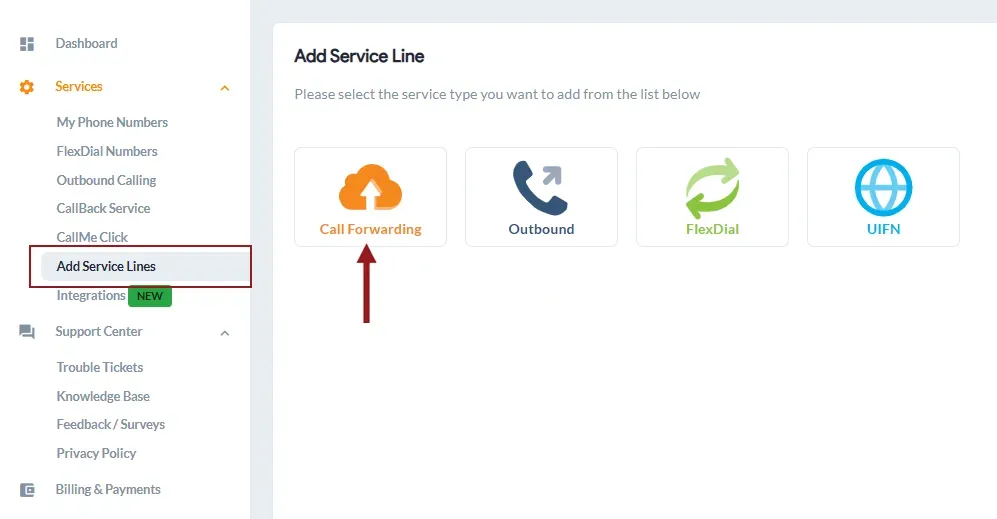
With Global Call Forwarding, you can customize how inbound calls are managed using various advanced call routing strategies through your control panel.
In this guide, we’ll walk you through the key routing strategies you can set up through our convenient control panel:
We’ll start with IVR and the call flow builder and then move on to individual advanced routing strategies.
Interactive Voice Response (IVR)
IVR is an automated phone system that enhances how businesses manage incoming calls. With Advanced or Cloud IVR—available with your virtual phone number plan—calls are answered automatically and guided to the appropriate agent, department, or self-service option without needing a live receptionist.
This system offers unmatched mobility and efficiency by helping callers complete simple tasks or reach the correct destination quickly. It’s especially beneficial for businesses handling high call volumes, as it organizes and prioritizes incoming calls, reducing wait times and improving customer experience.
How to Set Up Advanced IVR?
Here are the steps to configure IVR:
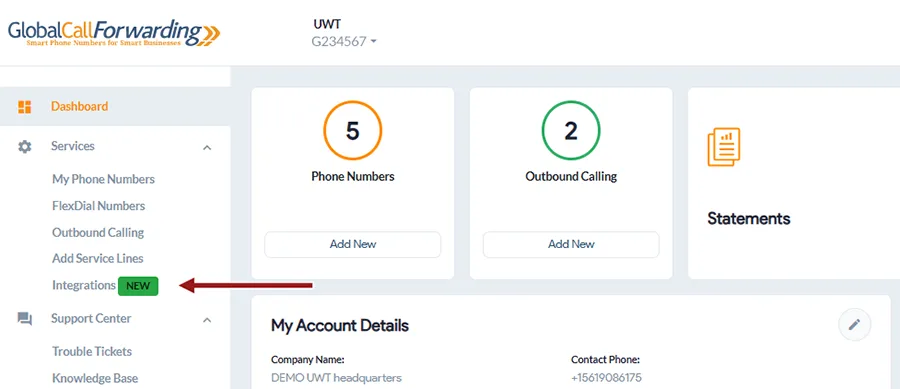
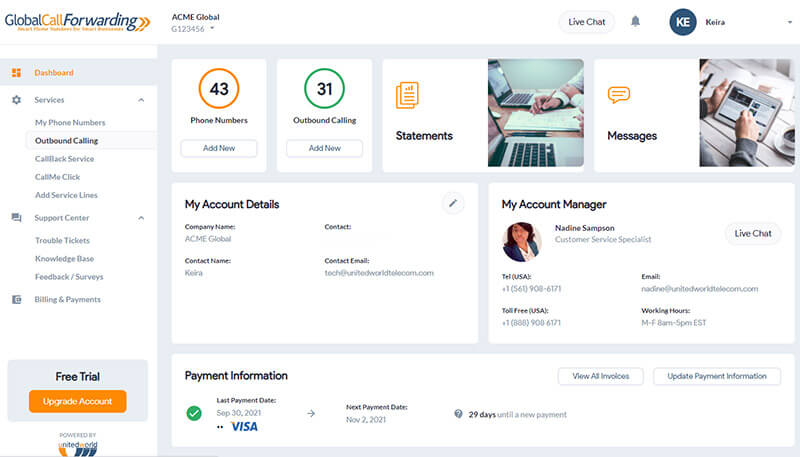
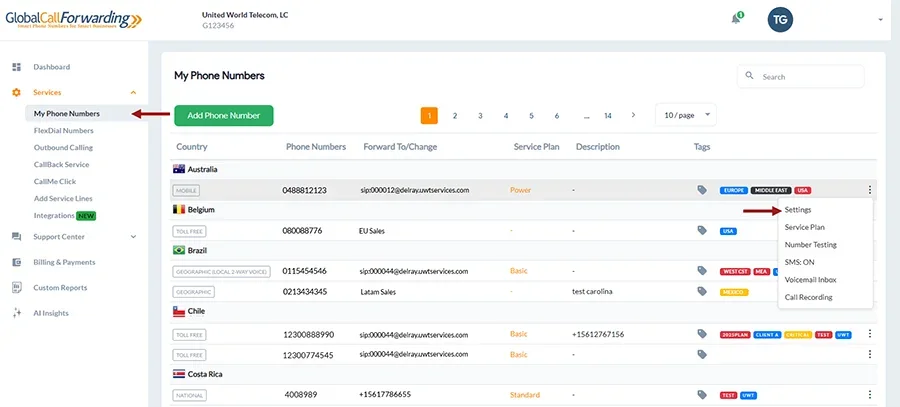
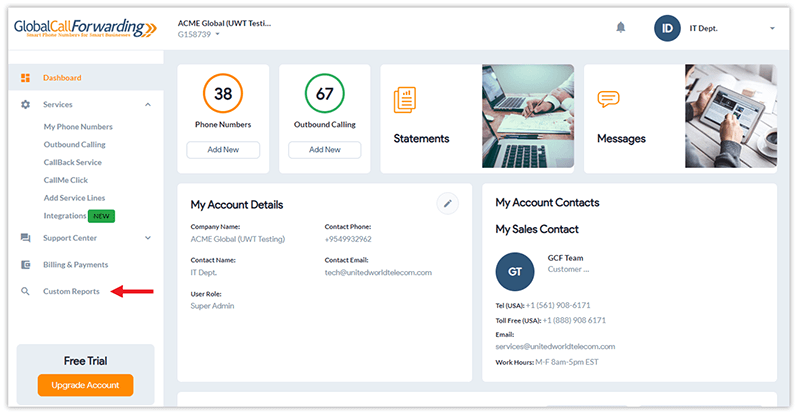
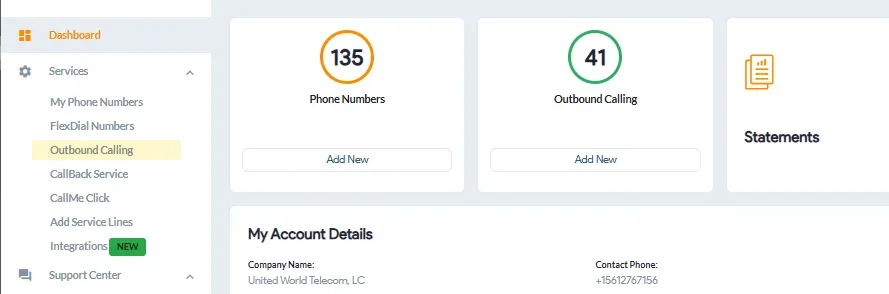
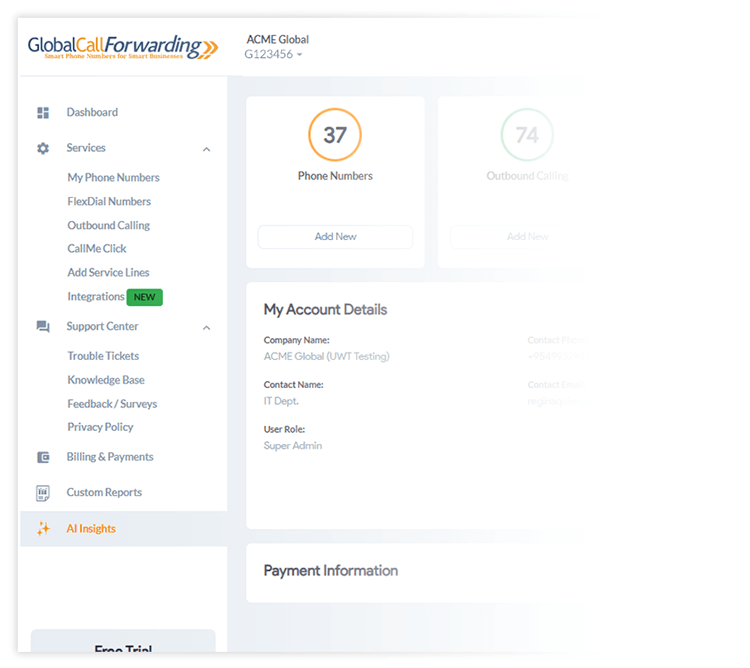
1. Sign in to your control panel.
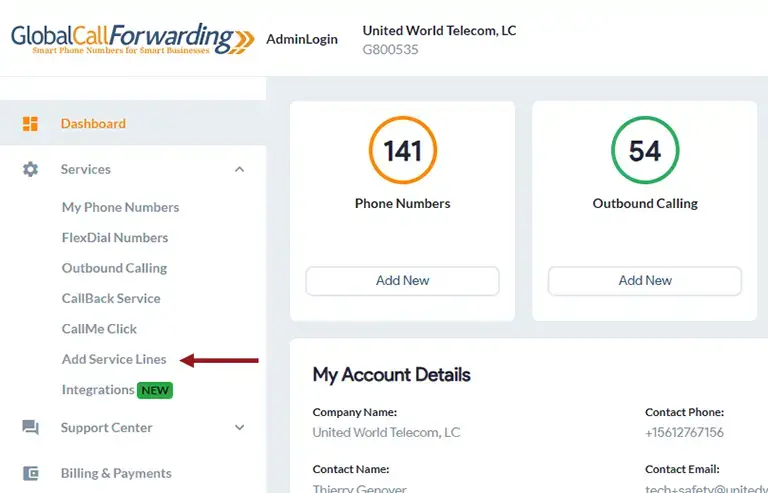
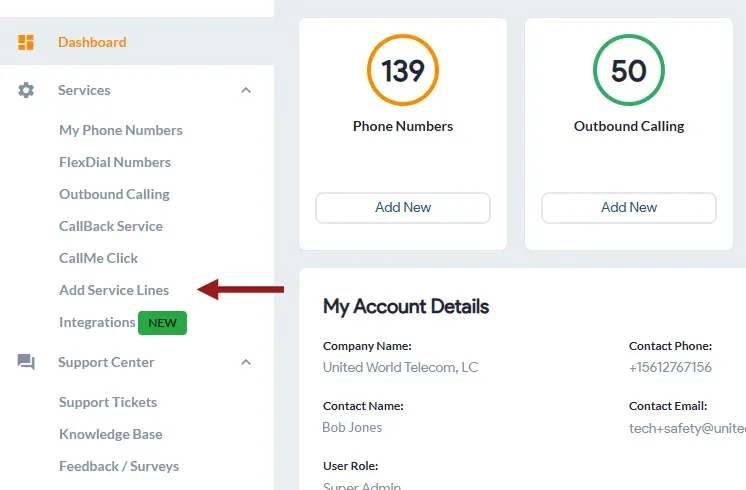
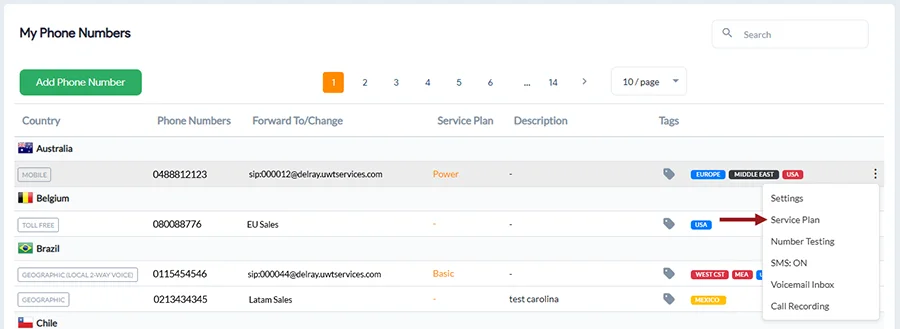
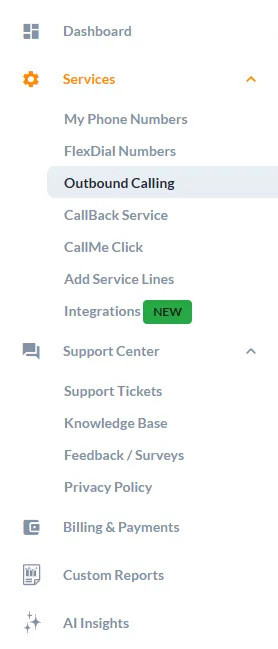
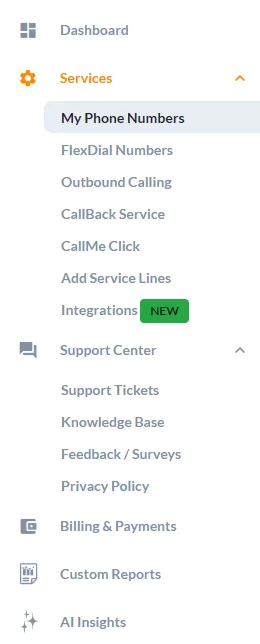
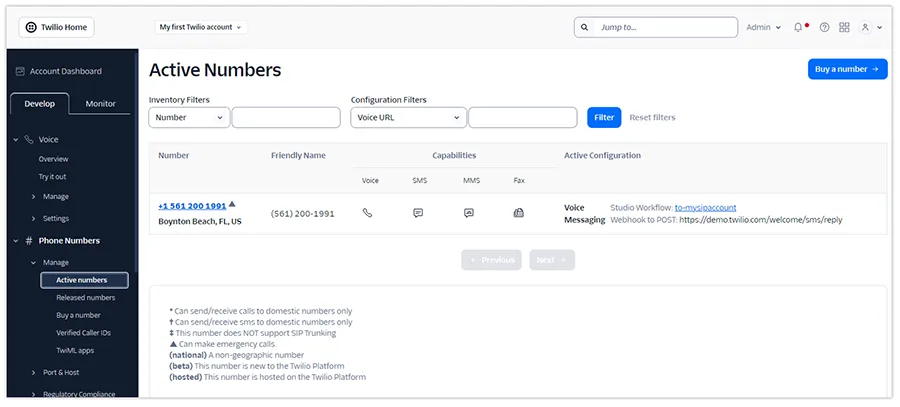
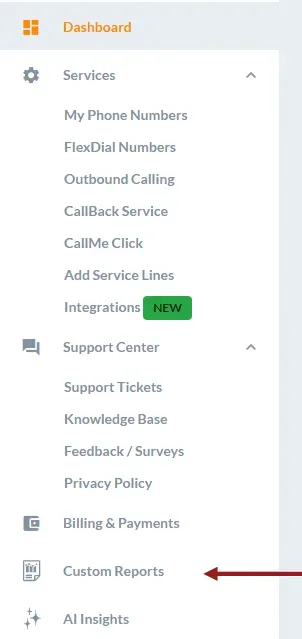
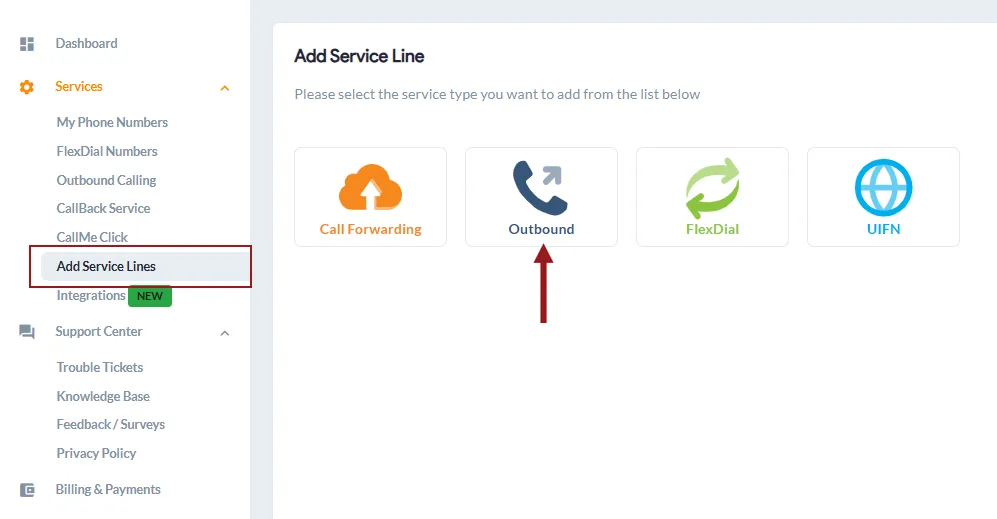
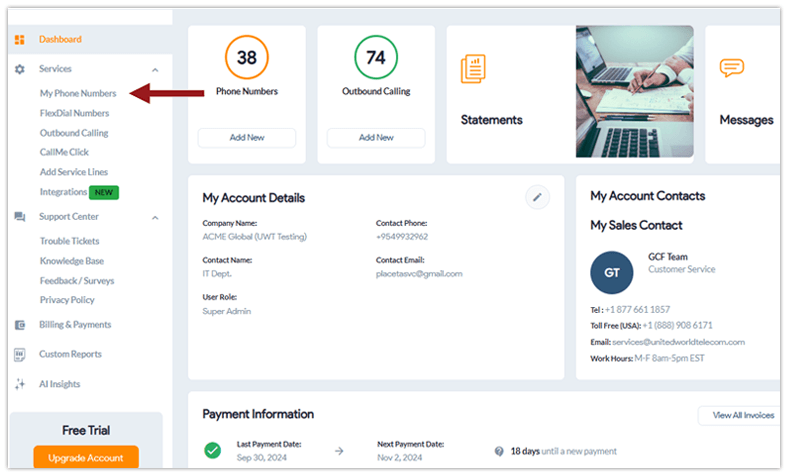
2. Under Services, click on My Phone Numbers, located in the page’s left-hand menu.
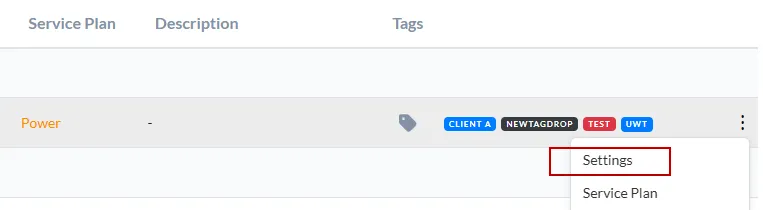
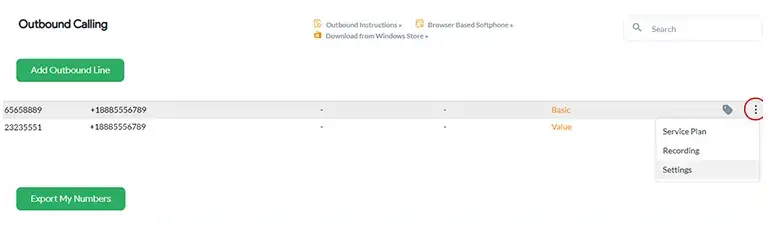
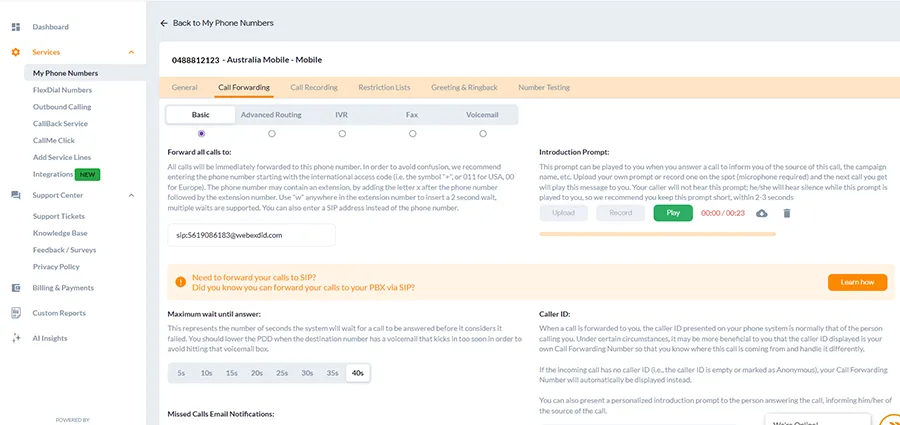
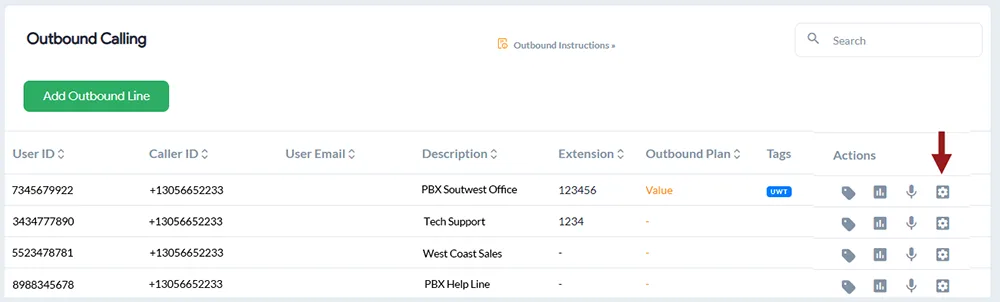
3. Go to the 3 dots on the far right and slect Settings next to the line you want to edit.
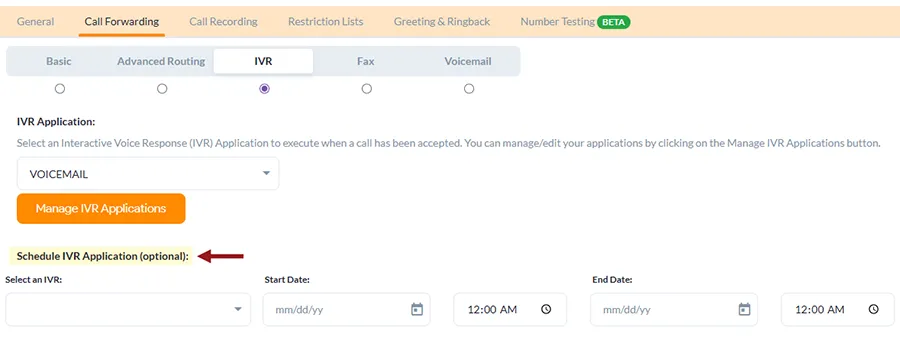
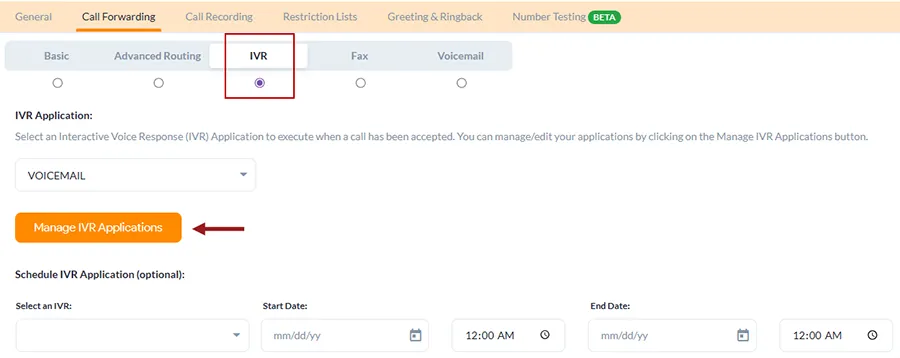
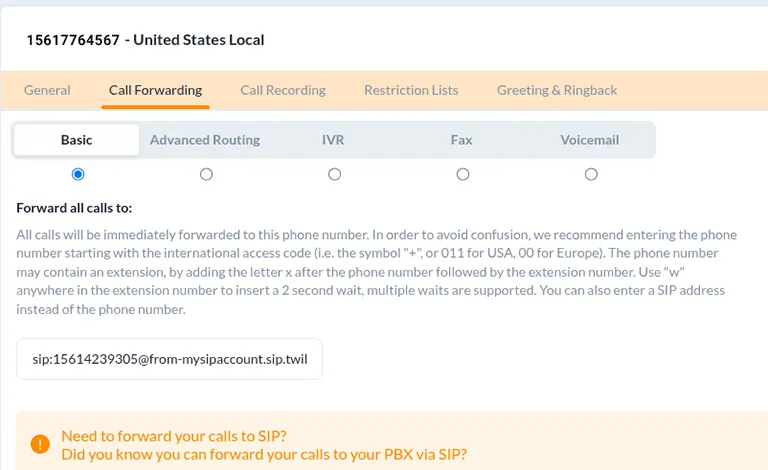
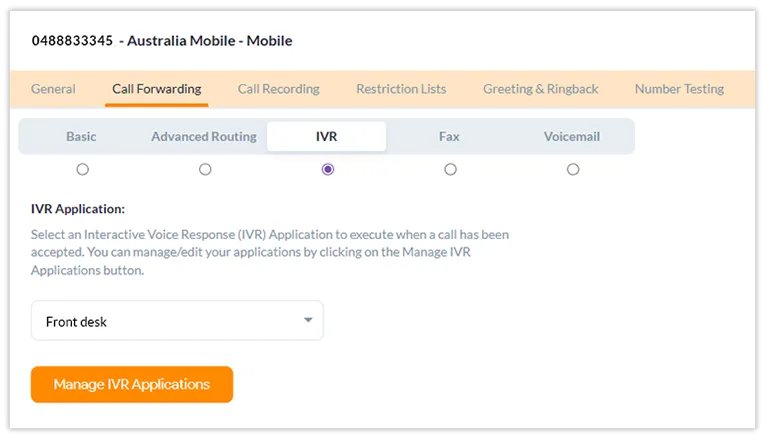
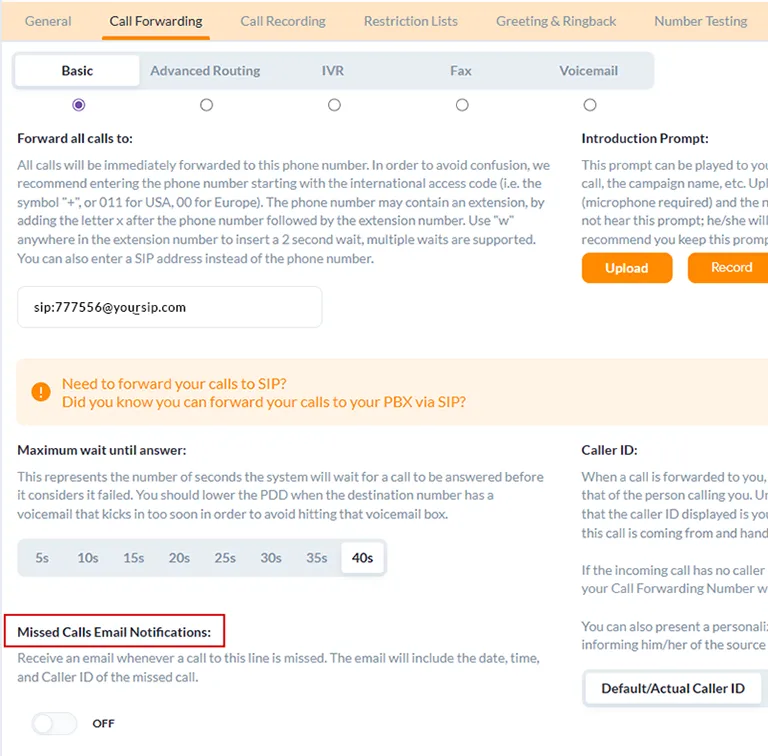
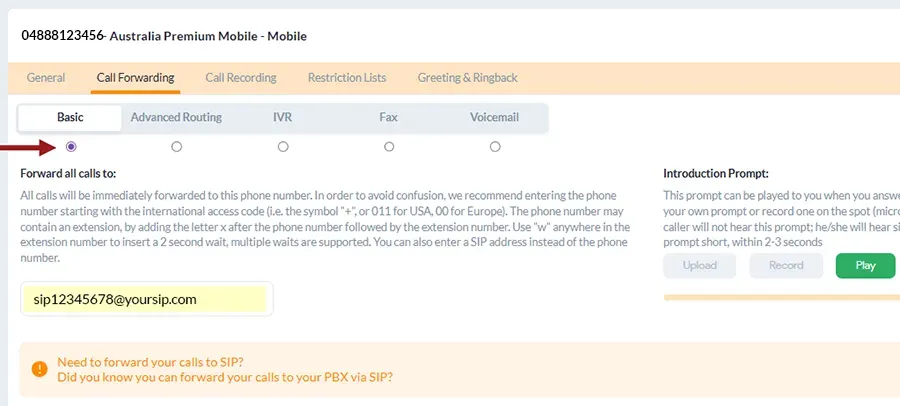
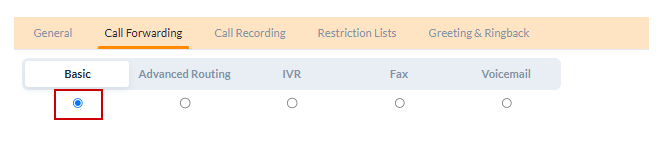
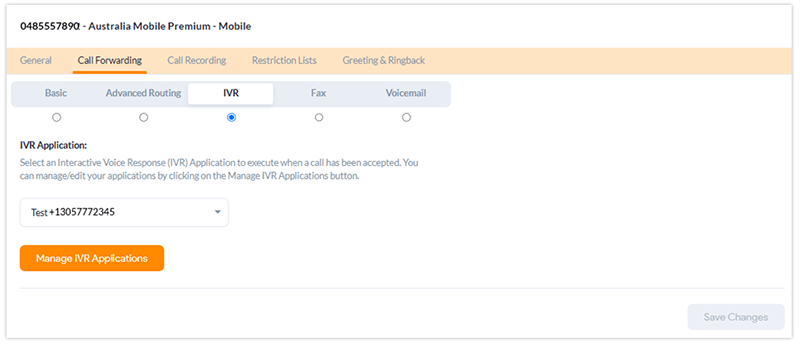
4. Underneath Call Forwarding, hover over IVR (⚪). To switch to IVR from Basic Forwarding, click the icon so it is selected (🔵), indicating that your call forwarding is set to IVR.
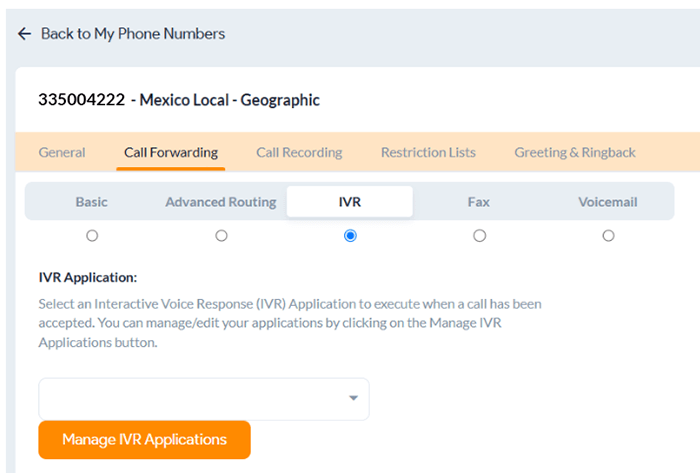
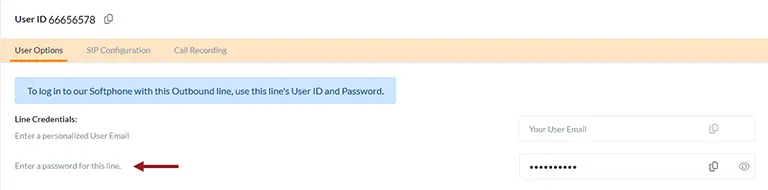
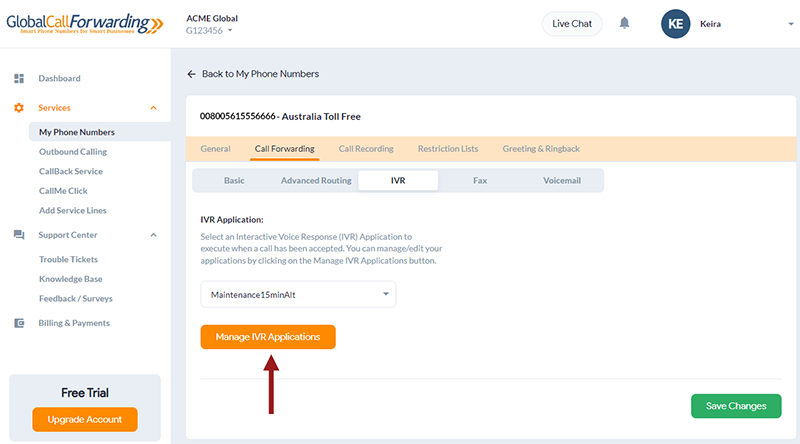
5. Click Manage IVR Applications to customize and configure your IVR settings.
Now, before setting up the IVR, you will need to configure prompts and destinations that you will add to your IVR system. Here are the steps:
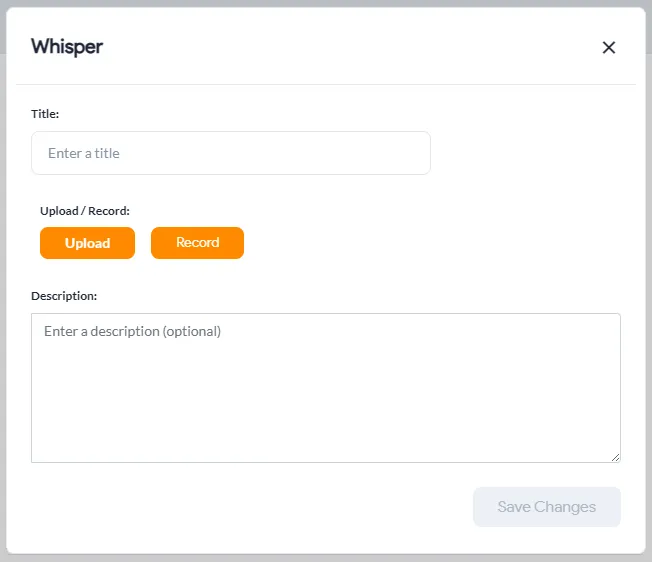
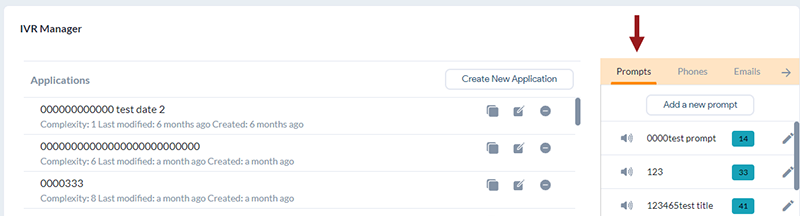
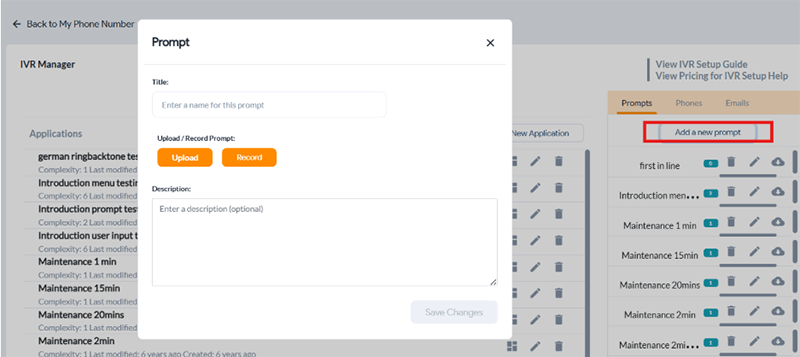
a) For Prompts — This is the message customers will hear when they connect with your phone system. To guide them effectively, you can include company details, announcements, updates, or navigational instructions. Example: Opening greeting or IVR main navigation menu.
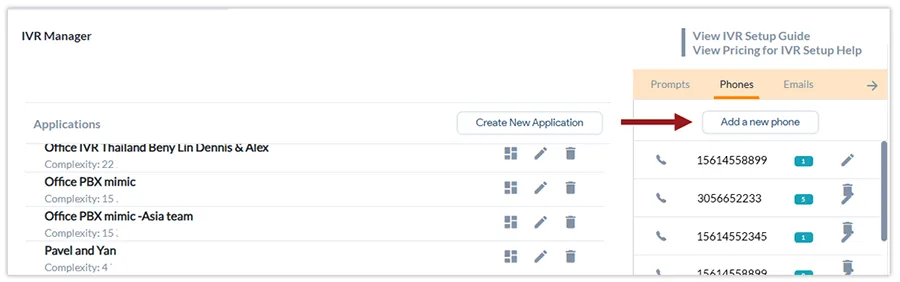
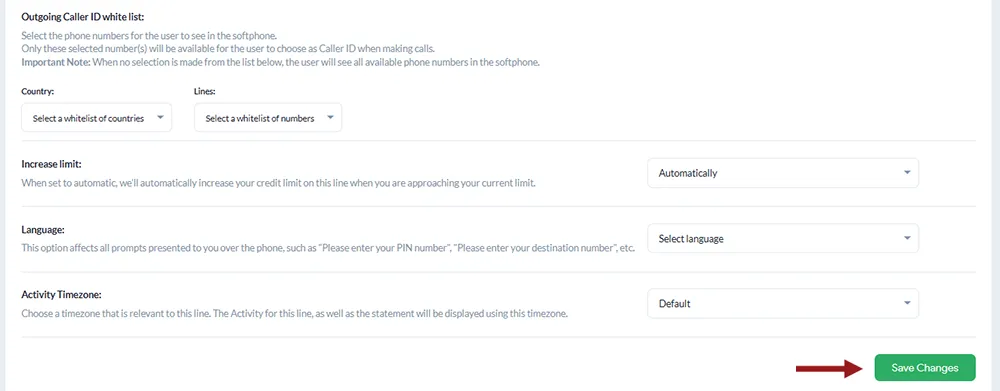
Go to the Prompts tab and click Add a New Prompt. Here, you can Upload/Record a new prompt or voice message. Then, click Save Changes.
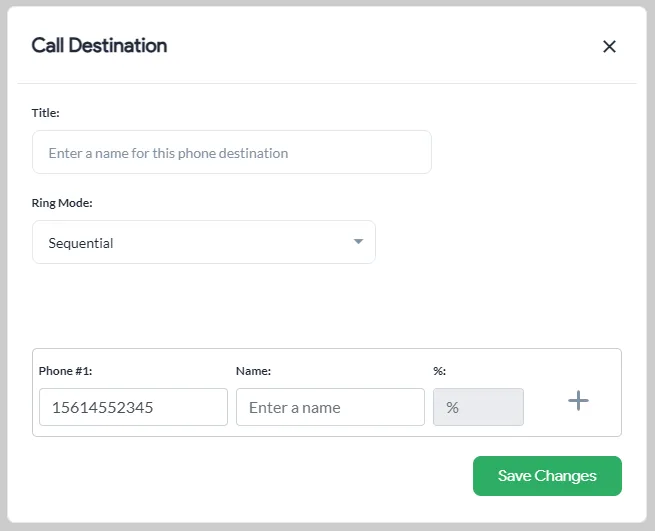
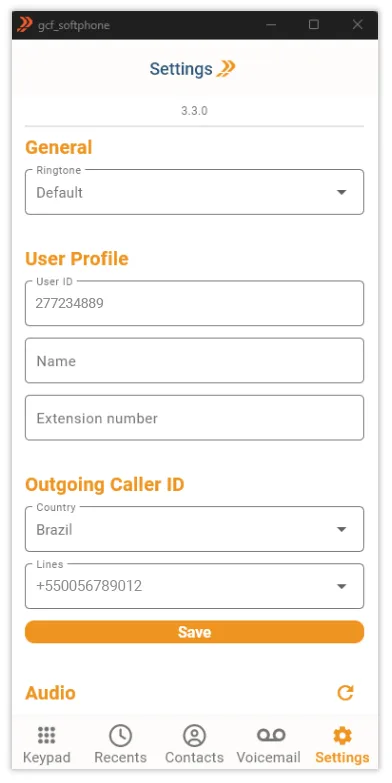
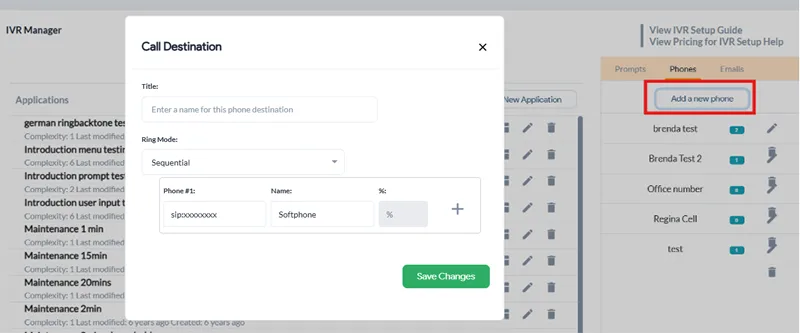
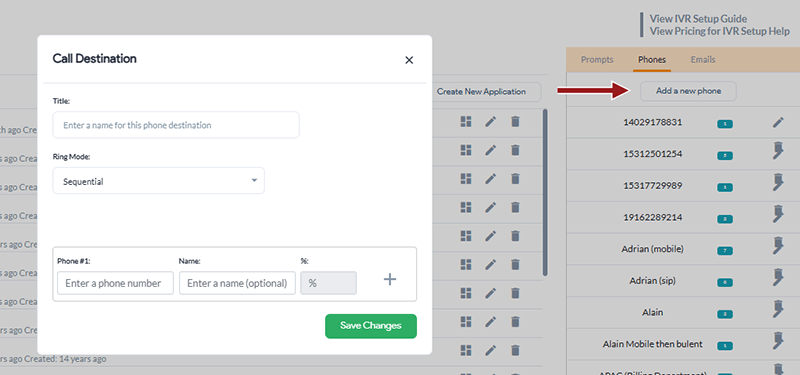
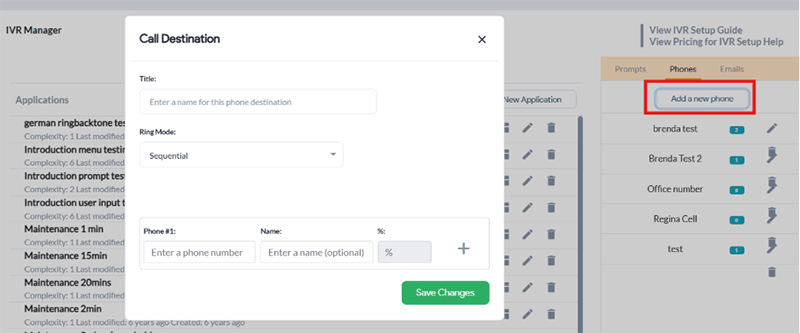
b) For Phones — Here, you can set up a list or ring group with multiple destination SIP addresses or phone numbers. Pro tip: Save the title with a descriptive name such as Customer service team UK for your service team in the UK. If it is an individual, then save it as [name] + phone number + location. Example: Peter phone number UK.
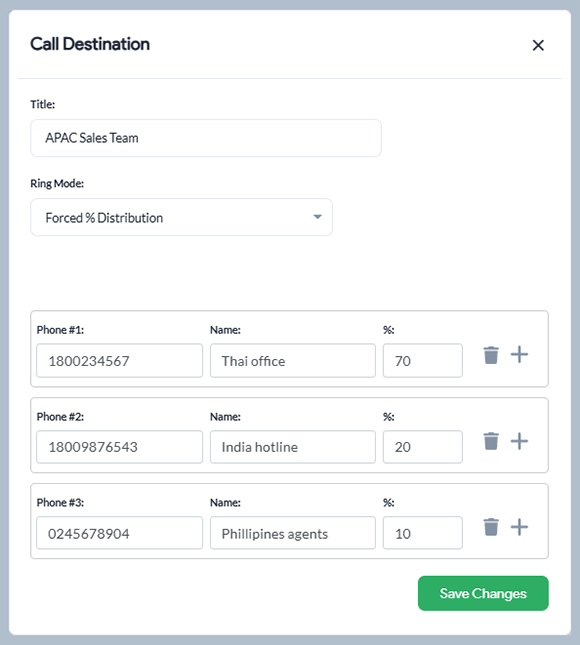
Click on the Phones tab and click Add a new phone. Enter the information, choose a Ring Mode (sequential, random, or simultaneous), enter your phone numbers, and adjust weighted call distribution with percentages, if desired. Then, click Save Changes.
Ring Modes:
-
- Sequential, where calls are sent to numbers one after the other
- Random, where a number from the list is selected at random to receive the call
- Simultaneous, where all numbers ring at the same time until someone answers.
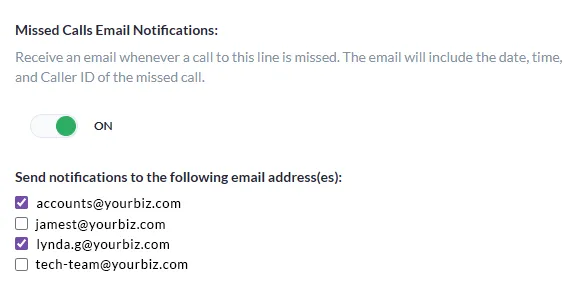
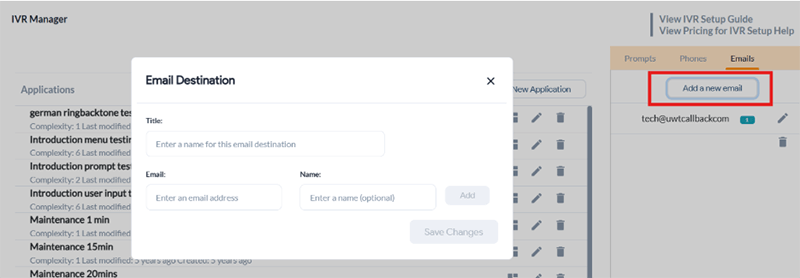
c) For Emails — Here you can enter email addresses where you want voicemail messages to be forwarded to. Example: Peter email address or Billing email addresses. This way, you can potentially send incoming fax messages and invoices directly to your Billing directly.
Click on the Emails tab and select Add a New Email. You can create a list with one or more email addresses from here. Then, click Save Changes.
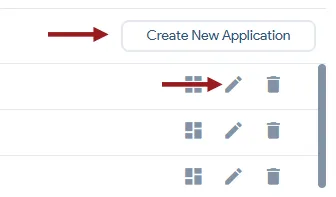
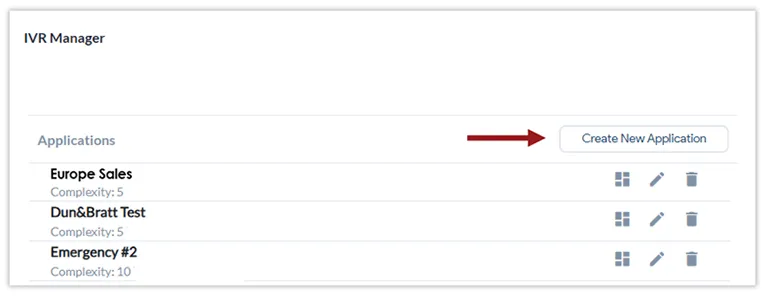
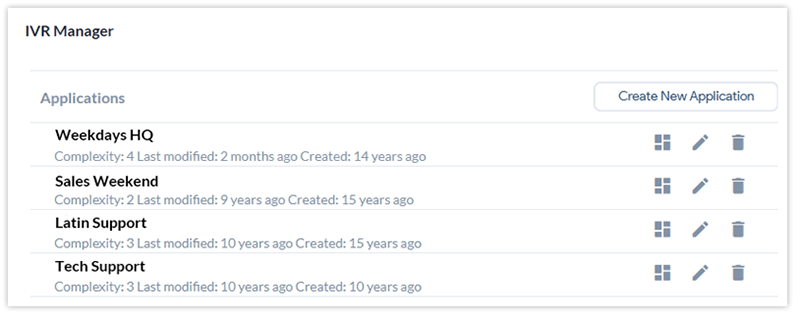
6. With all this set up, you can now create your IVR system. Start by clicking Create a New Application on the same IVR Manager page to get started:
Setting Up IVR With User Menu
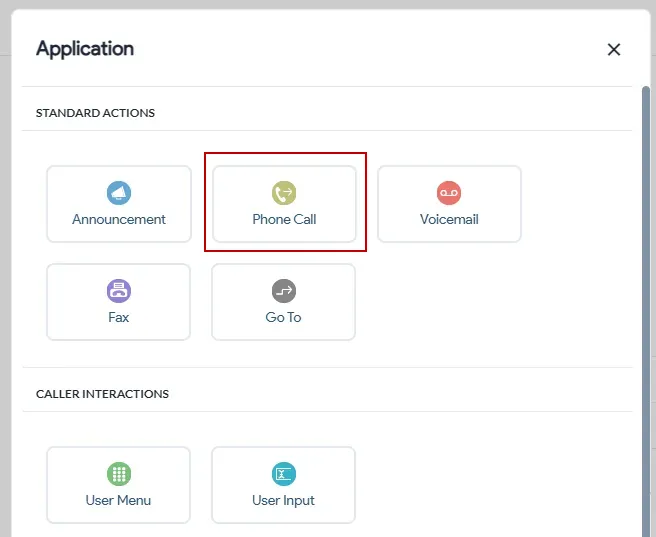
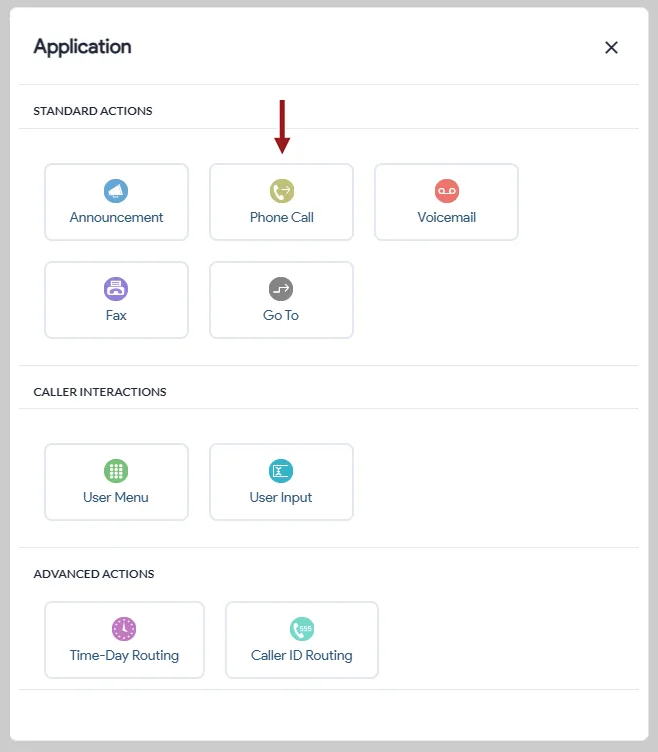
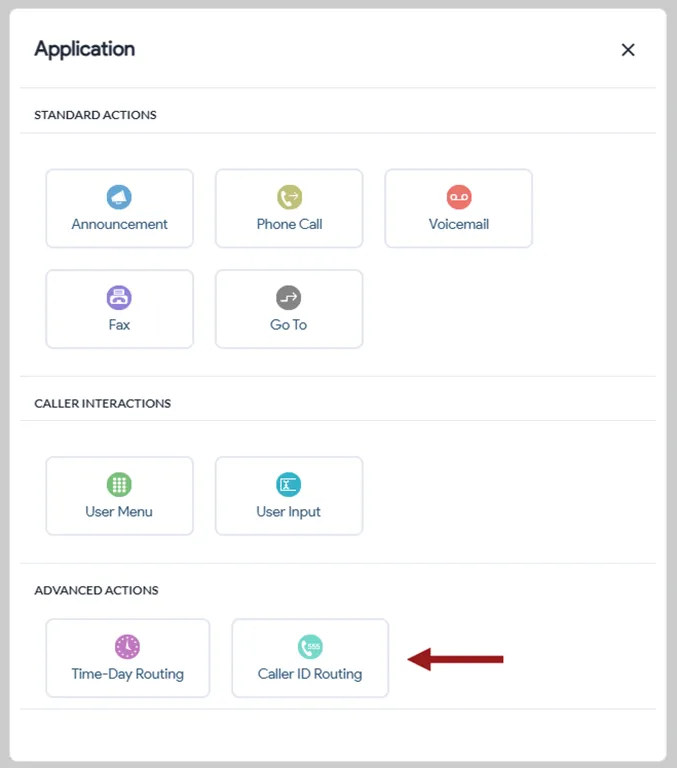
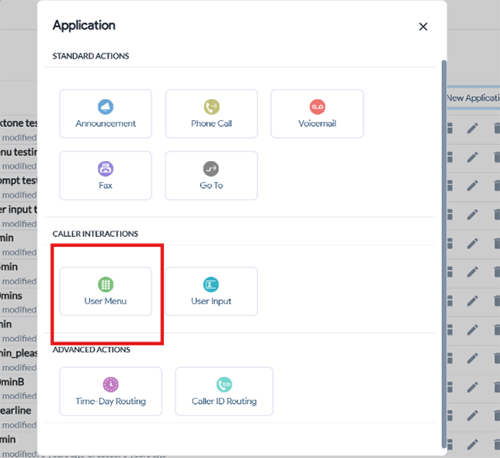
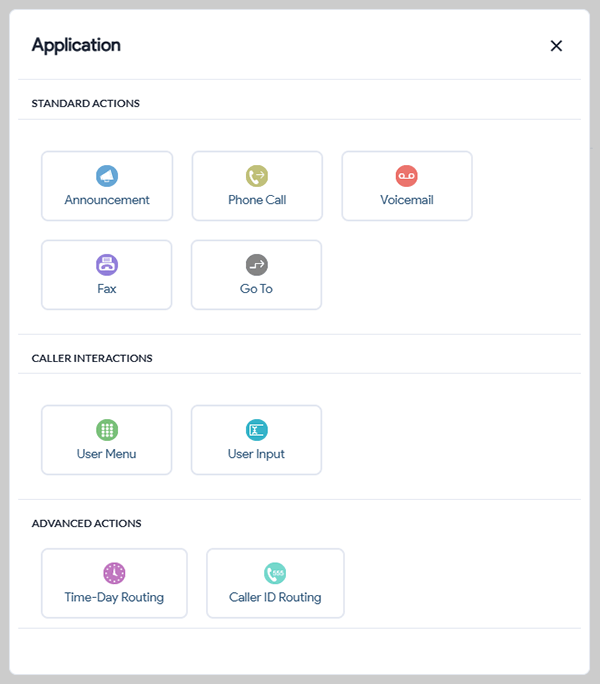
7. An Application menu screen will appear, select User Menu to build an IVR with menu options that callers will listen to and interact with.
8. Now, start filling the green card below with your requirements:
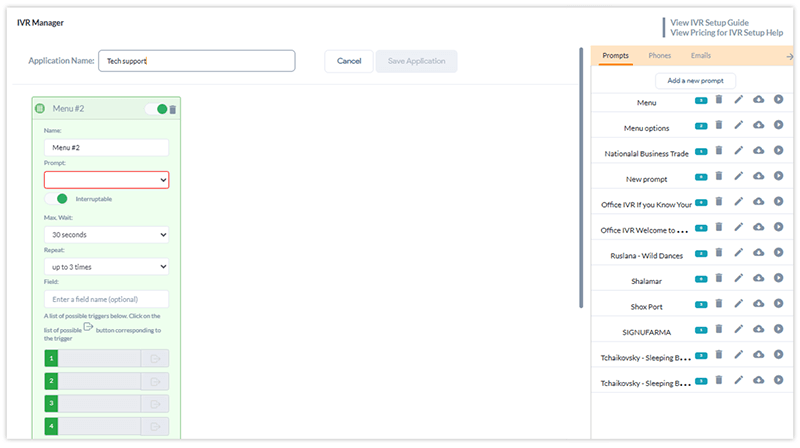
- Prompt: The main voice message welcomes callers and provides them with various menu options. Select from the prompts you’ve uploaded or recorded earlier.
- Interruptable Option: Choose whether callers can interrupt the message or must listen to it in full.
- Maximum wait period: The maximum duration callers will wait before the system takes action.
- Repeat: Number of times the message will repeat
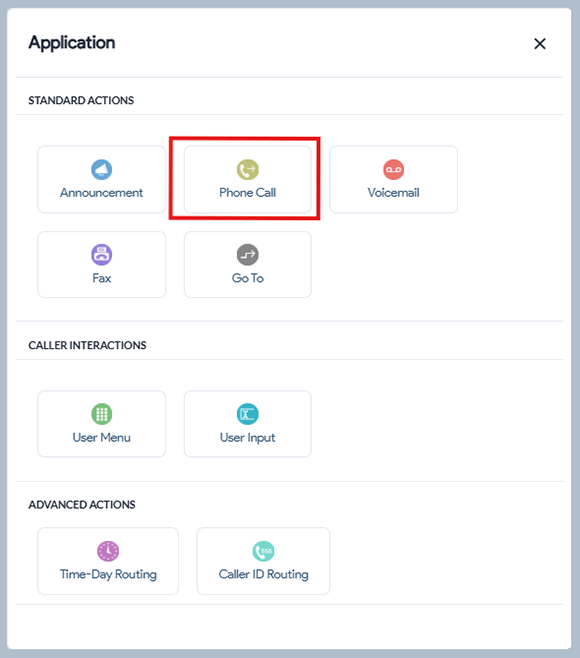
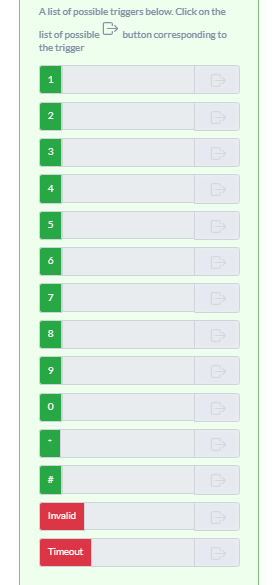
- Possible trigger for each key (number on the keypad): Select from various actions and triggers, and assign each key (1, 2, 3, etc.) to a specific target, such as a hunt group, department, voicemail, or a list of email addresses. You can utilize the phone numbers and email lists you’ve created here. The available actions and triggers are as follows:
- Phone Call: Redirect the call to another number, department, team, or hunt group.
- Announcement: Play a pre-recorded voice message or announcement to the caller.
- Voicemail: Route the call to voicemail.
- Time-Day Routing: Direct calls to specific locations or numbers based on designated times or days.
- Caller ID Routing: Forward calls from specific locations or area codes to selected numbers or groups.
- Invalid: Select the action to take when the caller presses an incorrect key or number.
- Timeout: Choose what happens when the message repeats the desired number of times, but the caller does not press a key.
Here’s an example: #1 directs the call to the customer service department list, #2 sends it to the billing department, and #3 forwards the call to voicemail. If the caller cannot find the correct option in the menu and doesn’t press any key, you can redirect them to voicemail and allow them to leave a detailed message for further assistance.
9. Finally, click Save.
Related:
Time of Day Routing (Time-Based Routing)
Time-based routing, also known as Time-of-Day routing, is included with any call forwarding service plan, allowing you to automatically redirect incoming calls from your toll-free or local numbers to alternative numbers or SIP addresses at specific times of the day. It ensures that important calls are never missed by directing them to your main office, satellite offices, remote teams, or even a home office during off-hours, weekends, or holidays.
You can set up Time-of-Day Routing in 2 ways:
Let’s look at both ways below:
Setting Up Time-of-Day Routing Through IVR Manager
1. Log in to your control panel.
2. Under Services, click on My Phone Numbers, located in the page’s left-hand menu.
3. Go to the Settings icon next to the line you want to edit. 
4. Underneath Call Forwarding, hover over IVR (⚪). To switch to IVR from Basic Forwarding, click the icon so it is selected (🔵), indicating that your call forwarding is set to IVR.
5. Click Manage IVR Applications to customize and configure your IVR settings.
6. Next, click on the Phones tab. Here, you can set up a list or ring group with multiple destination SIP addresses or phone numbers. Choose the Ring Mode and set up Weighted Distribution (if desired) for this group, and click Save Changes.
Pro tip: Save the title with a descriptive name, such as Customer service team UK for your service team in the UK. If it is an individual, then save it as [name] + phone number + location. Example: Peter phone number UK.
You can create multiple “destinations” like this where you plan to route incoming calls for this time-based rule.
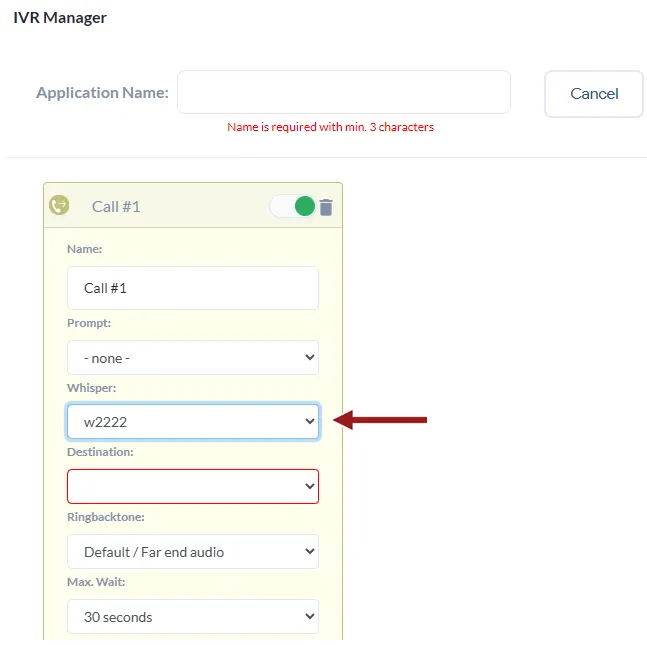
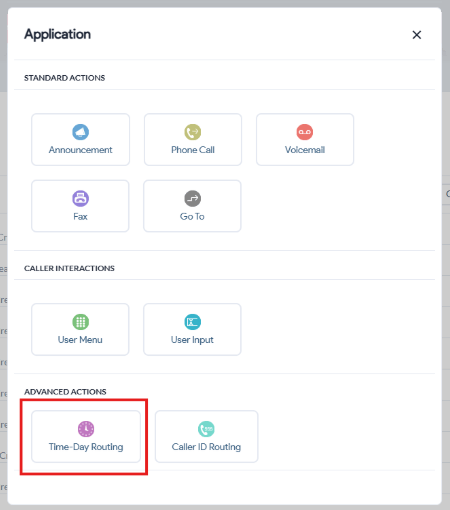
7. With the destinations set up, click on Create New Application on the IVR Manager page and choose Time-Day Routing.
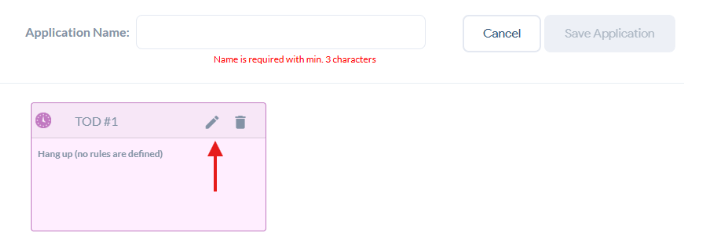
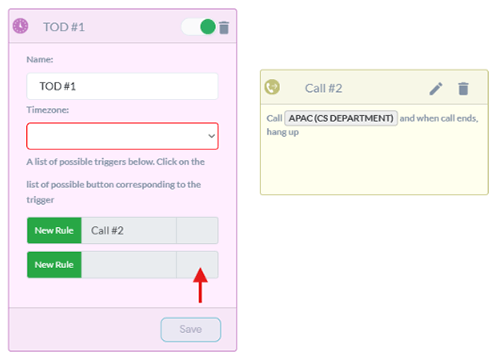
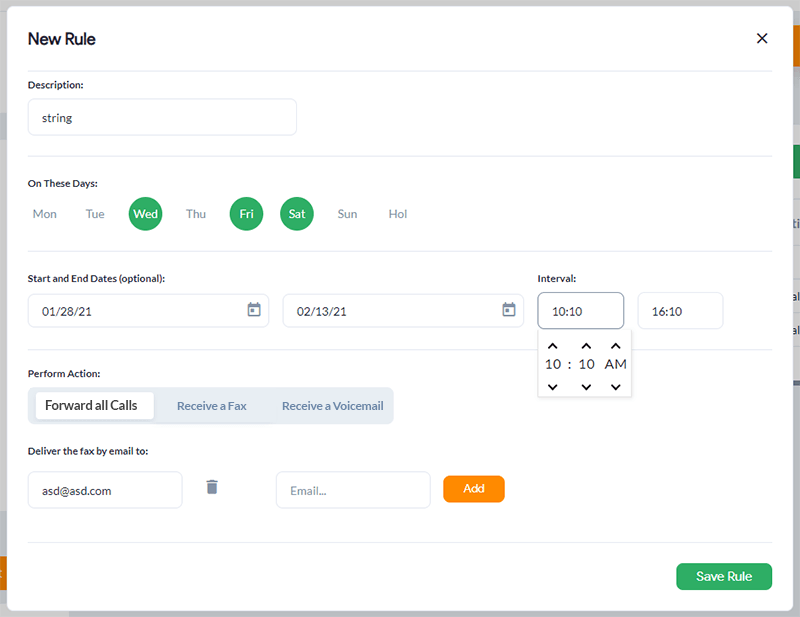
8. Name your new application and click on the edit button to customize the routing rule.
9. Next, give this rule a name and select your desired time zone from the dropdown.
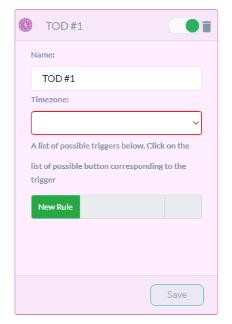
10. Then, click on New Rule to configure time-based routing. Specify the days (under On These Days) and Time range you want the calls to be forwarded. Click Next.

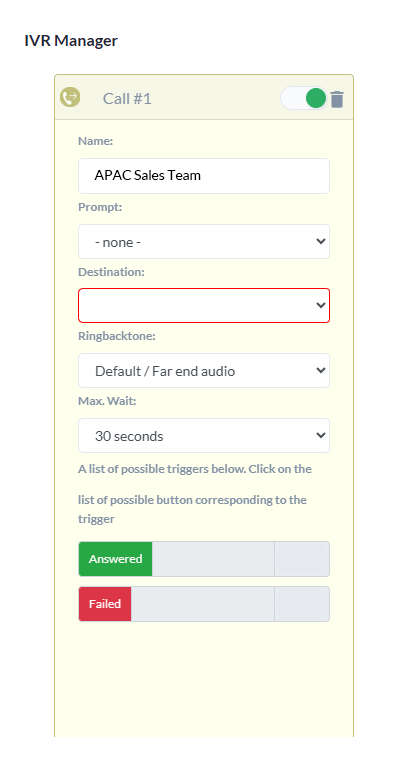
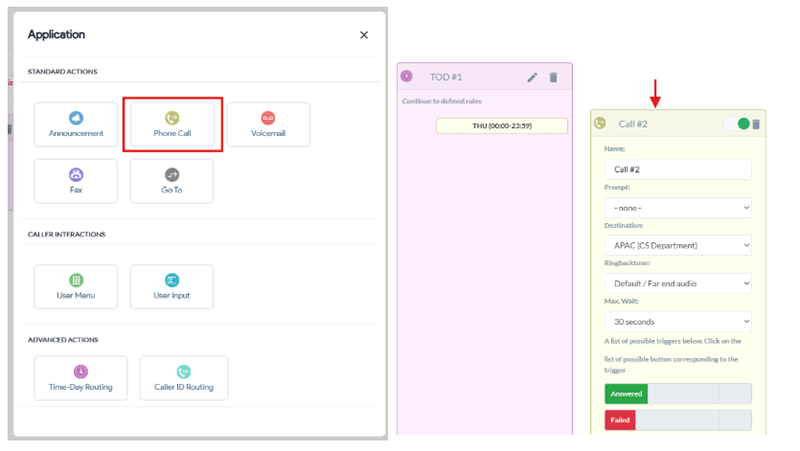
11. Now pick the action this rule should follow. For instance, if you want calls to forward to your APAC team during this time-based rule, you can select Phone Call and then customize the next card with the correct destination (in the example’s case – APAC ring group).
12. To add another time-based rule to the same IVR, you can go back to the first card and add a New Rule.
13. You can also send calls to Voicemail, Fax, Announcement, or User Menu for further customization.
14. When done configuring your Time-Based IVR, click Save Application on the top by the Application Name.
Setting Up Time-of-Day Routing Through Advanced Routing
1. Log in to your control panel.
2. From the dashboard, under Services, select My Phone Numbers from the left-hand menu.
3. Click on the Settings Icon (⚙️) on the line that you would like to modify.

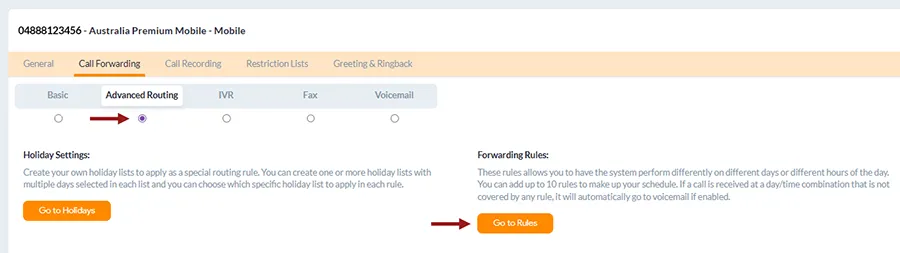
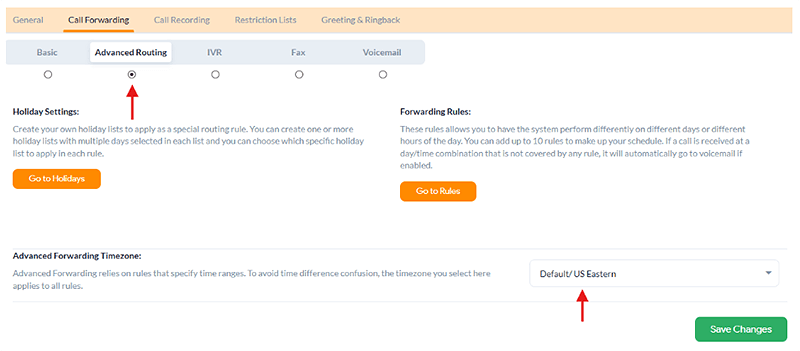
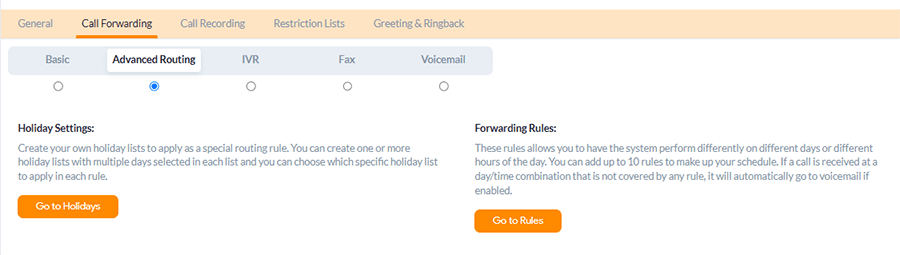
4. Underneath Call Forwarding, hover over Advanced Routing (⚪). To switch to Advanced Routing from Basic Forwarding, click the icon so it is selected (🔵), indicating that your call forwarding is set to advanced routing rules.
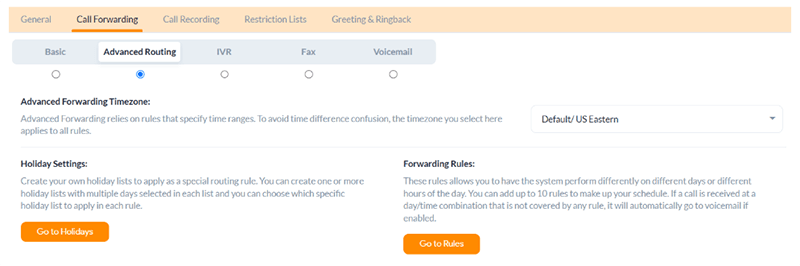
5. Navigate to Forwarding Rules and select Go to Rules.
6. A Rule List page will appear on your screen; tap Create New Rule next.
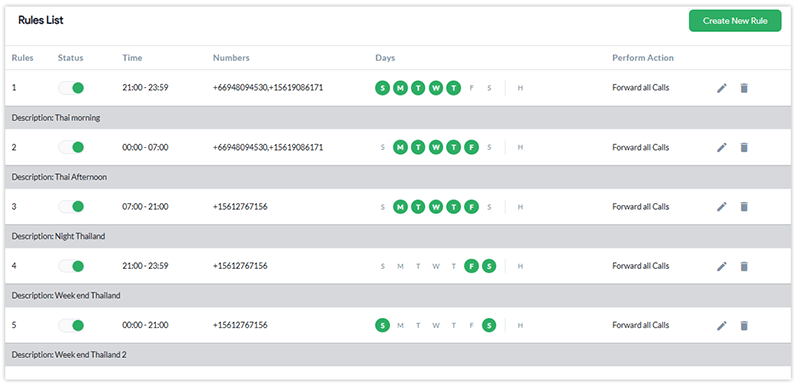
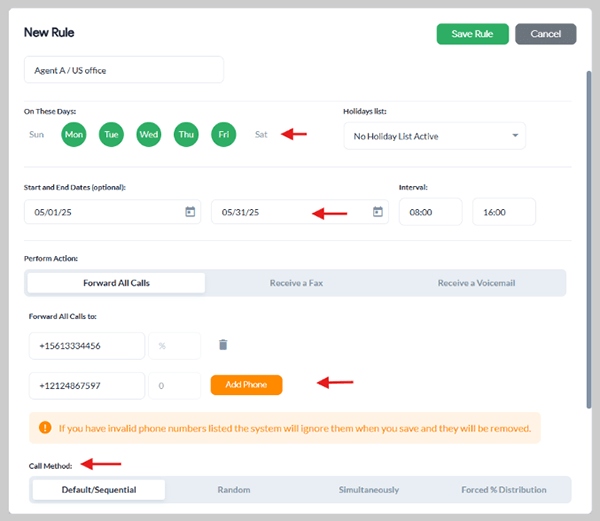
7. Let’s customize all your time-based routing settings now:

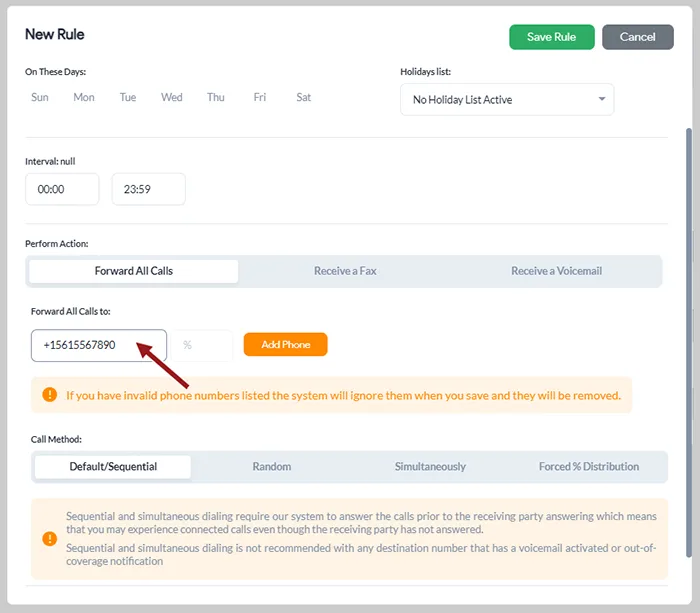
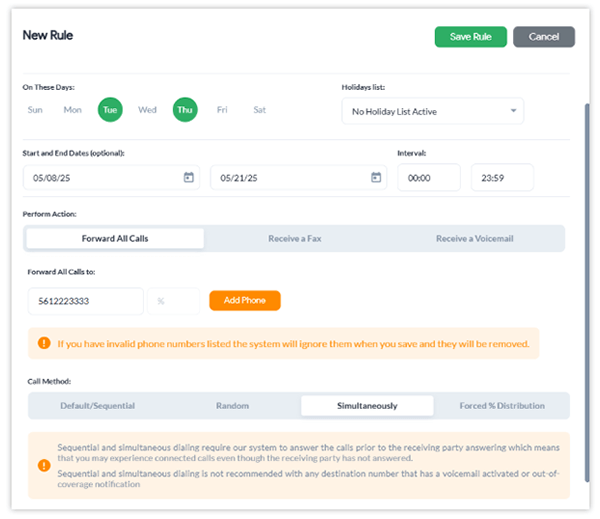
a) First, enter the description, then specify the days (under On These Days) you want the calls to be forwarded.
b) Then adjust your Start and End Date (for range) and Interval (for time frame).
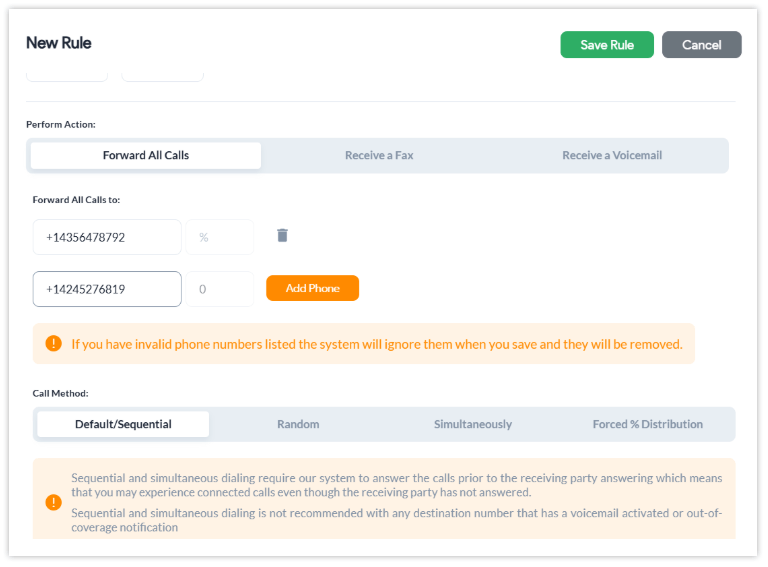
c) Customize Perform Action — you can set all calls to forward to your desired phone lines, fax, or voicemail.
d) If forwarding calls to different phone numbers or lines, list your desired phone numbers or SIP addresses under Forward All Calls to.
Side note: You can also set weighted distribution, if desired.
e) Then, adjust the Call Method settings to suit your preferences. Choose from different ringing methods—such as:
- Sequential, where calls are sent to numbers one after the other
- Random, where a number from the list is selected at random to receive the call
- Simultaneous, where all numbers ring at the same time until someone answers.
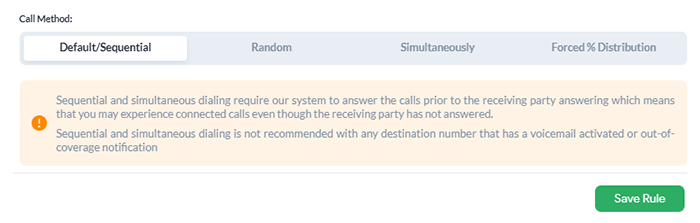
10. Click Save Rule and test your new routing rule.
Note: Suppose a call is received at a day or time combination that is not covered by any rule. In that case, the call will automatically go to voicemail if voicemail is enabled, or rejected otherwise.
Caller ID Routing (Location-Based Routing / Geo-Routing)
Caller ID Routing is a call management technique that directs incoming phone calls based on the caller’s geographical location by targeting caller IDs. When a customer calls, the system automatically identifies their location and routes the call to the most appropriate office, team, or agent, as decided by you.
For example, you can route incoming calls from a specific country, such as India, to your support center in the APAC region.
You can set up Caller ID through the IVR — follow these steps:
How to Set Up Caller ID Routing
1. Sign in to your control panel.
2. Under Services, click on My Phone Numbers, located in the page’s left-hand menu.
3. Go to the Settings icon next to the line you want to edit.
4. Underneath Call Forwarding, hover over IVR (⚪). To switch to IVR from Basic Forwarding, click the icon so it is selected (🔵), indicating that your call forwarding is set to IVR.
5. Click Manage IVR Applications to customize and configure your IVR settings.
6. Next, click on the Phones tab. Here, you can set up a list or ring group with multiple destination SIP addresses or phone numbers. Choose the Ring Mode and set up Weighted Distribution (if desired) for this group, and click Save Changes.
7. Click on Create New Application on the IVR Manager page and choose Caller ID Routing.
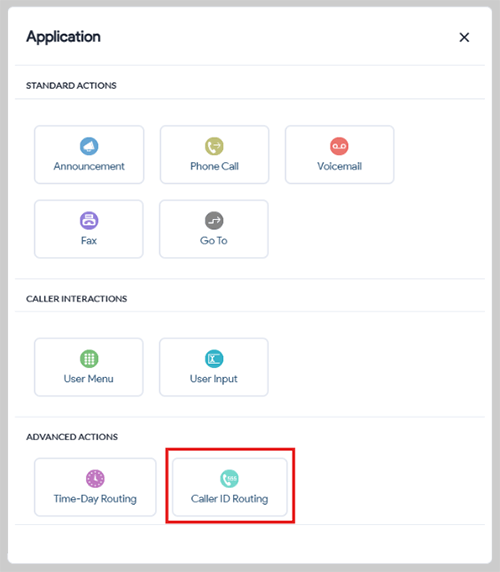
8. Name your new application and click on the edit button to customize the routing rule.
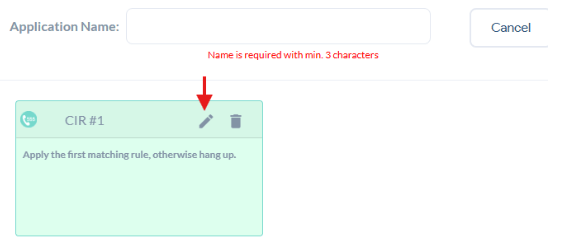
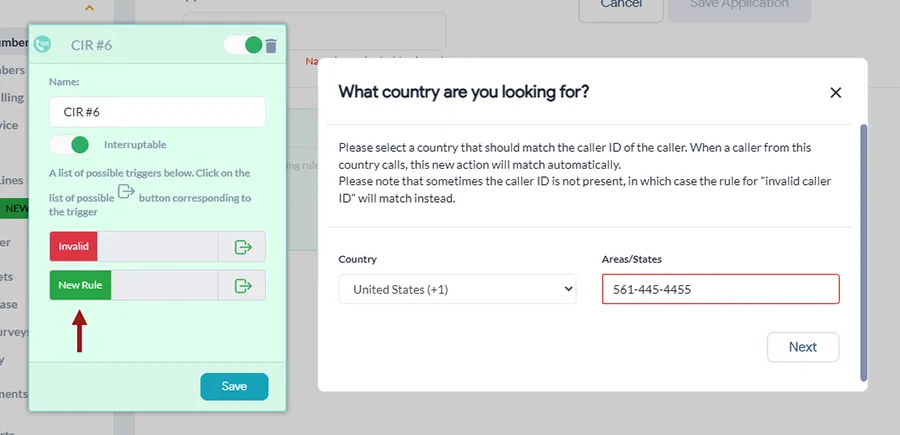
9. Now, give this rule a name. Here, you will configure Invalid and New Rule triggers for this caller ID routing rule.

10. First, start with the Invalid rule. Click it to open up the list of actions. Here is where you decide what happens if someone outside your desired location, regions, and caller IDs calls.
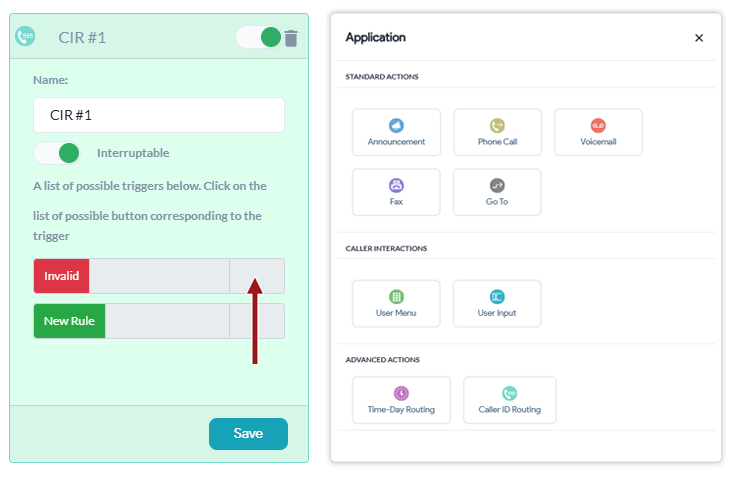
You can choose to send them to Voicemail, or play an Announcement, or use the Phone Call trigger to route them elsewhere like remote agents or a call center.
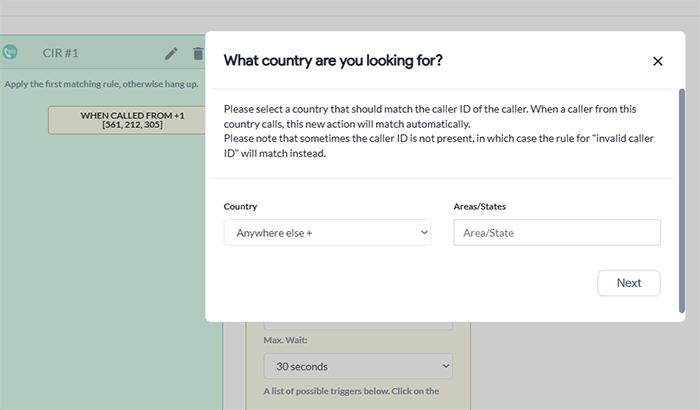
11. Next, set up a New Rule for your target locations and caller IDs. When you click on New Rule, you will be able to choose the country you want to include in this rule.
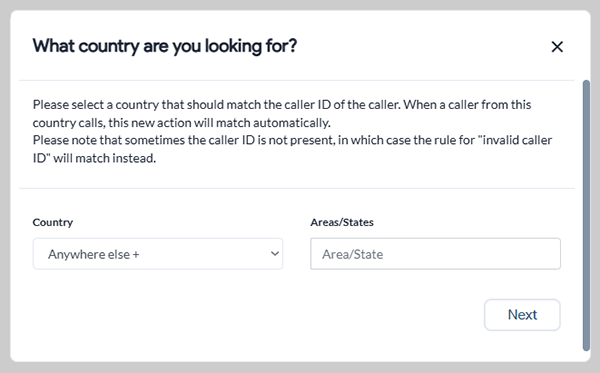
12. Then, click Next to choose what happens to callers calling from your selected country. Pick your action from the list of actions.
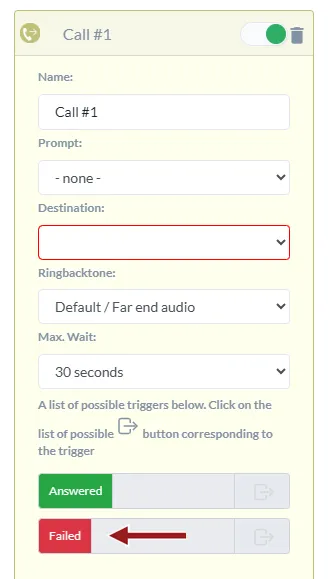
13. Now customize your routing rule:
- Select a prompt (if needed) from the pre-recorded and uploaded options. You can add prompts in the right-side menu.
- Choose a Destination — either a ring group or a phone number — where you want to forward the call. You can set up this ring group through the right-hand menu under Phones.
- Select a Ringback tone — either the default or one specific to the country where the calls will be routed.
- Determine the Wait time before a call is considered failed or moved to a backup trigger.
Here’s an example: Set Country to Paraguay +595 and use the Phone Call action to send incoming calls to your Emergency sales team.
14. Click Save at the bottom of the new card to save your changes.
15. You can also set another rule to the same IVR which will be applied when callers call from Anywhere else + to cover all your bases, or to support callers from another location.
16. You can also send calls to Voicemail, Fax, Announcement, or User Menu for further customization.
17. When done configuring your Caller ID-Based IVR, click Save Application on the top by the Application Name.
Simultaneous Ringing
Simultaneous ringing is a call routing feature that allows an incoming call to ring on multiple phone numbers simultaneously. As soon as any one of the designated phones answers, the ringing stops on all other devices. This ensures that the call is answered promptly by the next available person.
Businesses can improve their response times by enabling calls to ring on various devices or teams, such as office phones, smartphones, and those of remote workers. The caller remains unaware of the routing process; they simply dial the business number, and the call is directed to the first available representative.
Simultaneous ring maximizes the chances of a call being answered promptly, leading to better customer satisfaction and more efficient communication.
Note: Sequential and simultaneous dialing is not recommended for any destination number that has an active voicemail or out-of-coverage notification. If one of the destination numbers triggers a voicemail or an out-of-coverage prompt, the entire call is immediately terminated at that destination.
How to Set up Simultaneous Ring
1. Log in to your control panel.
2. On the dashboard, go to the left-hand menu and under Services, select My Phone Numbers.
3. Locate the line you want to modify and click its Settings icon (⚙️) at the right corner.
4. Underneath Call Forwarding, hover over Advanced Routing (⚪). To switch to Advanced Routing from Basic Forwarding, click the icon so it is selected (🔵), indicating that your call forwarding is set to Advanced Routing.

5. Select Go to Rules within the Forwarding Rules section.
6. Once the Rule List page appears, tap Create New Rule.
7. Set up your simultaneous routing rule with the desired numbers and destinations.
- Begin by entering a Description. Next, under On These Days, indicate the specific days you want to activate Simultaneous Ringing.
- Next, specify your desired Start and End Date and Interval.
- Set your Call Method to Simultaneously, which connects to all listed numbers concurrently.
By default, you can ring up to ten phones simultaneously. However, this number can be increased as you wish. Please contact your account manager to request an increase in simultaneous ring capacity.
8. Click Save Rule, and you are done setting up Simultaneous Ringing.
Sequential Forwarding
With Sequential Forwarding, incoming calls are directed to a series of preset phone numbers in a specific order until the call is answered, ensuring that no vital call goes unanswered.
Here’s how it works:
The call first rings on your primary number for a duration that you define. If there is no answer, the sequence automatically forwards to the following number. This process continues—up to four phone numbers—until someone picks up. If none of the numbers respond, you can choose to send the call to voicemail.
Sequential forwarding is ideal for businesses that want to maintain constant availability without missing calls. It helps distribute calls across team members or locations and is especially useful for remote teams, after-hours support, and businesses operating across time zones.
Note: Sequential and simultaneous dialing is not recommended for any destination number that has an active voicemail or out-of-coverage notification. If one of the destination numbers triggers a voicemail or an out-of-coverage prompt, the entire call is immediately terminated at that destination.
How to Set Up Sequential Forwarding
1. Log in to your control panel.
2. Then, under Services, select My Phone Numbers from the menu on the left side.
3. Click the Settings icon next to the service line you wish to modify.
4. In the Call Forwarding section, toggle the Advanced Routing switch to enable it. Once activated, the icon will turn blue (🔵), indicating that advanced routing is now active.
5. Select Go to Rules under the Forwarding Rules section.
6. Click Create New Rule and set up your preferences:
Here, you can enter all the parameters you want to include in your sequential forwarding rule. Enter a Description, select the days of the week (under On These Days), set the Start and End Dates, and specify the phone number to forward calls to under Perform Action.
7. Set your Call Method to Sequential, where numbers are dialed in a one-by-one order.
Add additional numbers that will ring sequentially if the previous number does not answer.

8. Click Save Rule.
Weighted Call Distribution/Percentage-Based Call Distribution
Percentage-Based Call Distribution—also known as Weight Call Distribution—is an advanced call routing technique that uses randomization and percentages to distribute calls across different destinations. This feature enables you to route X% of calls to one destination and the rest to another to manage incoming calls more efficiently.
It works through a Randomized Weighted Distribution. Each inbound call is evaluated independently using randomization weighted by these percentages.
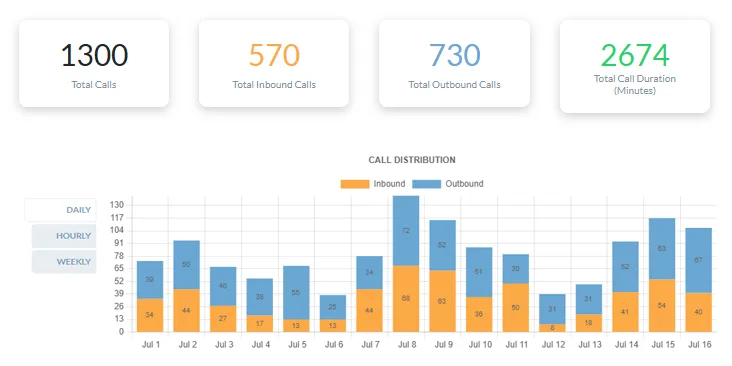
Let’s look at an example: 17 incoming calls, 20% of which go to A and 80% to B.
It’s not guaranteed that exactly 3 go to A and 14 to B. By randomization, you might see 2 vs 15, or 5 vs 12. However, over many calls, the average will trend toward 20%-80%.
How to Set Up Percentage-Based Call Distribution
Setting up percentage-based routing is simple with Global Call Forwarding. Once you have activated your service:
1. Log in to the control panel.
2. Under Services, click on My Phone Numbers, located in the page’s left-hand menu.
3. Hover over your desired phone line and click the Settings icon.
4. Underneath Call Forwarding, hover over Advanced Routing (⚪). To switch to Advanced Routing from Basic Forwarding, click the icon so it is selected (🔵), indicating that your call forwarding is set to Advanced Routing.

5. Now, under Forwarding Rules, click on Go to Rules and click on Create New Rule.
Here, you can:
- Add description
- Configure days and times for this routing rule
6. Then, select Forward All Calls and under ‘Forward All Calls to’ list your desired phone numbers and percentages for weighted distribution.
Note: Percentages must add up to 100% and cannot exceed 100%, and you must use whole numbers: 50% rather than 50.33%.
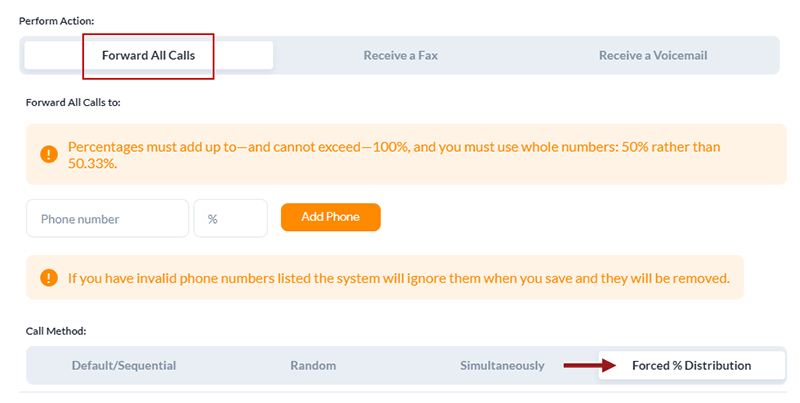
7. Choose your call routing method: Forced % Distribution, and click Save Rule.
Business Hours & After Hours Routing
Business hours and after-hours routing use time-based routing technology to define specific time zone-based schedules for each of your phone numbers. You can configure business hours (e.g., Monday to Friday, 9 AM to 5 PM) and set IVR rules to manage how incoming calls are handled both during and outside these hours.
How to Set up Business Hours Routing
To configure business hours and after-hours routing, follow these steps in your control panel:
1. Log in to your control panel.
2. Select My Phone Numbers from the menu on the left side of the dashboard.
3. Click the Settings icon next to the phone number you want to update.
4. Underneath Call Forwarding, hover over Advanced Routing (⚪). To switch to Advanced Routing from Basic Forwarding, click the icon so it is selected (🔵), indicating that your call forwarding is set to Advanced Routing.
5. In the Forwarding Rules section, select Go to Rules.
6. When the Rule List page opens, click Create New Rule to get started.
7. Enter a Description, choose the days of the week under On These Days, and set the Start and End Dates along with the desired time Interval.
If your business operates from 9:00 a.m. to 5:00 p.m., you can set up different routing rules for calls that arrive after 5:00 p.m.
8. Choose how to handle after-hours calls:
- Forward all Calls to a different number or location
- Send calls directly to Voicemail
To send calls to a different number or location: Add phone numbers under Forward all Calls for individuals or teams available to take after-hours calls.
Then, select the Call Method:
- Sequential – rings numbers one after the other
- Random – rings a randomly selected number
- Simultaneous – rings all numbers at the same time.
9. Click Save Rule, and changes will take effect based on the chosen time zone.
VIP Routing
VIP call routing lets your business prioritize critical incoming calls, ensuring that high-value clients and top accounts receive immediate assistance.
With Global Call Forwarding, you can set up VIP caller routing in the following ways:
- Dedicated phone numbers (Recommended) — Get a dedicated phone number to give out to VIP clients. Set up an X-digit extension for VIP callers to press or get a phone number and only “whitelisting” VIP callers. Then, decide where you want these calls to be routed via Advanced Routing or IVR. You can work with our tech support team to get dedicated phone numbers and set this up.
- Caller ID Routing — Route calls based on the caller ID (as shown above). However, to set up caller ID routing for one specific phone number, you’ll need to work with our tech support team.
Click for step-by-step instructions on setting up VIP caller routing.
Holiday Routing
Holiday routing is a call management feature that lets you redirect all inbound calls during specific holidays or designated periods.
You can forward these calls to alternate destinations, such as:
- Your personal phone number
- Remote team members
- Outsourced support services
- Voicemail, and more.
This ensures your customers and prospects continue to receive support, even when your leading teams are unavailable.
How to Set Up Holiday Routing
1. Sign in to your control panel.
2. Under Services, click on My Phone Numbers, located in the page’s left-hand menu.
3. Go to the Settings icon next to the line you want to edit.
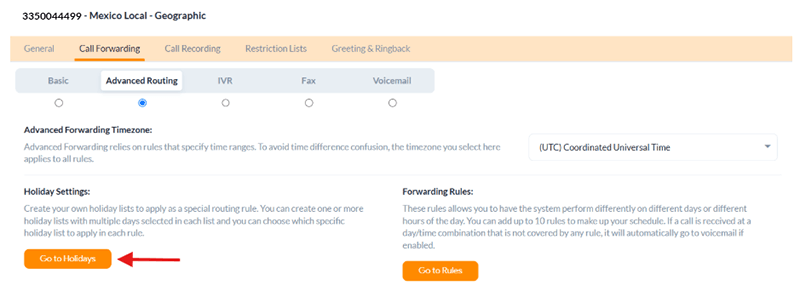
4. Underneath Call Forwarding, hover over Advanced Routing (⚪). To switch to Advanced Routing from Basic Forwarding, click the icon so it is selected (🔵), indicating that your call forwarding is set to Advanced Routing.
5. Navigate to Holiday Settings and select Go to Holidays.
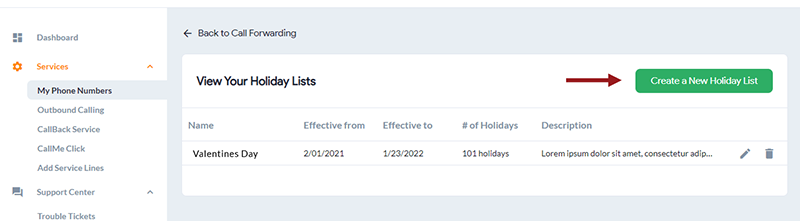
6. Click the green box in the right corner to Create a New Holiday List.
7. Now start adding the Name of Your Holiday List and the Description. You can set up multiple lists for different holidays.
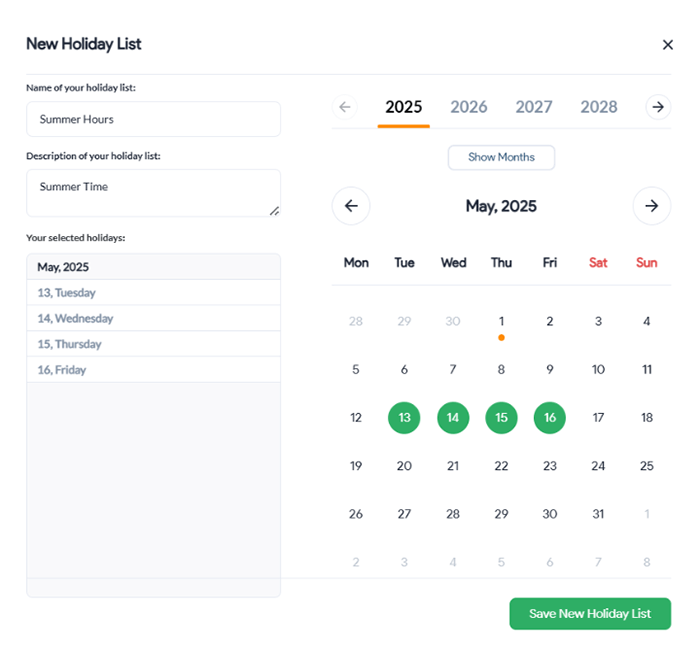
8. Then, click Save New Holiday List.
9. Now, go back to Advanced Routing and click Go to Rules.
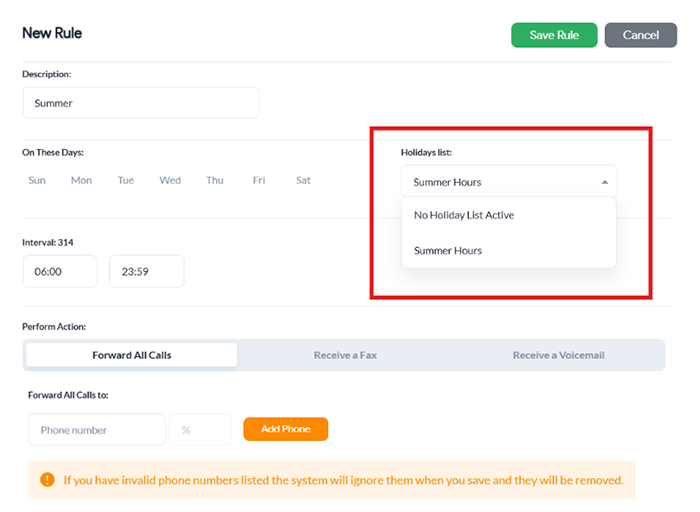
10. Click Create New Rule.
11. Add a Description and select the desired Holiday List from the dropdown box on the right-hand side, along with the desired time Interval.
12. Then, add the necessary routing rules for this particular holiday list:
To route to a different location or phone number, add phone numbers under Forward all Calls and select the Call Method. Otherwise, you can send calls during this time to Voicemail.
13. Click Save Rule and view the changes.
Related: Find Me Follow Me Routing