Outbound calling is an efficient strategic communication solution from United World Telecom that empowers organizations to initiate high-quality local and international calls to customers, while appearing as local in target markets. This is important for generating new leads, nurturing client relationships, conducting market research, and delivering personalized support.
This guide is designed to help you set up, manage, and troubleshoot outbound calling on your telephony system. Whether you’re looking to make calls from a VoIP line, integrate with CRM software, or use our Softphone apps, this guide provides step-by-step instructions and useful tips to ensure smooth operation.
How Outbound Calling Works with UWT?
Outbound calling lets your business place outgoing calls—local, long-distance, or international—using virtual phone numbers that display as the caller ID. With United World Telecom’s solution, you can route calls through local networks in over 160 countries.
This high-quality, feature-rich telephony solution enables companies to expand their global reach while maintaining a local presence in target markets, significantly boosting connection and pickup rates.
Our Outbound Calling service is a turnkey solution to help businesses appear local by displaying a customized Caller ID with your virtual phone number.
In this Outbound Calling & Softphone guide, we’ll go over:
- How to Get Outbound Calling
- How to Get Local 2-Way Voice Numbers
- How Does Outbound Calling Pricing Work?
- Checking Monthly Usage
- Outbound Calling Rates by Destination
- Viewing Remaining Balance for Outbound Calling Credits
- What Are My Outbound Calling Credentials?
- Setting Up Outbound Caller ID
- How to Install the GCF Softphone Apps?
- How to Use the GCF Softphone Apps? (Make & Receive Calls, Access Recordings & Transcripts, and more)
- How To Use the Softphone with the GCF Chrome Extension
- How to Integrate & Make Calls with CRMs and Help Desk Software
How to Add Outbound Calling?
You can add outbound calling in a few ways:
- Purchase the service directly from our website.
- Add it to your existing account via the control panel.
- Speak with our sales or account management team for assistance.
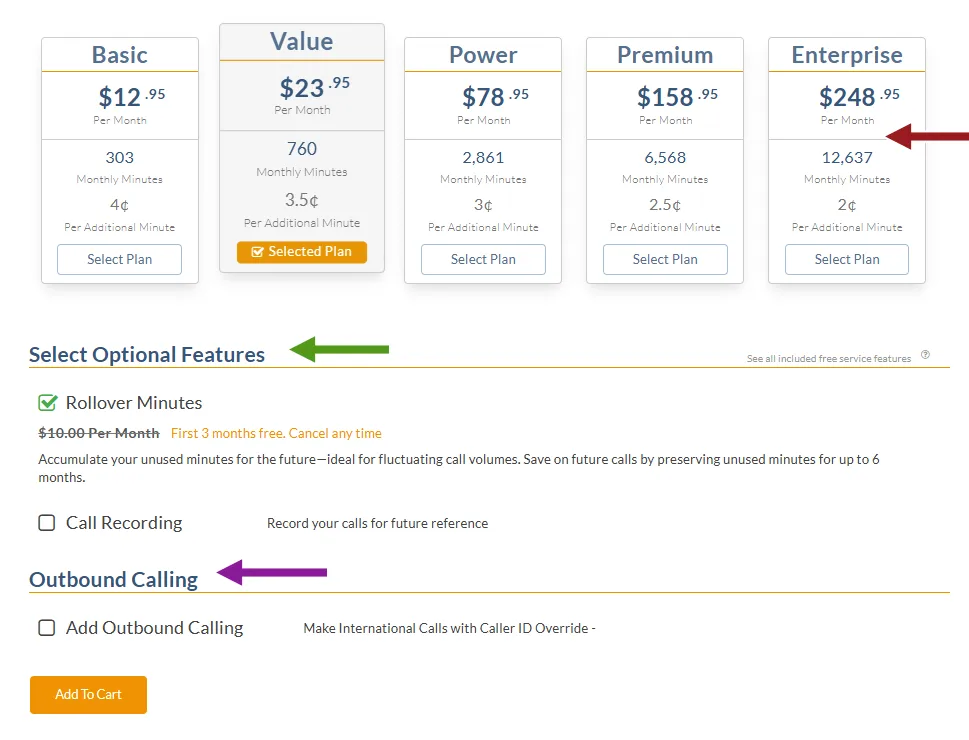
To Purchase Outbound Calling Directly from our Website:
1. Visit our Outbound Calling pricing page.

2. View rates and select an Outbound Calling plan.
3. Add Call Recording, if desired.
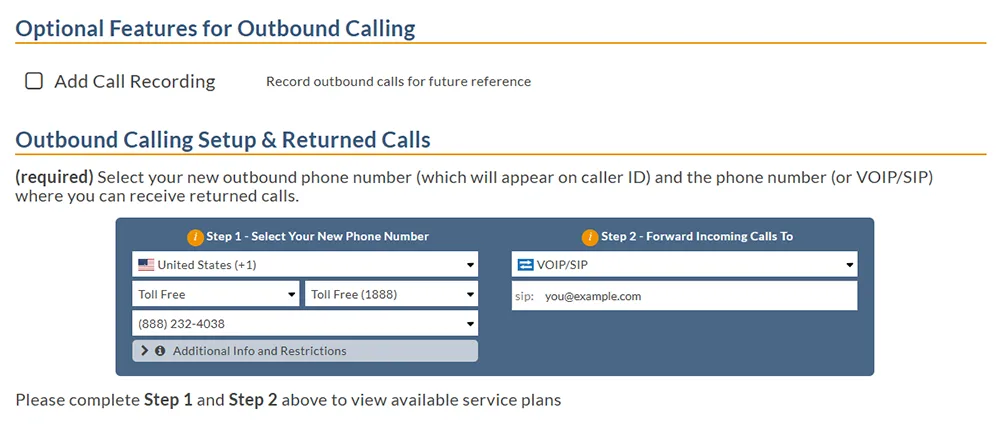
4. Then, fill in information about your new phone number and where you want calls to be forwarded.
5. Under “Outbound Calling Setup & Returned Calls,” select an Inbound Voice plan.
6. Fill in the necessary information, Add to Cart, and then Submit.
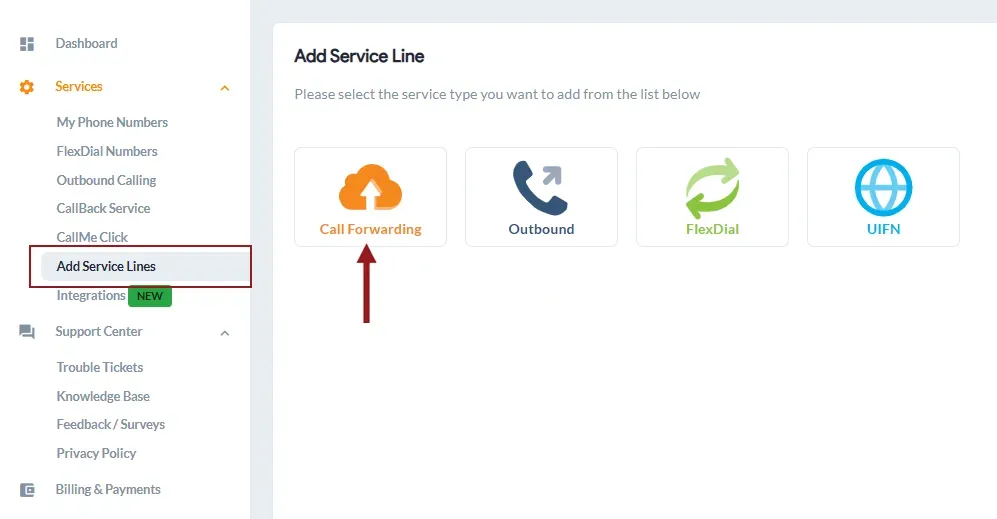
To Add Outbound Calling from the Control Panel:
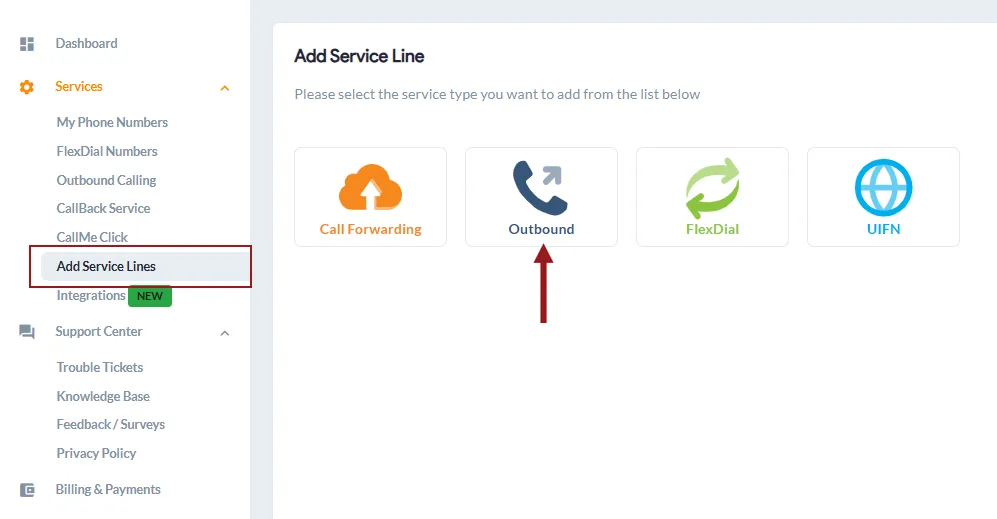
1. Log in to your control panel.
2. On the left-hand panel, under Services, click on Add Service Lines.
3. Select Outbound to proceed.
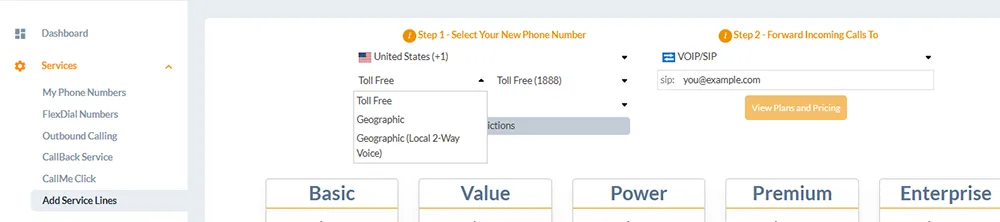
4. First, select the country and the specific phone number you wish to purchase.
5. Then, choose to Activate call recording for this outbound calling line, if desired.
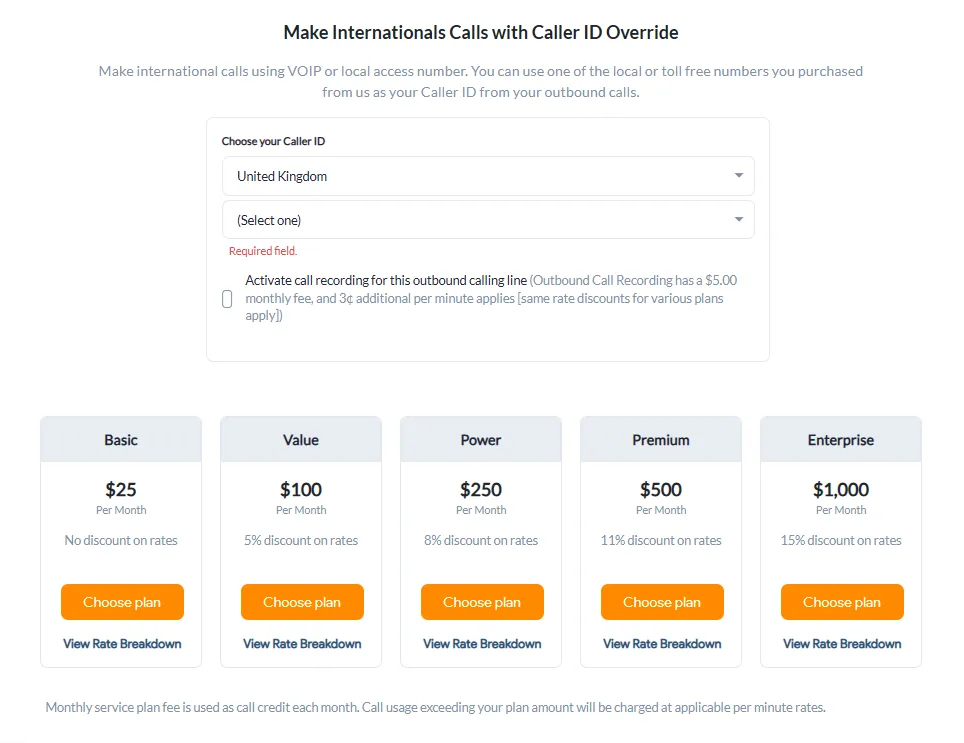
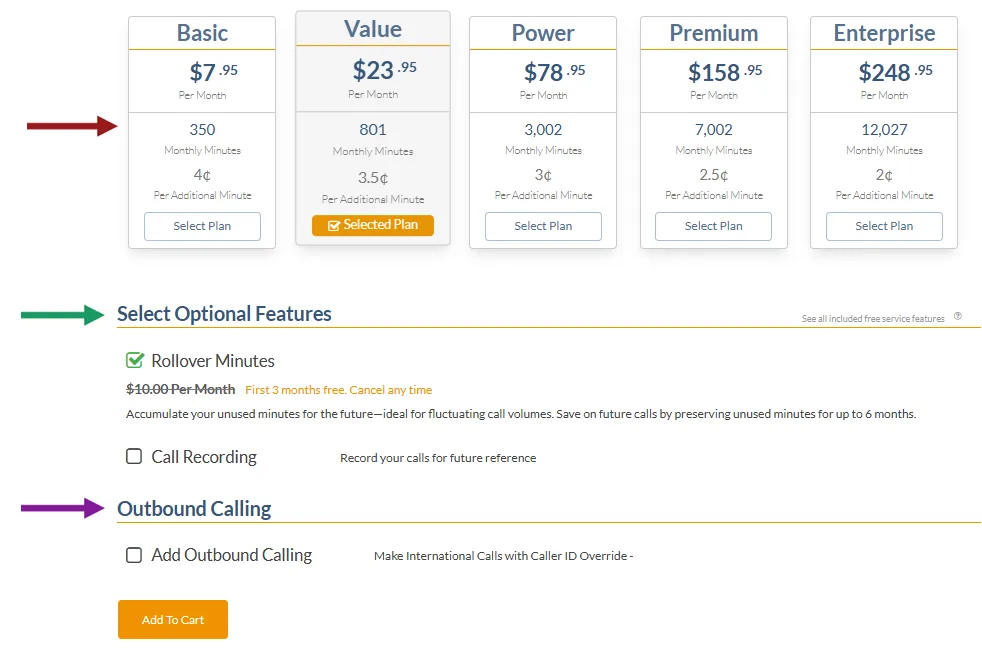
6. Proceed to review plans and select a suitable plan for this number.
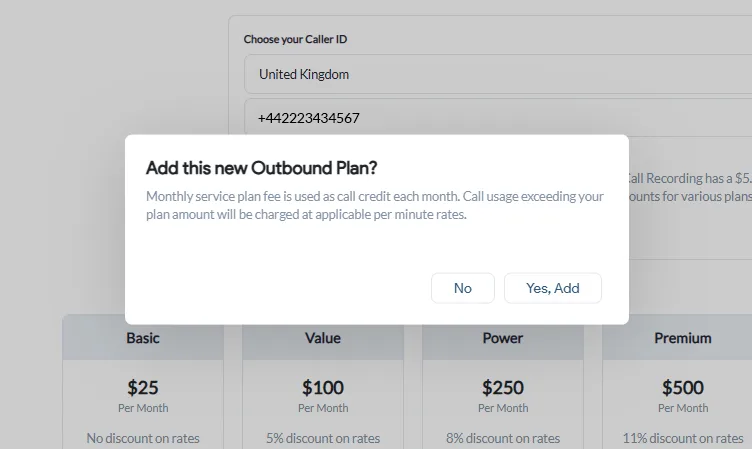
7. A dialog box will appear, prompting you to Add this new Outbound Plan?
8. Click Yes, Add to complete your order.
Note: During the signup process, you can turn on a free trial to test the service. You can also add more numbers to your cart before finalizing the purchase.
How to Get Local 2-Way Voice Numbers?
Local 2-Way Voice ensures your outbound calls from international phone numbers are routed through reliable local paths in your target regions. This means your calls connect seamlessly, and local in-country caller IDs are accurately displayed, building trust with your audience.
You can add Local 2-Way Voice numbers in two ways:
- Buy directly from our inventory of Local 2-Way Voice numbers.
- Add them via the control panel for quick setup and activation.
A. Steps to Buy Local 2-Way Voice Numbers from the Website:
1. Visit our Pricing page.
2. Choose your desired country and explore the available number types.
3. Look for options labeled Local 2-Way Voice, such as Geographic (Local 2-Way Voice), Mobile (Local 2-Way Voice), or National (Local 2-Way Voice).

4. Next, fill in where you’d like calls to be forwarded, and proceed with the remaining steps of the signup process.
5. Select your preferred Inbound plan, select Optional Features, and proceed to choose an Outbound Calling plan.
Note: Choosing an Outbound Calling plan is crucial to set up Local 2-Way Voice so you can make and receive calls through the selected number.
6. Then, select Add to Cart, enter payment information, and Submit.
Note: During the signup process, you can turn on a free trial to test the service. You can also add more numbers to your cart before finalizing the purchase.
B. How to Add Local 2-Way Voice Numbers from the Control Panel:
1. Log in to your control panel.
2. From the left sidebar, click on Add Service Lines and choose Call Forwarding.
3. First, choose your desired country.
4. Then, browse the available number types, looking specifically for Local 2-Way Voice: Geographic (Local 2-Way Voice), Mobile (Local 2-Way Voice), or National (Local 2-Way Voice) options.
5. Fill in where you want calls forwarded, and proceed to complete the signup process.
6. Then, choose your Inbound plan, select Optional Features, and choose an Outbound Calling plan.
7. Finally, select Add to Cart and Submit.
Note: During the signup process, you can turn on a free trial to test the service. You can also add more numbers to your cart before finalizing the purchase.
What Are My Outbound Calling Credentials?
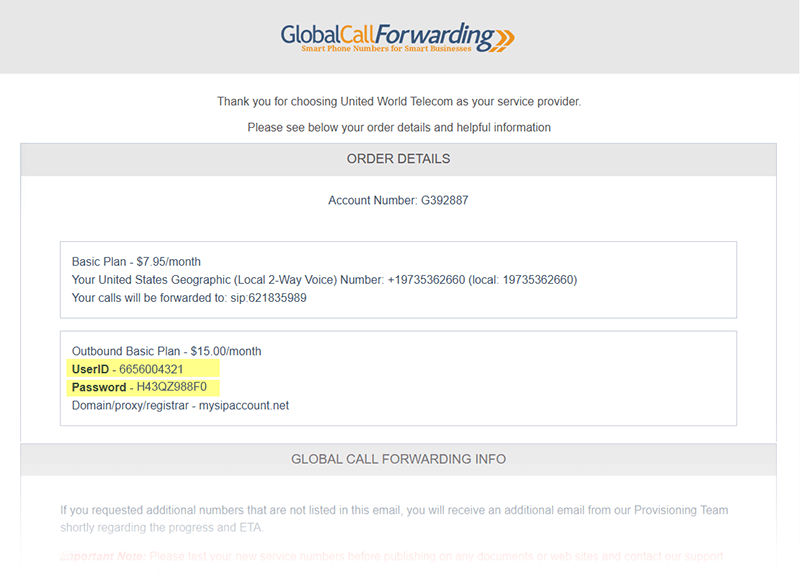
Once you purchase outbound calling services, you’ll automatically receive a User ID and password. These credentials are required to activate and start using your outbound calling plan. So, you’ll get:
- A User ID
- A Line Password
Note: You need at least one Outbound Calling Line (PIN) to place or receive calls in the GCF softphone app. The softphone login credentials are tied directly to these Outbound Calling Line PINs. You must use these credentials (User ID and Line Password) to log into the softphone apps (required for certain connector CRM/help desk integrations).
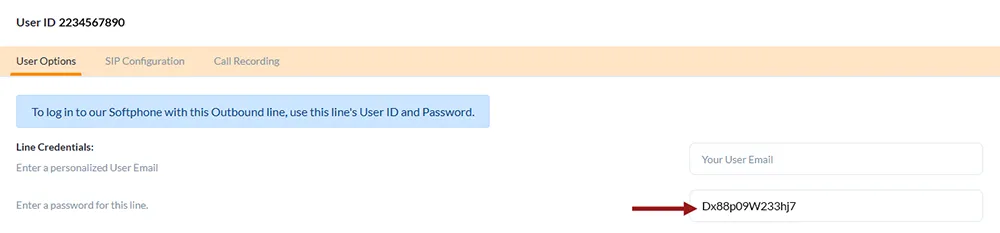
Your credentials will be emailed to you as part of your service confirmation letter. Here’s what it looks like:
However, you can also find your credentials in other ways:
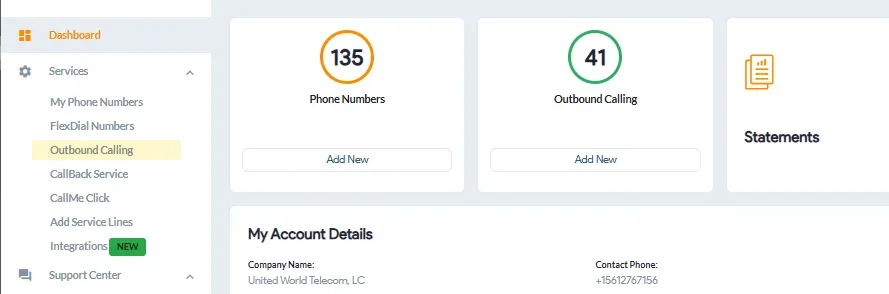
1. Log in to your control panel.
2. On the left side, you can see Outbound Calling, click, and proceed.
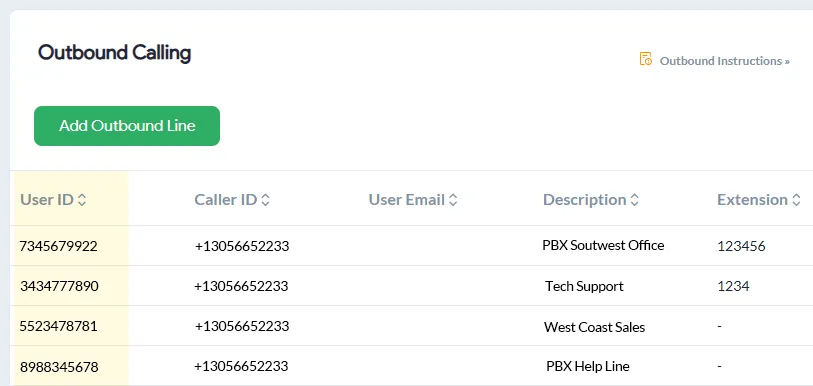
3. You can find the User ID for each outbound line in the corresponding User ID column.
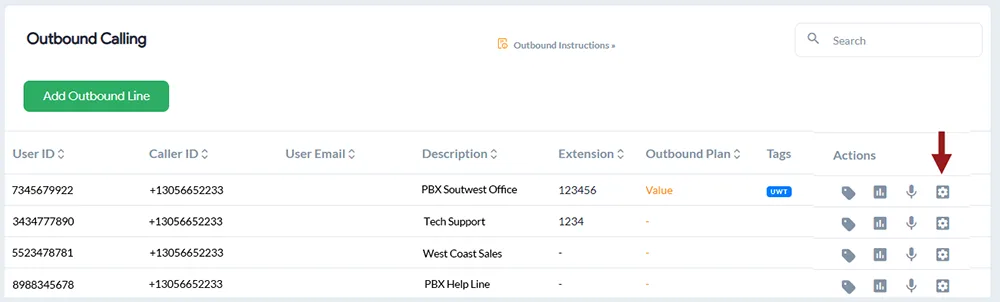
4. Select the User ID you want and click the Settings icon in the right corner.
5. You can view the Line Credentials, including the password for this line. Additionally, you can set a personalized User Email, which can be used as an alternative to the User ID.
4. To change your password, please enter a new password and click Save Changes.

When you change your password, all other users will be automatically logged out of the system.
How Does Outbound Calling Pricing Work?
Outbound calling pricing typically involves a combination of monthly service plans and per-minute usage rates.
United World Telecom offers 5 outbound calling plans (Basic, Value, Power, Premium, Enterprise), where a higher monthly fee provides a larger call credit and a discounted per-minute rate for usage exceeding the plan. Pricing also varies based on the destination of the calls.
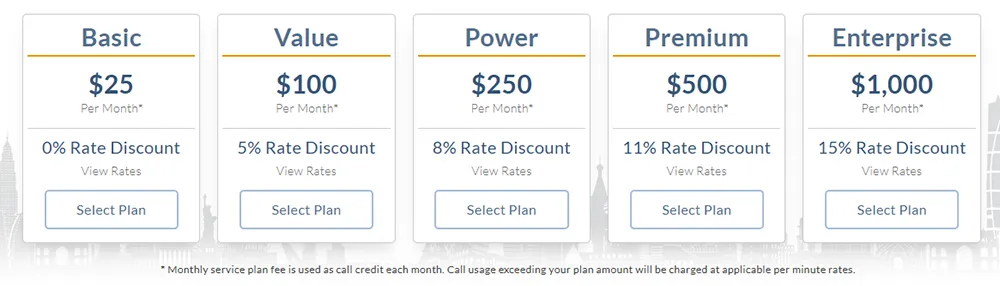
Pricing Breakdown and Plan Tiers
The monthly service plan fee is used as a call credit each month. Call credits work similarly to a calling card, in that there is a credit balance and per-minute rates to call different destinations. Call usage exceeding the plan amount will be charged at applicable per-minute rates.
Example
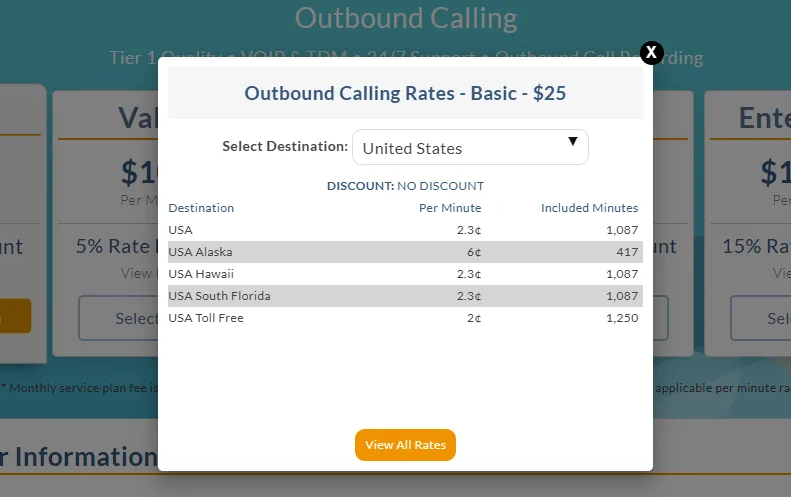
Suppose you subscribe to the Outbound Calling Basic Plan at $25 monthly. This gives you $25 worth of credit to make outbound calls.
Different countries and destinations (e.g., landlines and mobile phones) have different rates.
For example, the per-minute rate to call the US and Canada is $0.023, and the per-minute rate to call mobile phones in the United Kingdom is $0.08.
- You would have 1,086 included minutes if you only call the US & Canada ($25 / $0.023 per minute = 1,086 minutes)
- Similarly, you would have 312 included minutes if you only call mobile phones in the United Kingdom ($25 / $0.08 per minute = 312 minutes).
Your calling credit gets recharged each month until you discontinue the service.
Here are some further examples:
- You start the month with a $25 balance (Outbound Basic Plan).
- You make a 10-minute call to the US. $0.23 is deducted from your balance (10 * $0.023). You now have $24.77 remaining in the month.
- Then, you make a 10-minute call to a mobile phone in the United Kingdom. $0.80 is deducted from your balance, leaving you with $23.97 remaining in the month.
After using all your call credits, you can continue making calls, which will be charged at the per-minute rate.
A. How to Check Monthly Usage Details?
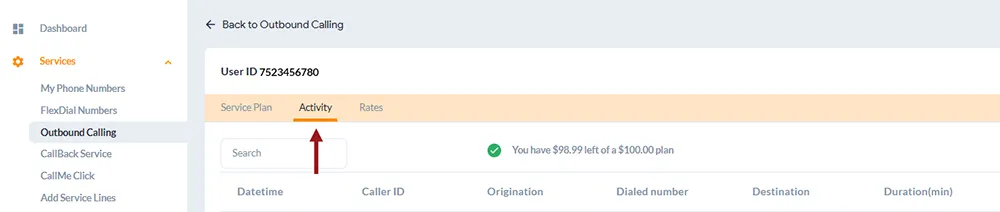
Your monthly usage details are available in your control panel — just log in to access them:
1. Log in to your control panel.
2. From the left sidebar, select Outbound Calling.
3. Under Action, choose Service Plan.

4. Go to Activity
Note:
If you sign up in the middle of the month, you will be billed a prorated amount and have a prorated calling credit.
The service is billed in 60/60 increments. If your outbound call is connected for 5 seconds, 10 seconds, or 32 seconds, you’re billed for 1 minute. And if the call does not connect, then you will not be billed for the call.
You can also View Rates for different countries on the Pricing page itself. Select View Rates for detailed information:
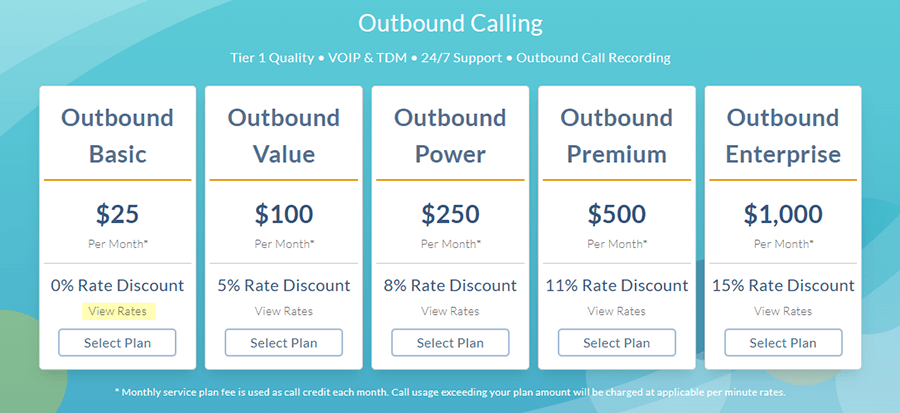
B. How to View Outbound Calling Rates by Destination
Outbound call plans are based on call credits.
Each monthly service plan includes a monthly credit balance, from which per-minute rates for calling various destinations are deducted. Higher plans offer a higher discount on outbound per-minute rates.
To view outbound calling rates for a particular destination or all destinations, you can follow the steps below:
If you do not have an outbound calling plan:
- Log in to your control panel.
- Navigate to the Outbound Calling tab.
- Click on Add Outbound Line.
- Underneath each plan, click on View Rate Breakdown.
If you already have an outbound calling plan:
- Log in to your control panel.
- Navigate to the Outbound Calling tab.
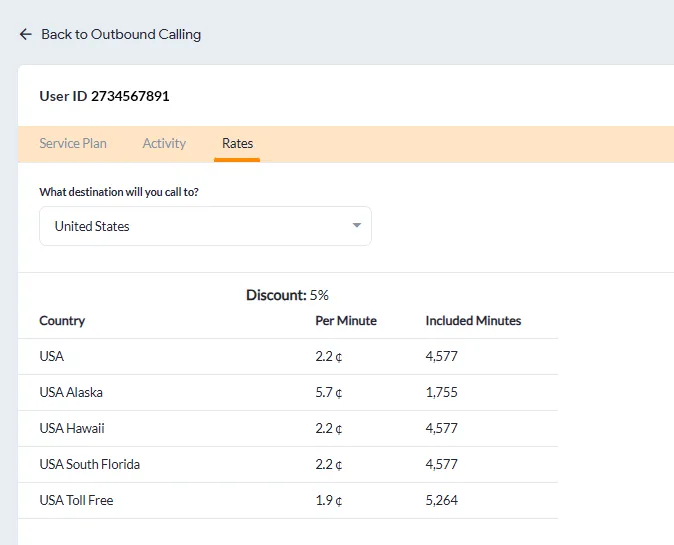
- Hover over an outbound line, and, under Actions, click on the Service Plan icon.
- From the Service Plan page, click on Rates in the gold bar.
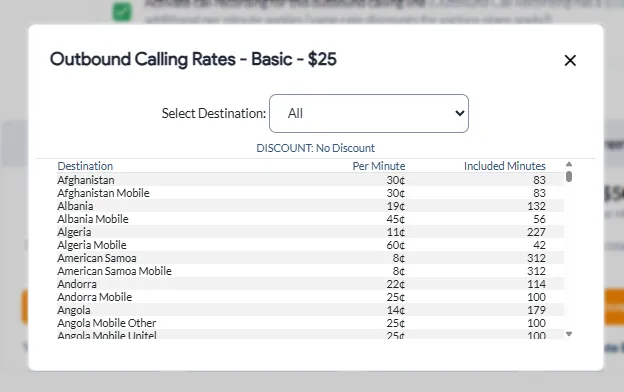
- Select the destination that you will call, or, to view rates for the whole world, select All from the dropdown.
Below you will see an example of outbound per-minute rates, with the Outbound Basic Plan, to all destinations:
C. How to View Remaining Balance for Outbound Calling Credits
Outbound call plans are based on call credits.
The monthly service plan fee is used as a call credit each month. There is a credit balance, and per-minute rates for calling various destinations. Call usage exceeding the plan amount will be charged at applicable per-minute rates.
We offer five outbound calling plans, each with included calling credits and an additional per-minute rate. Plan credits are available on a line-by-line basis.
To view the remaining credit balance on a particular outbound line, you can follow the steps below:
- Log in to your control panel.
- Navigate to the Outbound Calling tab.
- Identify the line you want to view the balance of, and, under Actions, click on the Service Plan icon.
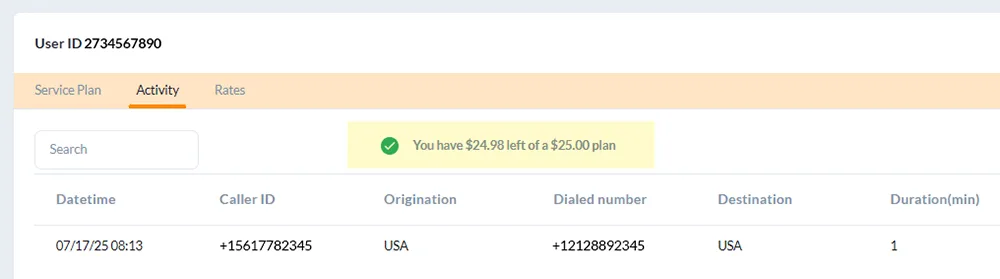
- From the Service Plan page, click on Activity in the gold bar.
- From there, you will see your remaining outbound credits.
- To view rates for a particular destination, navigate to the Rates tab.
Setting Up Outbound Caller ID
To manage your outbound caller ID, you’ll need an Outbound Calling service and phone numbers from Global Call Forwarding. Click here to see how to get Outbound Calling.
You can set up Outbound Caller ID in two ways: via the control panel or the softphone app.
A. Setting up an Outbound Caller ID from the Control Panel
1. Log in to your control panel.
2. Select Outbound Calling from the navigation bar on the left.
3. Hover over the Outbound Calling line you want to update and click the Settings icon.
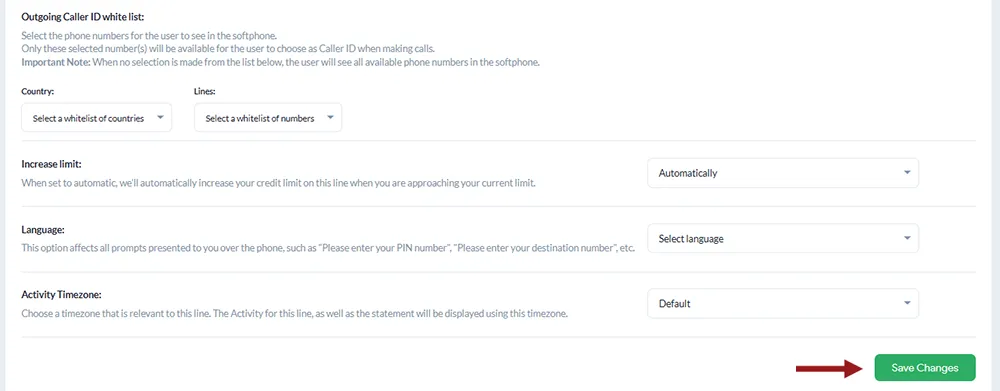
4. Under the User Options tab, scroll down to the Outgoing Caller ID Whitelist section. Here, you can select the country and choose the phone number (line) you want to display as your caller ID when making outbound calls.
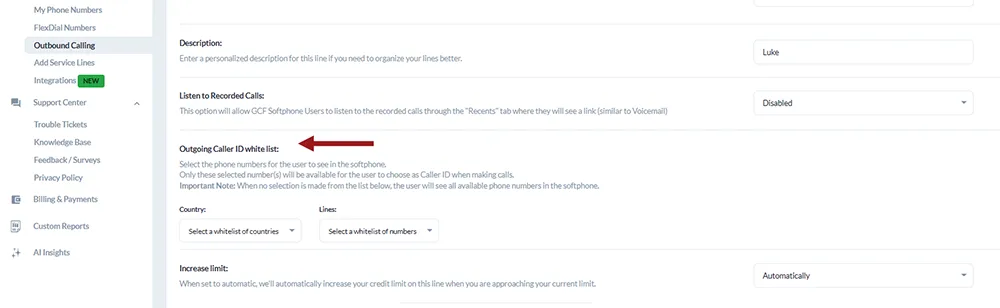
5. Click Save Changes when you are finished with all inputs.
B. Setting up Your Outbound Caller ID from the Softphone
Note: Scroll below for instructions on how to install and use the GCF Softphone apps.
After completing the steps above, you can set your outgoing caller ID in the GCF Softphone to display any number you’ve activated and registered with us.
- Log in to the GCF Softphone app on your device using your Outbound Calling User ID and password.
- To change your caller ID before making a call, click Settings in the bottom-right corner.
3. In the Outgoing Caller ID section, use the dropdown menus to select the desired Country and Line, and click Save.
4. Return to the keypad to begin making outbound calls with your customized caller ID.
How to Install and Use the GCF Softphone?
The GCF Softphone is an integral part of our Outbound Calling service, built to help businesses seamlessly connect with customers both locally and globally.
Our Softphone is a user-friendly, cloud-based application that transforms any internet-connected device into a professional business phone. Our softphone apps (web, desktop, and mobile) let you make and receive outbound calls without extra hardware. Simply install the app, log in with your outbound credentials, and select the desired caller ID line.
Note: You need at least one Outbound Calling Line (PIN) to place or receive calls in the app. The softphone login credentials are tied directly to these Outbound Calling Line PINs. Learn how to order your Outbound Calling service here.
With the GCF softphone, you can:
- Place and receive calls seamlessly
- Display a selected Caller ID on outgoing calls
- Access to voicemails directly within the dialer
- Check recent call activity and call history
- View active softphone users and make assisted call transfers
- Complete integration of contacts (with search and filter)
- Make free in-network calls to other users
- Integrate with CRMs and the Chrome browser
Here are quick links to start installing the Softphone app on your preferred platform:
- GCF Softphone for Windows (required for certain connector CRM/help desk integrations)
- GCF Softphone for Android
- GCF Softphone for iOS Apple
- GCF Softphone for macOS
- GCF Web Dialer (not an app but web-based softphone)
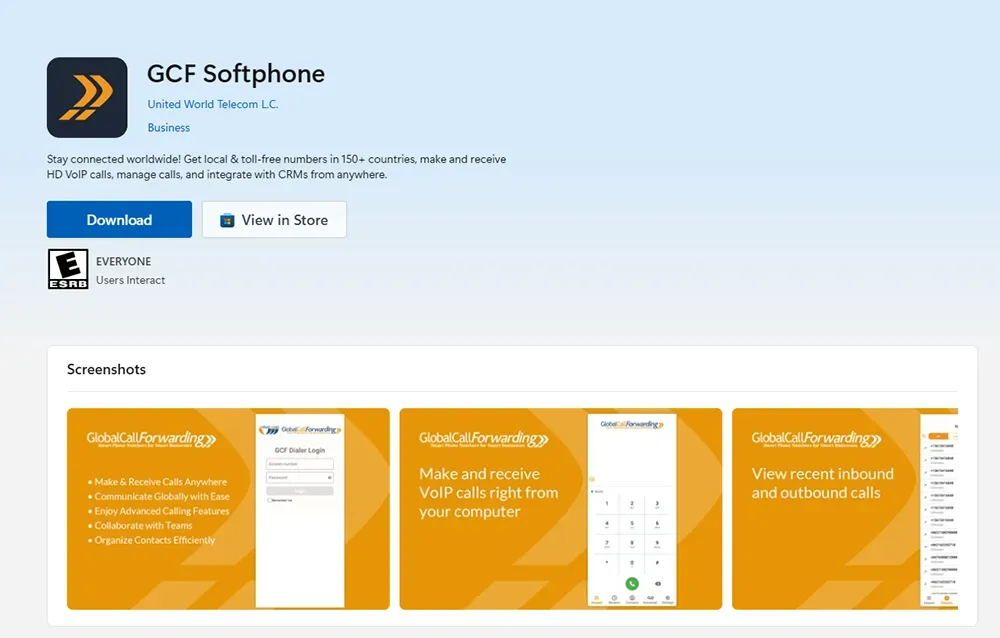
How to Install & Log in to the GCF Softphone for Windows?
The GCF Softphone Windows app is the main application required to make and receive calls through our connector integrations with top CRMs and help desk software.
1. Download the GCF Softphone app directly from the Microsoft Store by clicking here. Alternatively, you can simply search for “GCF Softphone” within the Microsoft Store.
2. Locate the GCF Softphone app (Downloads folder), and double-click it to open the softphone.
![]()
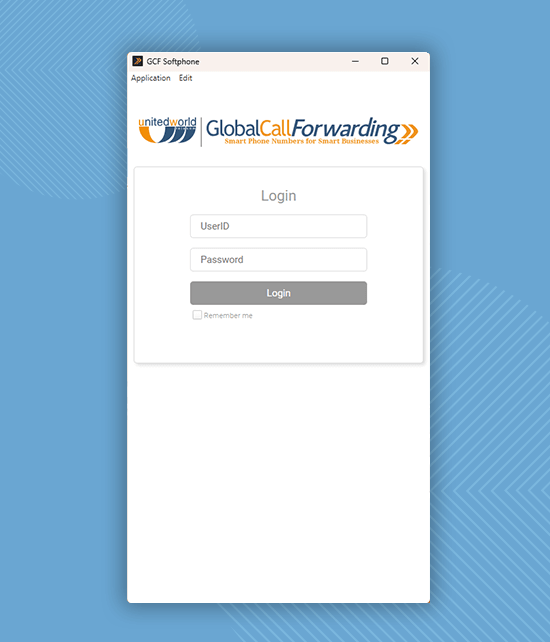
Log in to the GCF Softphone
Note: You’ll need your GCF Outbound credentials to log in; this is different from your GCF control panel login.
To get your Outbound credentials, follow these steps:
1. Log in to the control panel and click Outbound Calling on the left.
2. Each outbound line’s User ID can be found under the User ID column.
3. Select the User ID you wish to configure, then click the Settings icon on the right.
4. You can view the Line Credentials, including the password for this specific line. You can also set a personalized User Email, which serves as an alternative to the User ID.
5. Use this password for the Softphone login. You will need to follow the same steps to log in to other Softphone apps as well.
How to Use the GCF Softphone?
Now, let’s look at the following:
- To Make Calls
- To Receive Calls
- To Display Your Specific Caller ID
- To Access Call Transcriptions
- To Access Voicemail Transcriptions
- To Integrate with CRMs
A. To Make Calls:
1. After downloading the app, log in using your Outbound Calling User ID and Line Password. Once logged in, the dial pad will appear.
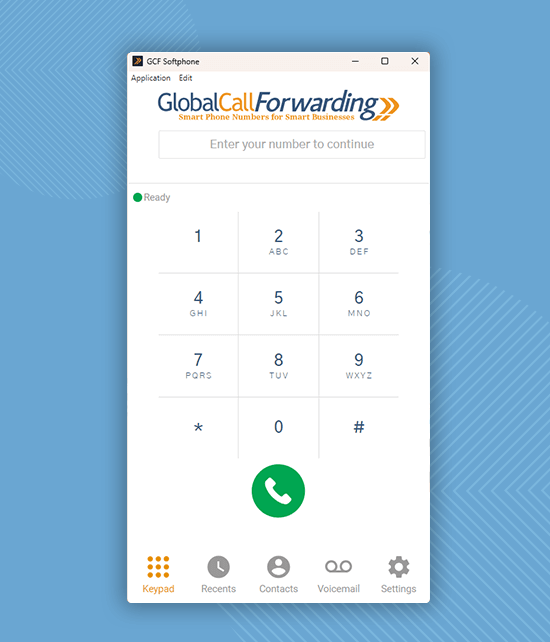
2. Enter the number you’d like to call or choose from an existing contact saved under the Contacts tab.
Note: Always enter the country code before the phone number. For international calls, dial 00 followed by the complete number, including the country code.
3. Finally, click the green call icon to initiate the call.
B. To Receive Calls:
To receive inbound calls on the softphone apps, set ‘Forward all calls to’ the Outbound line UserID you log in to the softphone with.
1. In the control panel, go to My Phone Numbers.
2. Click on your desired inbound phone line or the Settings icon.
3. Then, go to the Call Forwarding tab and the Basic sub-tab.
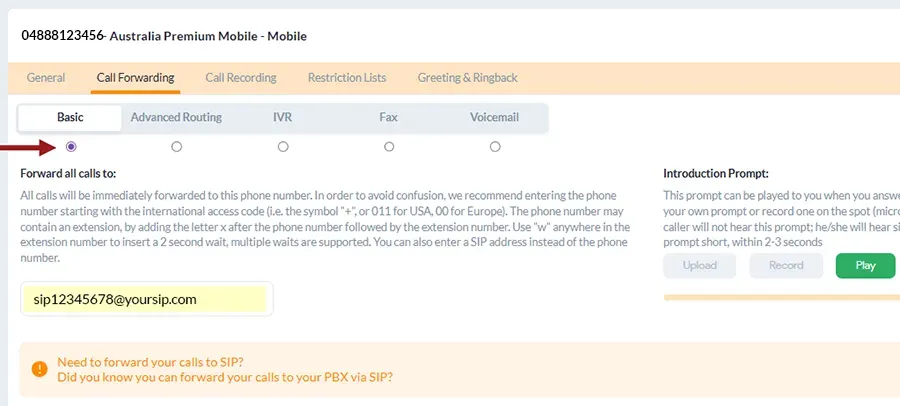
4. Here, under ‘Forward all calls to,’ enter “sip:” followed by your selected Outbound line’s user ID (see step 1). Example: “sip:UserID.”
5. Make sure you select the radio icon under Basic to switch the forwarding rule.
6. Click Save Changes.
To receive incoming calls on multiple destinations (devices, softphone app, integrations, phone lines, SIP addresses, locations), you will need to configure Advanced Routing.
1. In the control panel, go to My Phone Numbers.
2. Click on your desired inbound phone line or the Settings icon.
3. Then, go to the Call Forwarding tab and the Advanced Routing sub-tab.
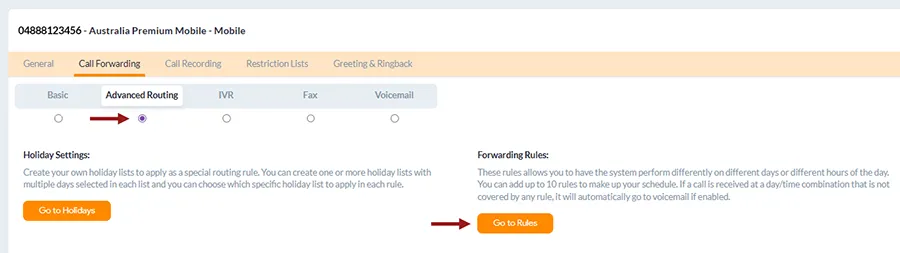
4. Make sure you select the radio icon under Advanced Routing to switch the forwarding rule.

5. Now, click on Go to Rule and Create New Rule.

6. In the ‘Forward all calls to’ section, you can enter different destinations where you want to receive calls.
7. You can include phone numbers, SIP addresses, etc.
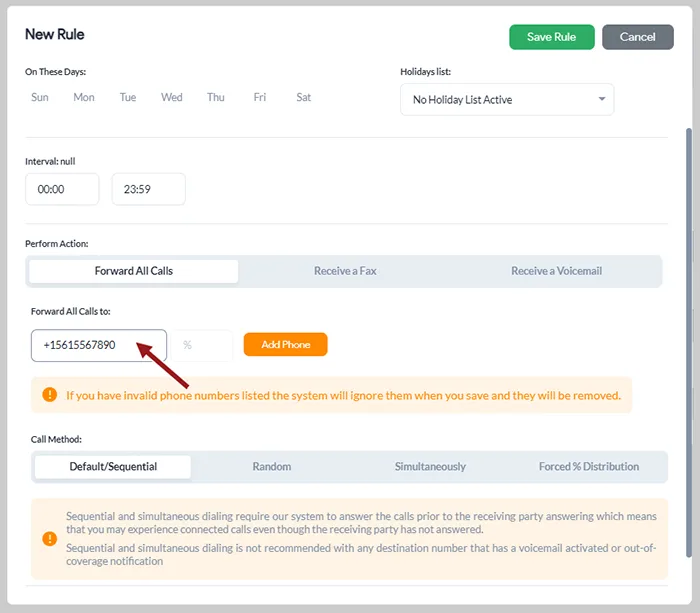
9. You can also customize the routing method: Sequential, Random, Simultaneous, and Forced % Distribution.
10. Click Save Rule to save changes.
C. To Display Your Specific Caller ID:
For first-time users, the Settings window will open by default, prompting you to select your preferred country and available lines.
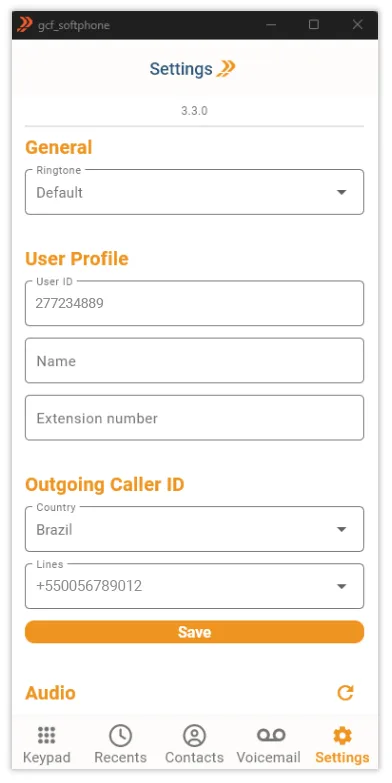
1. To update your Caller ID, click the Settings icon in the bottom-right corner.
2. In the Outgoing Caller ID section, use the dropdown menus to select your desired Country and Line, and click Save.
3. Go back to the dialpad to begin making outbound calls using your customized caller ID.
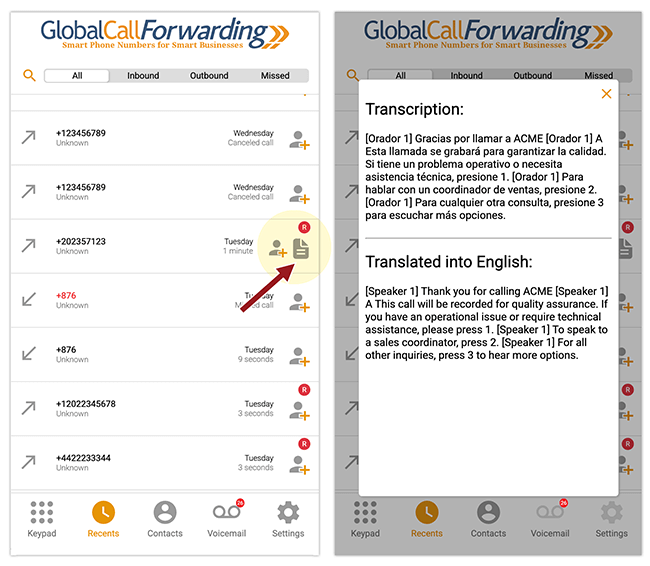
D. To Access Call Recordings and Transcriptions:
Note: This is only available if you have Call Recording or AI Insights activated for this Outbound phone line.
- Navigate to the Recents tab and click the gray page icon. The call transcription will open in a pop-up window.
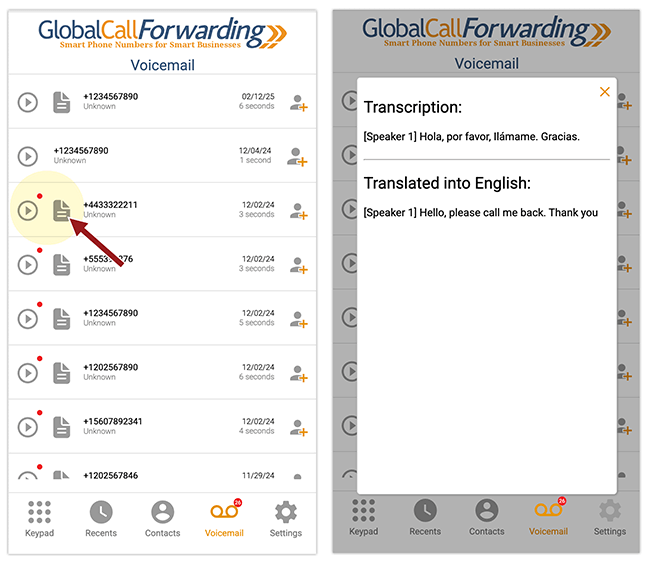
E. To Access Voicemail Transcriptions:
Note: This is only available if you have Voicemail Transcriptions activated for your phone line.
1. Go to the Voicemail tab and click the gray page icon. A pop-up will display the voicemail transcription.
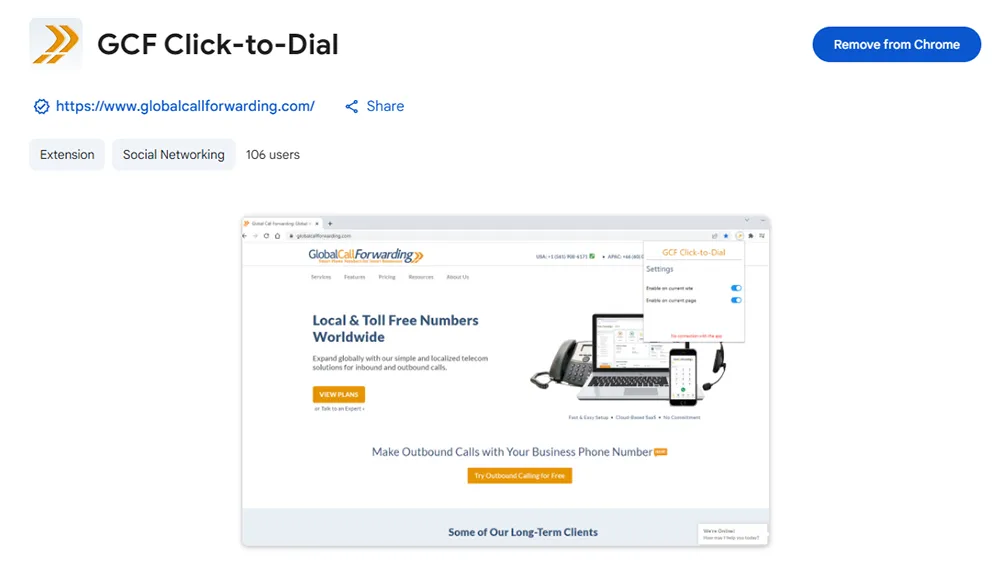
How To Use the Softphone with the GCF Chrome Extension
The GCF Click-to-Dial Chrome extension allows agents and reps to quickly dial phone numbers directly from any webpage. Simply highlight the number, right-click, and select the dial option, or click the extension icon to enter a number manually.
Ensure numbers include the correct country code (with a “+” or prefix) to avoid errors.
Use this extension with the GCF Microsoft Softphone to instantly place calls by clicking the call button next to numbers on Chrome pages.
1. Click here to install the GCF Chrome extension or visit the Chrome Web Store and click the Add to Chrome button to install the GCF Click-to-Dial extension.
2. Download the GCF softphone from the Microsoft Store. Follow the instructions and install. Open and log in to the softphone with your GCF credentials (UserID/PIN and password).
3. Once the extension is activated and the Softphone is opened and ready for use, both will automatically connect.
4. On a browser, select the desired phone number and click the green phone icon. It will automatically put the phone number in the softphone.
5. Click on the Call button on the softphone to initiate the call.
You can turn the Dial immediately setting on or off in the extension settings. This way, when you click the call button, the call is placed through the softphone directly, without asking you to click Call.
How to Integrate with CRMs and Help Desk Software
Seamlessly connect your GCF Softphone with top CRM platforms and enjoy features like automatic data sync, click-to-call, and more. See how to integrate with:
- Zoho CRM
- Zoho Desk
- Salesforce
- HubSpot
- Pipedrive
- Zendesk
- Intercom
You can find individual instructions for each CRM or help desk here. Here’s a rough idea of how to set up these integrations:
1. Log in to your control panel.
2. Go to Integrations from the left menu.
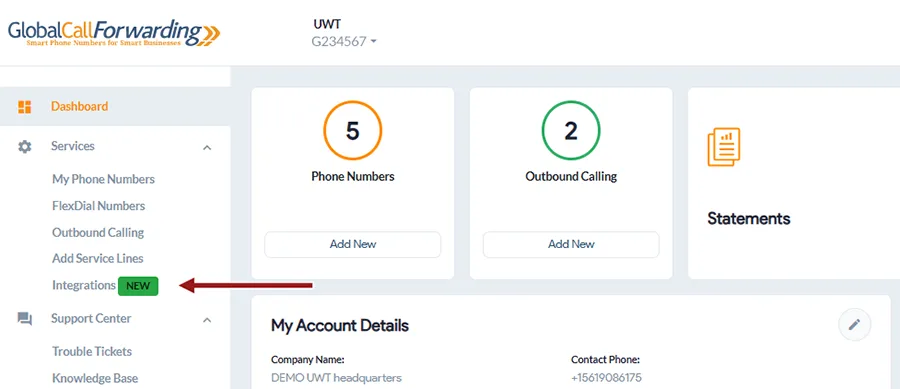
3. Select your preferred CRM (e.g., Zoho, Salesforce, HubSpot).
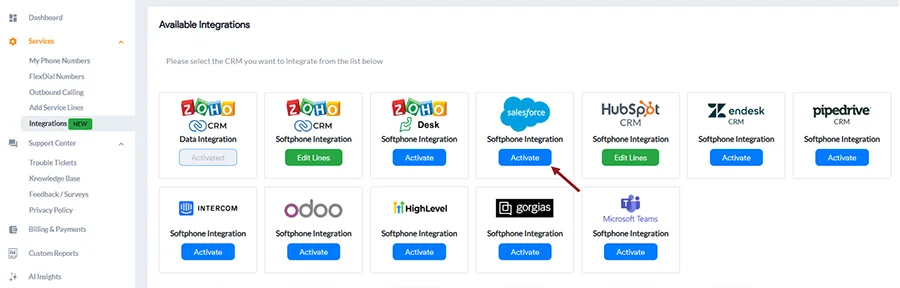
4. Click Activate.
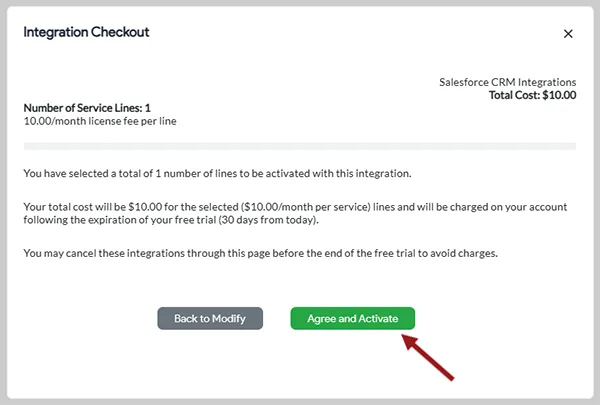
5. You will need to select which inbound and outbound lines to add to this integration. Make a note of your User ID and password – you will need this information to complete the activation on the CRM platform’s end.
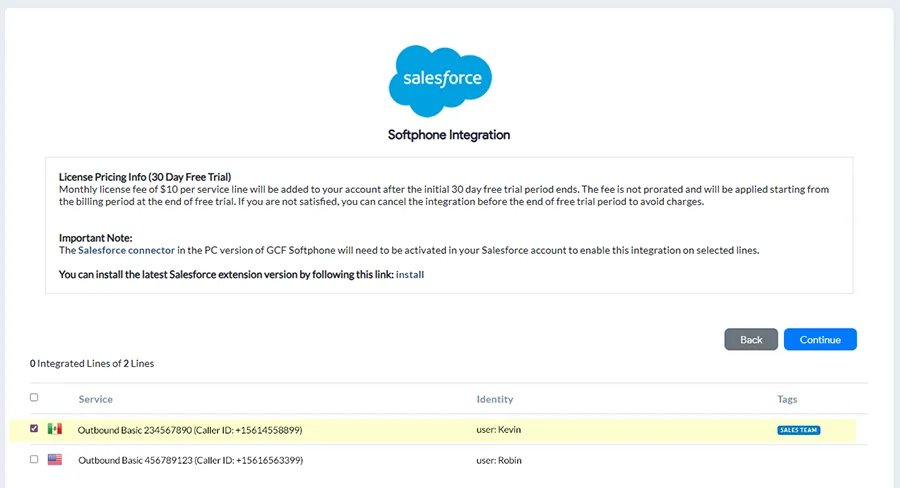
6. Click Continue, and Agree and Activate.
7. Now, on the platform’s end, you will need to enter your User ID and password to set up the integration. Once logged in and connected, you can use the softphone within the CRM or alongside (depending on the integration activated).
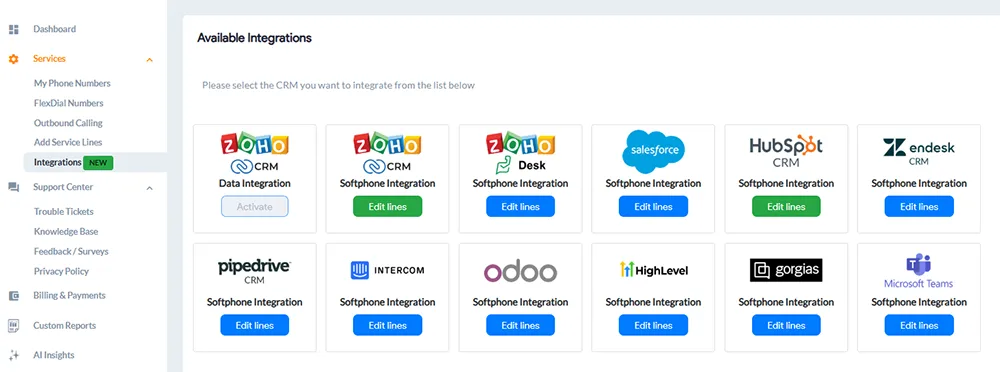
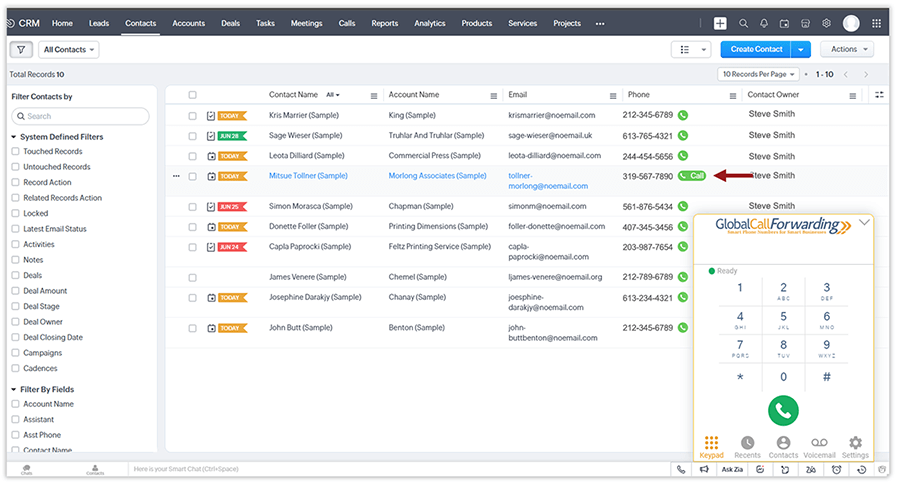
Important Note: With Zoho, Salesforce, and Zendesk integrations, you can access and use the softphone directly within the CRM pages – like in this Zoho CRM example:
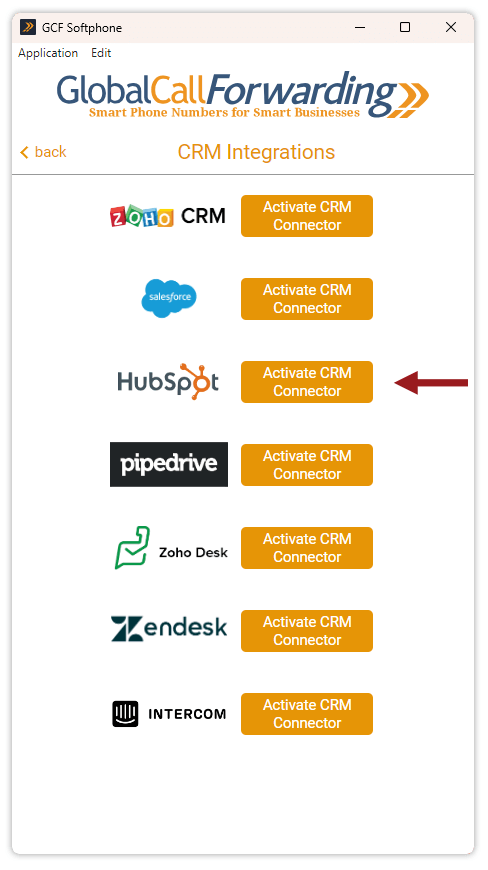
With all other connector integrations like HubSpot, Intercom, Zoho Desk, etc., you will need the Windows Softphone app to connect and manage calls (see image below).

You can find more information about these connector integrations in their individual guides. Here’s a general overview of how to connect and use them.
Steps 1–5, up to Agree and Activate, are the same as outlined above.
1. After accepting the terms and clicking Agree and Activate, open your GCF Softphone desktop app and log in using the Outbound Lines’ credentials (User IDs/PINs and passwords) you selected earlier when activating the integration from the control panel.
2. Click on Settings, then go to CRM Integrations, and select Activate CRM Connector for HubSpot or your desired platform.
3. A new window will appear—log in using that platform’s credentials. Here’s an example with HubSpot:
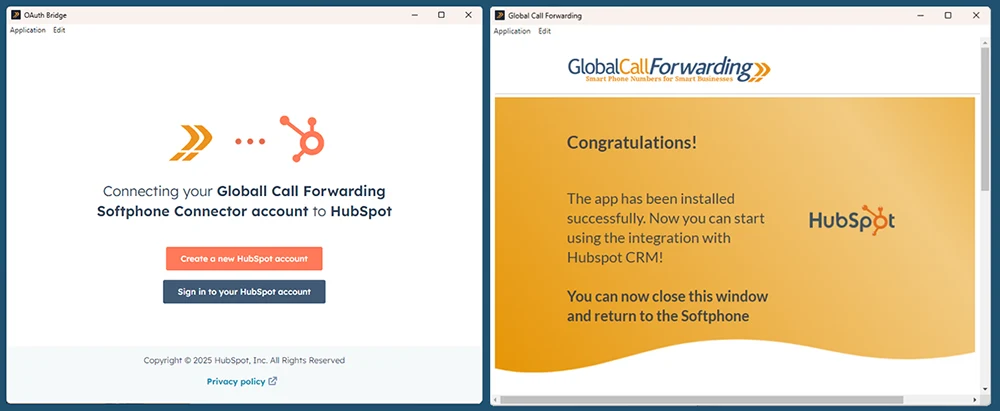
4. There may be 2-3 more steps for connecting the two platforms – you can find more information in our guides or by connecting with your account manager.
5. Once both platforms are connected, you can open your CRM platform to start making calls with the softphone.
Users can initiate calls through the CRM using the GCF Softphone in two ways:
Option 1: Make and receive calls directly from the GCF Softphone.
- Open the Contacts section in the softphone. You’ll see both HubSpot and GCF contacts listed, automatically synced and updated.
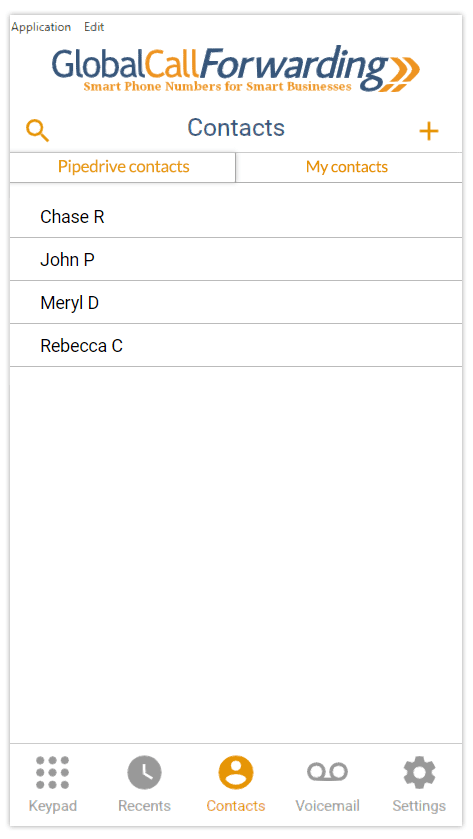
2. Click on the number or contact you’d like to call to start the call.
3. To receive inbound calls in the Softphone app, set the ‘Forward all calls to’ field to the same Outbound Line User ID you use to log in to the app. (Refer to the steps above)
Option 2: Use the GCF Click-to-Dial extension to instantly call phone numbers by clicking them directly within your CRM.
1. Click here to activate the GCF Chrome extension.
2. Once the extension is activated, it will automatically link to your GCF Softphone app.
3. In your CRM, a click-to-dial button will appear next to each phone number—just click the button to instantly dial the contact.
4. This will open the softphone dial pad. Click the Call button to initiate the call.
Alternatively, you can enable the Dial Immediately setting in the extension preferences. With this turned on, clicking the call button will instantly place the call through the softphone—no additional confirmation needed.