As a Global Call Forwarding customer, you can create users and roles, and then assign roles to these users who have access to your Global Call Forwarding account.
1. Log in to your control panel. From the dashboard, click on the user name in the top right corner of the page. A dropdown will appear, click on Account Settings. Here, you will see two tabs: User Management and Role Management.
Or, in the left side bar, click on Account Settings, and you’ll find User Management and Role Management under it.
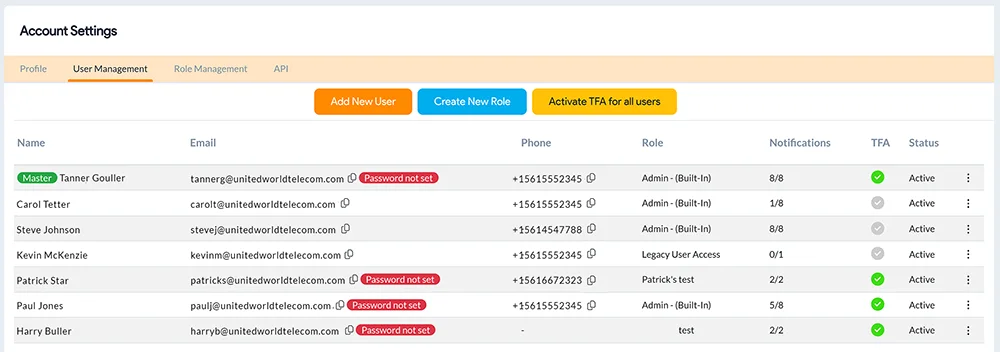
2. Under User Management, you will see two buttons: Add New User, Create New Role and Activate TFA.

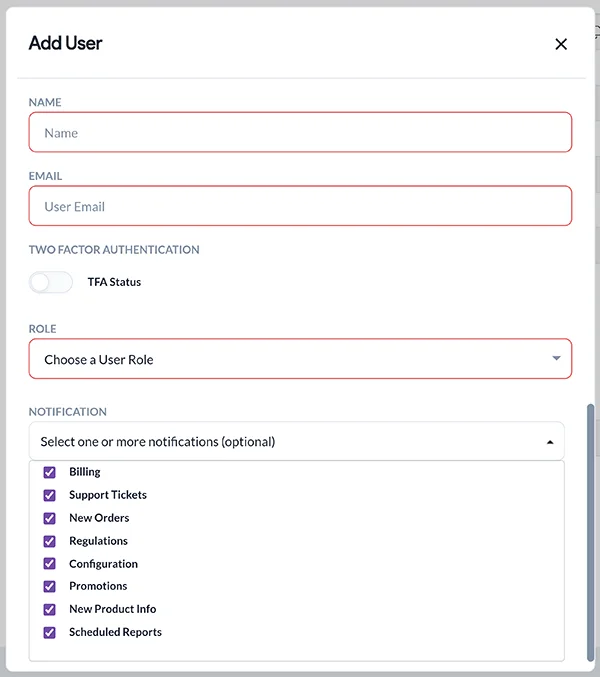
You can click on the Add New User button to add new users to your account. Enter their Name, Email, and Choose a User Role.
Default roles available include:
- Admin (Built-In) — This static role will give the user access to full permissions, including copies of all emails; except for the ability to create/modify new users and roles.
- All Email Notifications (Built-In) — This static role will allow a new user to ONLY receive all email communications from UWT/GCF. This role will NOT give the user any control panel access.
- Billing Email Notifications (Built-In) — This static role will allow a new user to ONLY receive invoice email communications from UWT/GCF. This role will NOT give the user any control panel access.
- If your account has pre-existing “Additional Users” or “Additional Emails,” then you will have the below options with the “Legacy” tag
Note: If you want to add a custom user role and assign it to this user, you will need to first create this new role. To do this, click on the Create New Role and skip to step 4 below for instructions on setting up new roles.
You can also require this new user to set up Two Factor Authentication by toggling the TFA Status button (we highly recommend this).
Then, click Save.
3. Next, select what email notifications this user will receive. Every role has a set amount and type of email notifications. By default, every user is enrolled for all notifications allowed under their role. However, you can edit these notifications to opt out and only subscribe to some notification types.
For example: A user can have an admin role and opt out from all notifications i.e. “0/8.” You can see which notifications you are subscribed to by hovering over the notifications for each user.
Below are the default notifications based on the role. You can choose all of these notifications or opt out of some, as needed:
- Admin (Built-In):
Billing
Support Tickets
New Orders
Regulations
Configuration
Promotions
New Product Info
Scheduled Reports - All Email Notifications (Built-In)
Promotions
New Orders
Regulations
Billing
New Product Info
Support Tickets
Configuration
Scheduled Reports - Billing Email Notifications (Built-In)
Billing
Scheduled Reports
Then, click Save.
Note: You can click the dotted menu on the right side of the user to edit these notifications in the future.
4. You can also create a new role in this tab or go to the Role Management tab to Create New Role and manage different user roles.
Besides the above-mentioned default user roles, the Super Admin or the main account contact person for an account can create and assign new user roles.
For each role created, you can allow users to “Enable/Modify” (make changes) or “View” (view only).
5. Click on Create New Role and enter the Name and Description of the new role.
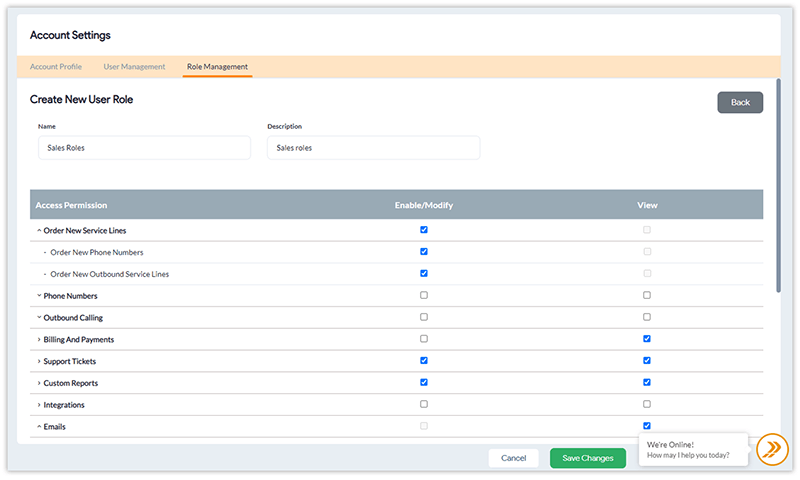
6. Then, select the different permissions you want to provide this role — to Enable/Modify or simply View:
- Order New Service Lines: This option will allow the user to order a new service line for the account. You can provide permission for the user to Order New Phone Numbers or Order New Outbound Service Lines or both.
- Phone Numbers (Toll-Free, Local, Geo, National, Mobile, etc. DIDs): The permissions in the category allow the user to access only select numbers and specific functions that belong to the number. Here, you will see permissions for each phone number and phone line in your account. You can choose to provide permissions for the user related to Service Plan, Call Activity, Voicemail Inbox, Rates, Line Settings, and Call Forwarding. You will also see permissions for features like IVR, Call Recording, Advanced Routing, and so on.
- Outbound Calling: Similar to the above, this permission will handle different functions for your Outbound Calling service lines. Here, you will see permissions for each outbound phone line in your account. You can choose to provide permissions for the user related to Call Activity, Rates, SIP Configuration, and Line Settings.
- Billing and Payments: To modify or simply view billing and payment information. (Related: how to change billing contact info).
- Support Tickets: To submit or simply view support ticket information.
- Custom Reports: This permission handles generating and scheduling custom reports.
- Integrations: To modify or simply view softphone and SIP integrations.
- Emails: Where users have the “View” permission for different categories such as Billing, Support Tickets, New Orders, Promotions, etc.
7. Click on Save Changes to save the new roles you create.
Important notes:
- The following categories of permissions are NOT expandable options. You can enable/disable them for full access to each one of these functions for the user: Billing and Payments, Support Tickets, Custom Reports, and Integrations.
- If a new user role ONLY contains email permissions without any other account permissions, we will only give the assigned user the ability to receive respective email notifications without any control panel access capability.
- All newly created users will also have the TFA Status option and the ability to change their passwords from the Account Settings menu, for added security.
- To change your Super Admin Contact Name and Company name, you will need to contact our customer support team.