You can set up ring groups and add hunt groups to your call flow in your Global Call Forwarding control panel.
There are two ways to add and use hunt groups with your business phone numbers:
- Have incoming calls forwarded directly to members of your hunt group
- Include hunt groups within your IVR system (e.g., customer service group, tech support HQ, etc.)
To forward all calls to your hunt group:
- Log in to your control panel.
- Click My Phone Numbers on the left-hand side of the page, under Services.
- Choose a phone service line and click on the 3 dots to the right and select Settings.
- Select Call Forwarding from the horizontal menu and click Advanced Routing.
- Click on the orange Go to Rules button.
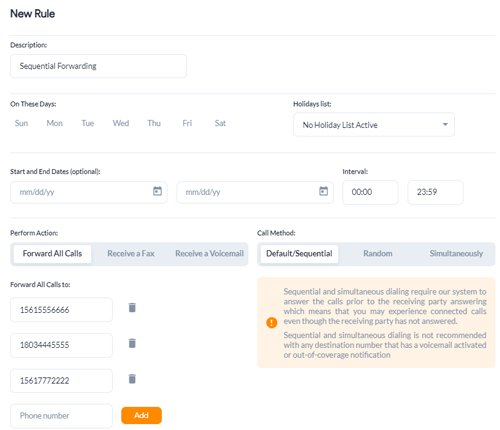
- Click the green Create a New Rule button. Add the description and select your desired days and times.
- Select Forward All Calls and add your preferred call group phone numbers.
- Then, choose your ring strategy under the Call Method section, either Sequential or Simultaneous.
- Click Save Rule.

Now, an incoming call will automatically forward to members in the hunt group, based on your call routing method.
To include a hunt group within your IVR menu:
1. Log in to your account.
2. Click My Phone Numbers on the left-hand side of the page, under Services.
3. Click the Settings icon for the phone number line to create its call flow.
4. Click the Call Forwarding tab and select IVR.
5. Click the Manage IVR Applications to customize your IVR processes in the call flow builder.
6. Next, hover to the right side of the screen to create a hunt group and add phone numbers to it:
-
- On the right, click on the Phones tab and then Add a new phone. Here, you can create a hunt group with multiple destination sip or phone numbers. This can be your sales team in the head office or your remote customer service team located in a different country.
- You can also choose what type of Ring Mode you want for this hunt group:
- Sequential routing: Route calls down the list, always starting with the first in line.
- Random routing: Route calls randomly to people within the list.1. Simultaneous ringing: Route the incoming call to everyone on the list at the same time.
Pro tip: Save the title with a descriptive name, such as Customer service team UK for your service team in the UK. If it is an individual, then save it as [name] + phone number + location.
Example: Customer service UK or Peter phone number UK.
7. Once done, Save Changes.
8. Then, click on your existing IVR menu or Create New Application.
9. If creating a new menu, select User Menu from the pop-up box.
10. Fill in the necessary information: select a prompt, max. wait time, etc.
11. Then, assign your hunt group by clicking the arrow for the desired number and selecting Phone Call from the pop-up box.
12. Choose your hunt group in the Destination field and fill in the rest. When done, click Close and then Save Application.

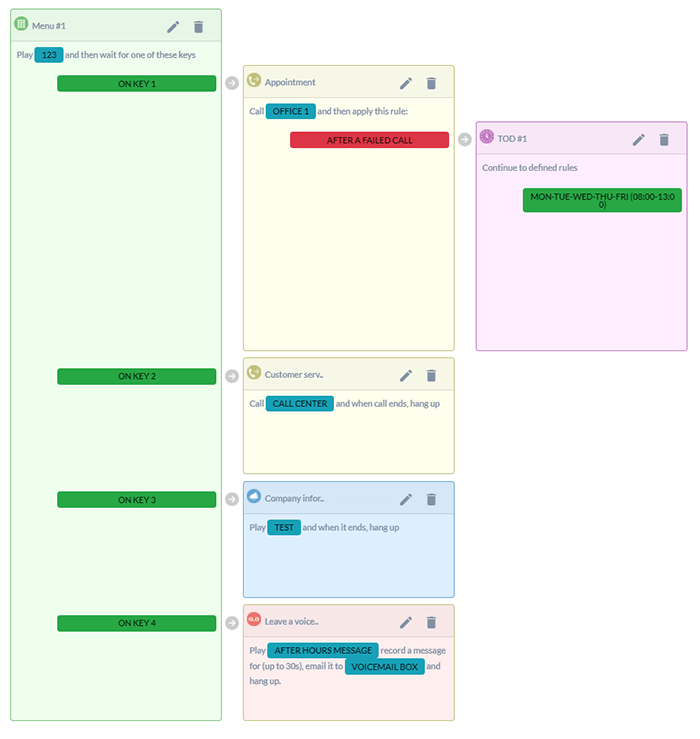
Now, when customers call, they will hear a message with an IVR menu. If they want to speak with a salesperson, they press 1 and the call routes to the main office. If they want to speak with a customer service rep, they press 2 and the call routes to your call center. You can add multiple destinations to either of these hunt groups.
Need more help? Our account management and tech support team are always available to assist you in creating a well-functioning phone system. Speak with your account manager or chat with tech support!